

Changing the default camera settings on your iPhone can enhance your photography experience by customizing the way your camera behaves. This guide will provide a overview of how to adjust these settings to match your preferences, making it easier to capture stunning photos and videos every time you use your iPhone’s camera.
Why Change Default Camera Settings?
iPhone stands out as one of the most popular and versatile devices. With its powerful camera system, users can capture everything from spontaneous moments to carefully composed shots with impressive clarity and detail.
However, while the iPhone’s default camera settings are designed to provide a good balance between quality and convenience for most users, they might not always align with your personal preferences or specific shooting needs.
Changing the default camera settings on your iPhone can significantly enhance your overall photography experience. It allows you to tailor the camera’s functionality to better suit your style, preferences, and the conditions under which you typically shoot. Here are some reasons why customizing these settings can be beneficial:
1. Personalization for Your Shooting Style
Everyone has their own unique style of photography. Whether you prefer capturing vivid landscapes, detailed close-ups, or dynamic action shots, adjusting the default settings can help you achieve the results you want without having to make constant manual adjustments.
For instance, if you frequently use portrait mode to capture depth and detail in your photos, setting this as your default mode ensures that your camera is always ready to deliver those beautiful, bokeh-filled shots.
2. Consistency in Results
Consistency is key to producing high-quality photographs. By customizing the default settings, you ensure that your iPhone’s camera is always set to your preferred mode, filters, or resolution.
This consistency helps in maintaining the same level of quality and style across your photos and videos, making your content look more professional and cohesive.
3. Efficiency and Convenience
Adjusting the default camera settings can streamline your shooting process. Imagine you’re at a family gathering or a spontaneous event where quick shots are necessary.
Having your preferred settings already in place means you don’t have to fumble with the camera app’s options, allowing you to capture moments more swiftly and effectively.
4. Enhanced Quality and Control
Your iPhone’s camera is equipped with a range of advanced features that can be customized to enhance photo and video quality. By changing the default settings, you can leverage these features—such as high-resolution video recording, HDR, or manual exposure controls—to better suit the conditions you’re shooting in.
This not only improves the quality of your captures but also gives you more control over the final output.
5. Adaptation to Specific Needs
Different scenarios call for different settings. For example, shooting in low-light conditions might require adjustments to the exposure and night mode settings, while capturing fast-moving subjects might benefit from higher frame rates in video mode.
By changing your default settings, you can adapt the camera to better meet your specific needs and preferences.
How to Change the Default Camera Settings on iPhone
1. Preserve Settings
One of the most useful features in the Camera settings is the ability to preserve specific settings between uses. This means you can set your camera to remember the last-used mode, filters, and other adjustments, making it easier to achieve consistent results.
Here’s how you can do it:
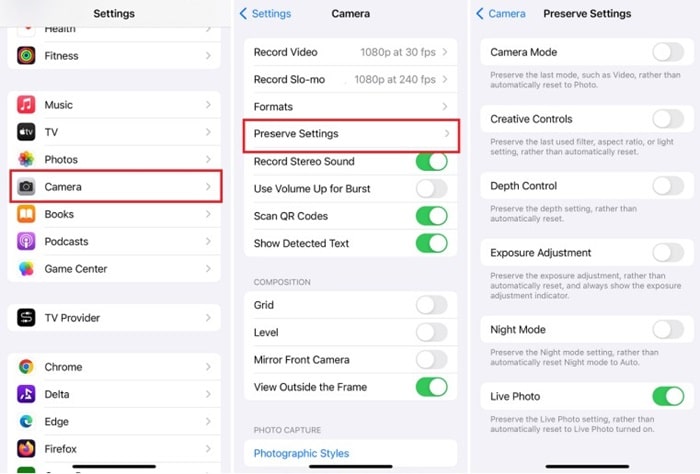
- Open Settings:
Navigate to Settings > Camera - Preserve Settings:
Tap on Preserve Settings, you will see several options to customize
Enable Camera Mode
To make a specific camera mode your default, enable the Camera Mode option. For example, if you frequently use the Video mode, enabling this setting will ensure that the Camera app opens in Video mode by default.
Enable Creative Controls
Creative Controls, also known as Filters & Lighting on older models, allow you to preserve settings related to filters, aspect ratio, lighting, or depth settings. Enable this option to keep your last-used creative adjustments.
Enable Depth Control
For iPhones with Depth Control (iPhone XS, XR, and later), you can preserve Depth Control settings. Similarly, enable Exposure Adjustment and Night Mode (available on iPhone 11 and later) to maintain these settings across sessions.
Disable Live Photos
If you prefer not to use Live Photos, disable the Live Photo option to ensure it remains off. This will prevent Live Photos from automatically turning back on when you reopen the Camera app.
Once you’ve adjusted these settings, open the Camera app. Use the buttons and icons to toggle features like flash, Live Photos, timer, filters, and zoom. Your chosen settings will be saved, making it unnecessary to readjust them each time.
2. Change Video Resolution Settings
For users who prioritize video quality, adjusting video resolution settings is crucial. Follow these steps to customize your video settings:
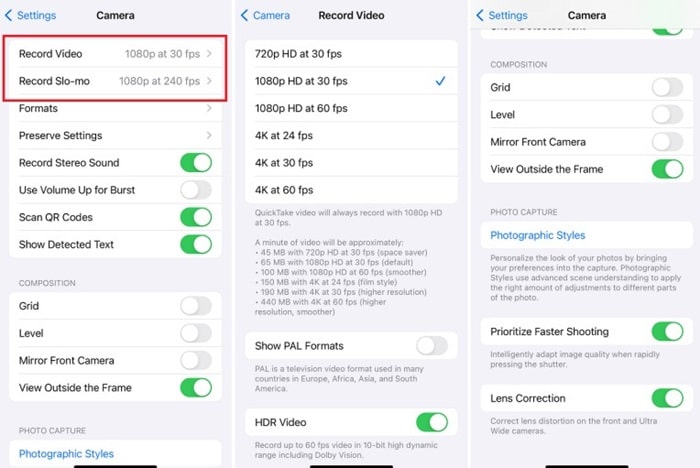
- Open Settings:
Go to Settings > Camera - Select Record Video or Record Slo-mo:
Choose the option to set default video recording settings
Set Video Resolution
You can select from various video resolutions and frame rates:
- 720p at 30fps
- 1080p at 30fps or 60fps
- 4K at 24fps, 30fps, or 60fps
Adjusting these settings allows you to balance video quality with file size and storage capacity.
Configure Slow-mo Settings
For slow-motion videos, set the resolution to:
- 1080p at 120fps
- 1080p at 240fps
These settings help you capture smooth, high-quality slow-motion footage.
Additional Camera Settings
Beyond preserving settings and adjusting video resolution, there are other camera settings that can enhance your shooting experience:
- Enable Grid:
Go to Settings > Camera and enable Grid to add a grid to the camera viewfinder. This helps with composition by following the rule of thirds. - HDR (High Dynamic Range):
HDR improves photo quality in challenging lighting conditions by capturing more detail in both the bright and dark areas of the image. - View Outside the Frame:
This setting provides a preview of what’s outside the current frame, helping you compose shots more effectively. - Scene Detection:
Scene Detection automatically adjusts settings based on the scene you’re photographing, optimizing color and exposure. - Lens Correction:
Enable this feature to correct distortion caused by the lens, particularly useful for wide-angle shots.
Conclusion
Customizing the default camera settings on your iPhone can greatly enhance your photography and videography experience. By preserving your preferred settings, adjusting video resolution, and utilizing additional camera features, you can ensure that every shot and video is captured exactly the way you want.
Follow this guide to take full advantage of your iPhone’s camera capabilities and improve the quality of your photos and videos.


