Taking photos with the iPhone 16’s new Camera Control Button opens up exciting possibilities for photography fans, whether you’re snapping spontaneous shots or aiming for professional-quality images.
This new feature streamlines control over photo settings and adds versatility with customizations that allow you to shoot in the way that feels most natural and effective. Let’s dive into how to unlock this button’s full potential and make your photos even more impressive.
Customize Camera Control Settings
The Camera Control Button isn’t just a one-function button; it’s like a digital Swiss Army knife for photography. When you press it, the default setting opens the iPhone’s built-in iOS Camera app instantly, perfect for capturing moments on the go.
But here’s the fun part: you can customize how this button works and what happens when you press it.
Setting up a Clean Preview for an Uncluttered View
When you’re ready to shoot, sometimes all those little icons and controls on the screen can get distracting. If you want a more immersive, clutter-free view of your subject, go to Settings > Camera > Camera Control and enable Clean Preview.
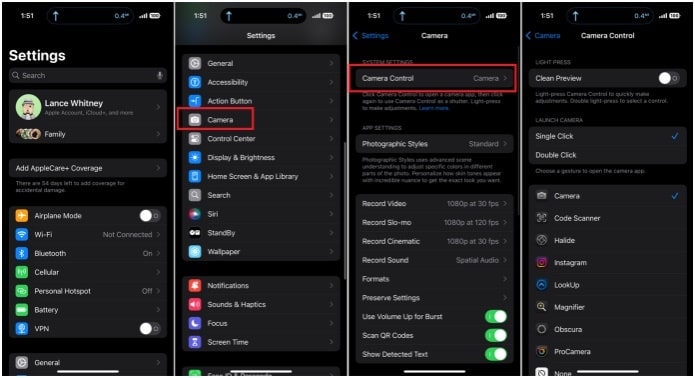
This setting clears away on-screen controls, giving you a clean, uninterrupted look at what you’re photographing. But if you’re someone who likes having options and guides, keeping this feature off might be more comfortable while you get used to the Camera Control.
Choosing Between Single and Double Click Activation
One of the best parts of the Camera Control Button is that it adapts to you. If you’re someone who’s quick on the draw, you’ll probably love the Single Click setting – just one press, and your camera’s ready.
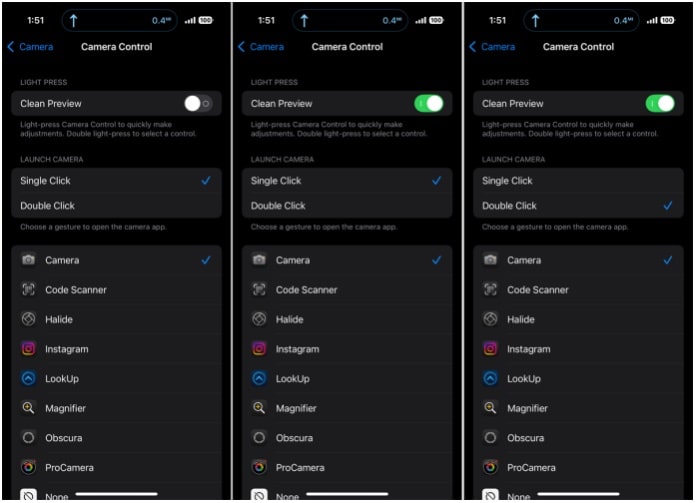
But sometimes, a single click can be too easy, leading to accidental openings. To avoid this, you can switch to Double Click. With this option, the Camera app only opens after a second click, cutting down on accidental activations.
Launch Different Apps with the Camera Control Button
Who says the Camera Control Button has to be all about Apple’s default Camera app? If you’re an Instagram enthusiast or prefer using another camera app, you can change things up.
Under the Launch Camera section, you’ll find a list of compatible apps like Instagram or even accessibility features like Magnifier. Just tap on the app you want, and voila! Now, each press of the Camera Control Button takes you directly to your favorite photography or social app, so you can snap and share faster than ever.
Accessibility Options
For those with vision impairments or anyone who needs a closer look at fine details, the Magnifier function is a gem. When enabled, pressing the Camera Control Button transforms the camera into a magnifying glass, helping users see up-close details without needing any additional tools.
This feature makes the iPhone 16’s camera more inclusive and versatile, catering to a broader range of needs.
And if you don’t want to use the Camera Control Button at all? No problem! You can set the option to None, effectively disabling the button so it doesn’t interfere with any other functions.
Taking Pictures and Adjusting Camera Settings
Once you’ve customized the settings to your liking, it’s time to start snapping photos. The Camera Control button makes it easy to shift between taking photos, recording videos, and even adjusting settings without digging into the app.
Capturing a Photo or Video
When you’re ready to capture a scene, simply press down on the Camera Control button. This action instantly opens the Camera app, letting you focus on framing your shot. To take a photo, press the button once.
If you want to switch to video, just hold the button down until you’re finished recording, and release it when you want to stop. This fluid shift between photo and video capture adds a lot of convenience for those unpredictable moments.
Adjusting Camera Settings Quickly
Here’s where the Camera Control Button really shines. If you want to tweak settings on the fly, give the button a double tap. This action opens up a quick-access menu for essential settings like exposure, depth of field, zoom, style, and tone.
Once the menu is open, simply slide your finger up and down (or left and right in landscape mode) on the button to scroll through the settings. When you land on the setting you want to adjust, a single tap opens it, and you can adjust further by sliding your finger up and down again.
This system makes it simple to customize your camera without taking your eyes off the action, allowing for a more natural and intuitive shooting experience.
Exposure
The Exposure setting on the iPhone 16 lets you control how bright or dark your photo appears, making it a fantastic tool to fine-tune the mood of your shots. In practical terms, this setting lets you adjust between +2 EV and -2 EV—essentially changing the amount of light that reaches the camera’s sensor.
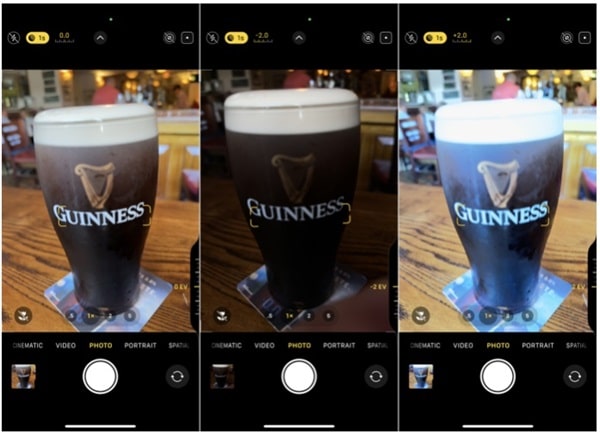
Think of it like opening or closing a window: the wider the opening (or the higher the EV), the more light floods in, making the scene look brighter. Lower the exposure (go negative on the EV scale), and you bring in less light, creating a darker, more dramatic image.
Here’s a tip: sometimes, scenes that are slightly underexposed can add a whole new dimension to your photos. A darker image might add a mysterious vibe or emphasize just the right amount of light on a subject, making it feel more captivating.
Play around with this setting to add an artistic flair, especially in high-contrast situations like sunsets or dimly lit interiors.
Depth of Field
Depth of Field (DOF) is where you get to decide what parts of the image are crystal clear and which parts have that beautiful blur. Adjusting DOF on the iPhone 16 is similar to using the Portrait Mode effect but with more customization.
By increasing the Depth of Field, you’ll bring more of the scene into sharp focus—ideal for landscape shots where you want every little detail to pop. But if you reduce it, you’ll get that blurry background effect that really makes the subject stand out, adding a professional feel to portraits.
This setting is super handy in different lighting conditions. For example, in low light, you might need a lower DOF to let in more light and keep the subject crisp without extra noise.
But if you’re outdoors on a bright day, crank it up a bit for a fully focused scene. The choice is yours—blurred and dreamy or sharp and detailed!
Zoom
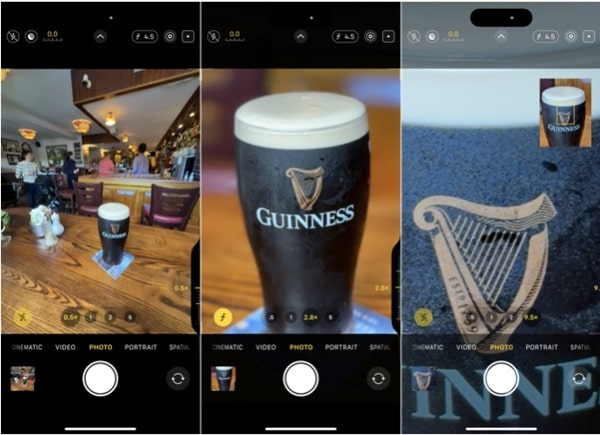
The Zoom feature is straightforward but essential. With the iPhone 16, zooming lets you either get up close and personal with your subject or zoom out for a wider, more expansive view.
If you’re trying to capture a faraway subject, zooming in will help you fill the frame without having to move physically closer. On the other hand, zooming out is perfect for capturing large scenes or big groups, making sure everyone and everything fits comfortably in the shot.
Be mindful that zooming too far can sometimes affect image clarity, especially in low light. But with a little practice, you’ll get a feel for when zooming enhances the photo and when it might be better to move a little closer or farther back yourself.
Styles
The Styles setting is like choosing an instant filter for your photos, giving you control over the color temperature and overall vibe. The iPhone 16 offers a range of styles, from warm and cool tones to vibrant or black & white options.
This feature can transform an everyday scene into something special by shifting the mood, for example..
- Warm tones add a golden hue that’s great for sunsets or cozy indoor scenes.
- Cool tones give a crisp, calming look, perfect for snowy landscapes or nighttime shots.
- Black & White comes in both stark and muted versions, which can make your subject look timeless and add depth.
- Vibrant brings out bright colors, while Neutral offers a balanced look without much alteration.
Styles give you a ton of flexibility, so try them out to see which fits your subject best. They’re ideal for storytelling through color, making each image feel distinct and expressive.
Tone
Tone controls the shadow intensity in your photos, adding another layer of light and dark balance. This setting essentially helps you adjust the contrast without fully altering the exposure, giving your images a more nuanced look.
By moving the tone slider from -1 to +1, you can add more shadows for a dramatic effect or lighten them to create a softer, more open feel.
For instance, if you’re photographing a portrait and want to highlight facial details, increasing the shadow effect can bring out texture and depth. But for bright, airy images—like beach scenes—reducing the shadow effect keeps the photo light and breezy.
It’s a subtle but powerful way to set the mood in your photos.
Adjusting Accessibility Settings
Finally, the iPhone 16’s Accessibility Settings for Camera Control allow you to tailor the Camera Control Button experience even further. Head to Settings > Accessibility > Camera Control, where you can enable or disable features based on your needs.
This can be incredibly useful if you find the button too sensitive or want to control how light or firm the press needs to be.
If you’re noticing that the Camera Control Button sometimes reacts too quickly or slowly, these settings let you tweak the pressure sensitivity and the speed needed for actions like double-tapping. It’s all about giving you a seamless, enjoyable photography experience tailored just to you.
Conclusion
This Camera Control Button on the iPhone 16 puts essential tools at your fingertips, letting you switch between modes and settings smoothly, so you never miss a moment. Whether you’re a casual shooter or a photography pro, mastering this button is the key to unlocking your iPhone’s full creative potential.


