You are so eager to test Windows 11 but not quite ready to abandon Windows 10. Rest assured! You can arrange a dual-boot setup whereby the same computer runs two operating systems.
Starting your PC will allow you to choose whether you wish to investigate Windows 11 or delve into Windows 10. Sounds great, right?
Creating a dual-boot system, however, goes beyond merely downloading an installer and following some instructions. You must thoroughly prepare your PC to prevent any faults.
From reviewing hardware needs to building a bootable USB for installation, this article will walk you through everything.
How to Dual Boot Windows 10 and Windows 11
Allocate Enough Storage for Windows 11
Enough free disk space to house the new operating system is the first item you should be sure of. Although Windows 11 installs at least 25GB, realistically you should budget 50GB to 60GB for it.
Why is it? Well, updates, programs, and data will rapidly occupy that space once you start running Windows 11. Better still to have some additional space from the beginning!
Now is the moment to clear your present drive if it is completely packed. Remove programs you no longer require, relocate massive media to an external drive, or delete pointless items.
If you would want to keep things more neat, you may also think about creating a fresh partition on your hard drive to install Windows 11.
Verify Your PC Meets the Windows 11 Requirements
Here’s where things get a bit more technical. Windows 11 comes with stricter hardware requirements than Windows 10. Before you dive into the installation, you’ll need to ensure your computer is up to the task.
Two key features to check are:
- TPM 2.0 (Trusted Platform Module): This security chip is essential for running Windows 11
- Secure Boot: This feature ensures that only trusted software can boot with your system, protecting it from malware attacks
How to Access BIOS and Check Settings
- Restart your PC and press the appropriate key (usually F2, F10, DEL, or ESC) to access your BIOS
- Look for the TPM setting in the Security or Advanced tab. Make sure it’s enabled and set to version 2.0
- Navigate to the Boot section and confirm that Secure Boot is turned on
Every computer manufacturer designs their BIOS menus a little differently, so the exact names and locations of these settings might vary. If you get stuck, try looking up instructions specific to your PC model.
Use Microsoft’s PC Health Check Tool
Microsoft provides a handy tool called PC Health Check to help you determine if your PC is compatible with Windows 11. Initially offered as a download, it now comes pre-installed with most Windows 10 systems.
- Open PC Health Check on your computer
- Run the compatibility test to see if your system passes all the necessary checks
- If everything looks good, you’re ready to move on to the installation process
Download the Windows 11 ISO File
Now that you know your PC is compatible, it’s time to download the Windows 11 ISO file. This file contains everything you need to install the new operating system.
- Head over to the Windows 11 download page on Microsoft’s official website
- Scroll to the section labeled Download Windows 11 Disk Image (ISO)
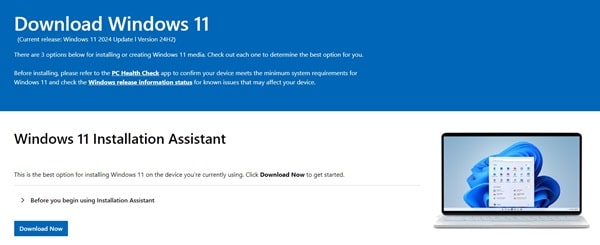
- In the dropdown menu, select Windows 11 (multi-edition ISO for x64 devices) and click Download Now
- Choose your preferred product language, click Confirm, and then select 64-bit Download
- Save the ISO file somewhere easy to access on your computer
Create a Bootable USB Drive Using Rufus
The easiest way to install Windows 11 is through a bootable USB drive. While you can burn the ISO to a DVD, it’s a bit of a hassle since the Windows 11 ISO is larger than 5GB—you’d need a dual-layer DVD or Blu-ray disc.
If your PC doesn’t even have a disc drive (which is common nowadays), a USB drive is your best bet. We recommend using Rufus, a free and easy-to-use tool for creating bootable drives.
Steps to Create a Bootable USB with Rufus
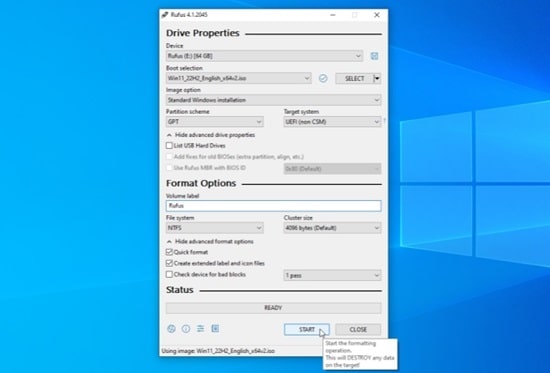
- Insert a USB drive (at least 8GB) into your computer
- Download and install Rufus from its official website
- Open Rufus and make sure the Device field points to your USB drive
- Under boot selection, choose Disk or ISO Image and click Select. Locate the Windows 11 ISO you downloaded earlier
- Make sure the Image option is set to Standard Windows installation
Leave the rest of the settings at their default values unless you need to make specific changes. When you’re ready, click Start.
Rufus will display a few options before starting, you can leave these as they are unless you know exactly what you want to change. Once Rufus starts, it will format the USB drive and copy the ISO file.
This process may take a few minutes, so be patient. When Rufus shows a status of Ready, click Close to exit the program.
Set Up a Partition for Windows 11
Next step is how to create a partition for your Windows 11 installation. If you’ve got a Windows 10 PC and want to add Windows 11 without wiping everything, you’ll need to shrink your current drive to make space.
Open Disk Management on Your PC
First things first, you’ll need to access Disk Management on your Windows 10 computer to free up some space. Here’s how to do it:
- Click the Start button on your PC
- Search for Windows Administrative Tools and open Computer Management
- In the Computer Management window, select Disk Management from the left-hand panel
Disk Management is the tool that allows you to resize, partition, and manage your drive space.
Shrink Your Primary Drive (C:)
Now that you’re in Disk Management, you need to shrink your current C: drive to make room for the new partition where Windows 11 will live.
- Right-click on the C: drive (or your main partition) and choose Shrink Volume
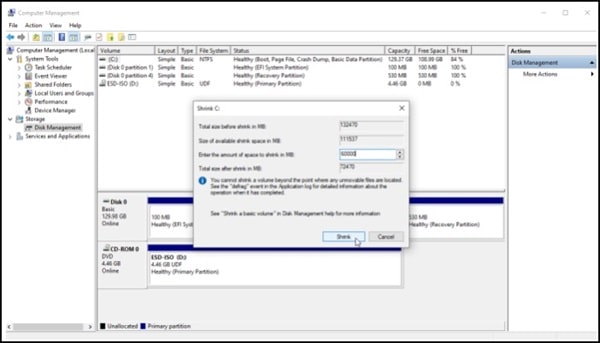
- A new window will appear asking how much space you want to shrink
- If you want to reserve 60GB for Windows 11, type 60000 into the field (because 1GB = 1024MB)
- Click the Shrink button, and Windows will take a moment to reduce the size of the partition
After shrinking, you’ll see the freed-up space listed as unallocated space in the Disk Management window. This is the area we’ll turn into a new partition for Windows 11.
Create a New Partition for Windows 11
Now that you have some unallocated space, let’s create a dedicated partition for Windows 11.
- Right-click the unallocated space and choose New Simple Volume from the pop-up menu
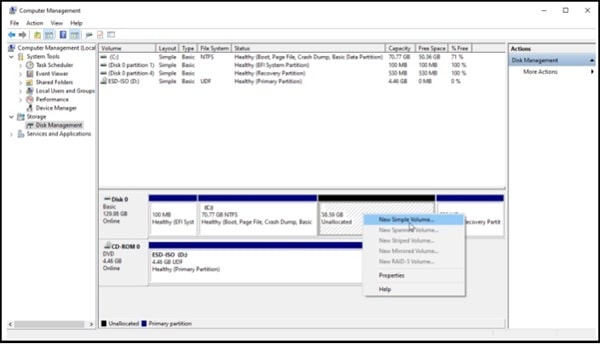
- Follow the steps in the New Simple Volume Wizard:
- Volume Size: Accept the default value (this should match the amount you just freed up)
- Assign Drive Letter: Choose Do not assign a drive letter or path for now and click Next
- Format Partition: Use the default NTFS file system, and in the Volume Label field, type something like ‘Windows 11’ so you’ll know what it’s for later
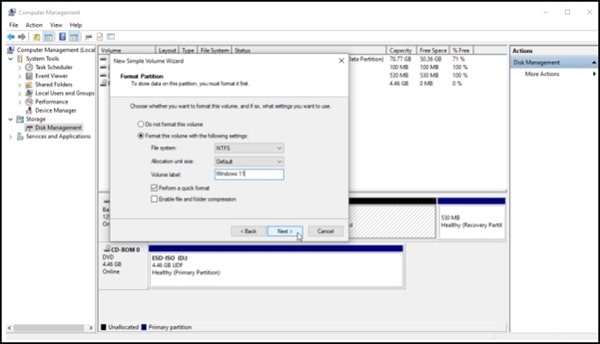
- Click Next, then Finish to complete the setup
Install Windows 11 from a Bootable USB
Now it’s time to install Windows 11 onto the partition you just created. Make sure you have your bootable USB stick with the Windows 11 installer ready to go.
- Insert the USB stick into your computer
- Restart your PC and press the appropriate key (usually F12, ESC, or DEL) to access the boot menu
- From the boot menu, select the USB drive containing the Windows 11 installation files
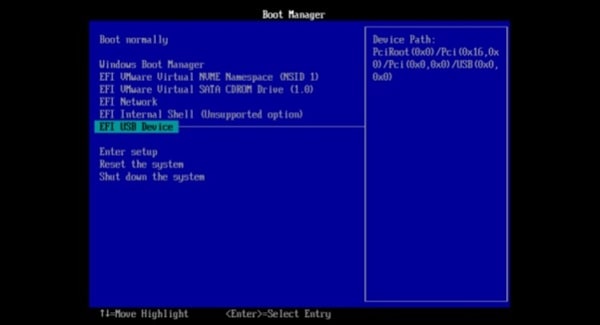
When the installer loads, follow these steps:
- Choose your language, time, and keyboard preferences, then click Next
- Click Install Now on the next screen
- If you have a product key, enter it when prompted. If not, click I don’t have a product key to enter it later
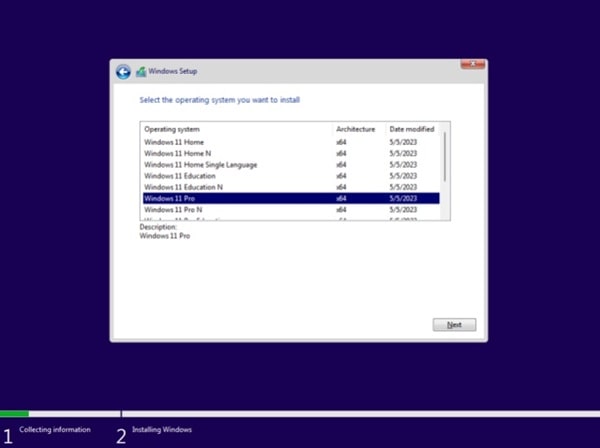
Next, you’ll need to select the version of Windows 11 you want (like Home or Pro) and accept the license agreement.
Install Windows 11 on the New Partition
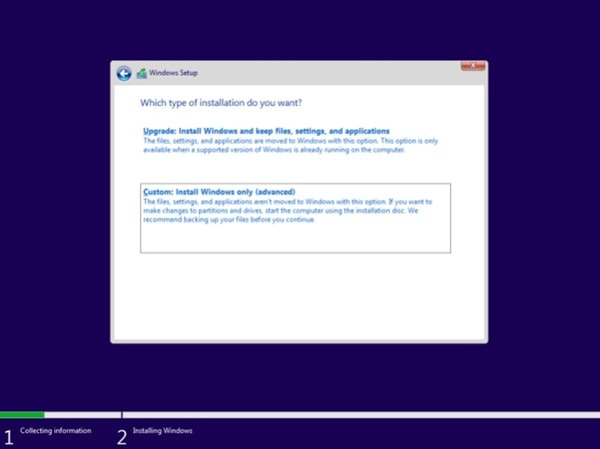
When asked about the type of installation, choose Custom: Install Windows only (advanced). This allows you to select where Windows 11 will be installed.
- In the list of available partitions, select the Windows 11 partition you just created
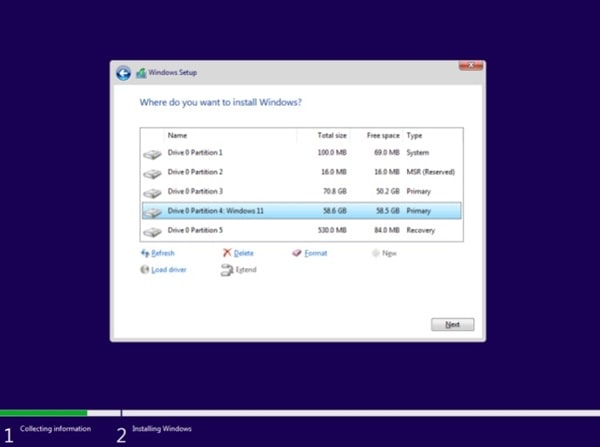
- Click Next to begin the installation
Windows 11 will now install on the new partition, this process might take a little while, so grab a coffee while you wait.
Once the installation is complete, you’ll be asked to set up Windows 11—choose your region, keyboard layout, and other preferences. After the setup, you’ll land on the fresh Windows 11 desktop!
Choose Your Default Operating System
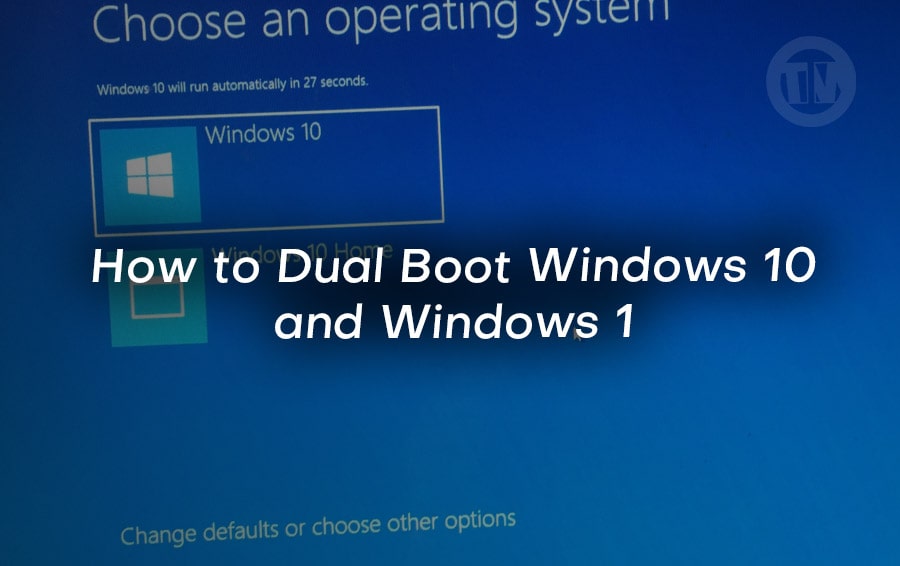
Now that you’ve installed Windows 11, each time you restart your computer, you’ll see a boot menu. This menu gives you the choice between Windows 10 and Windows 11.
- Select the OS you want to boot into by clicking on it
- If you don’t make a choice, the system will automatically boot into the last OS you used—likely Windows 11
If you want to change the default OS or adjust the timer for the boot menu:
- In the boot menu, click Change defaults or choose other options
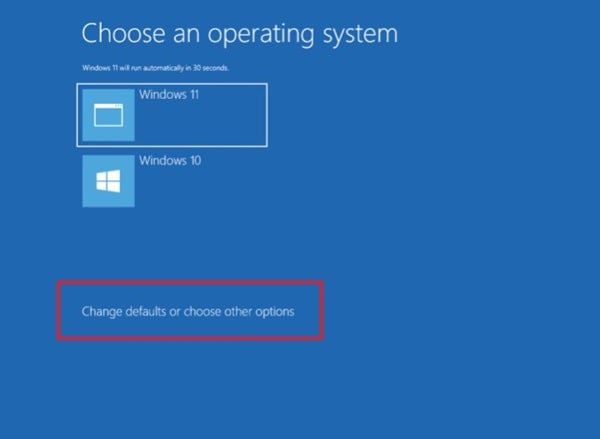
- Choose Change the timer to set how long the boot menu stays open. You can pick 5 minutes, 30 seconds, or 5 seconds
- Select Choose a default operating system and pick either Windows 10 or Windows 11
How to Remove One of the Operating Systems (Optional)
If you decide down the road that you no longer need one of the operating systems, you can remove it and reclaim the disk space. Here’s how:
- Boot into the OS you want to keep
- Open Disk Management (search for “Disk Management” in the Start menu)
- Right-click the partition for the OS you want to remove and select Delete Volume
- Next, right-click the partition you want to keep and choose Extend Volume
Make sure to select the maximum amount of space to extend, then click Next and Finish. Your remaining partition will now use the full disk space, and the removed OS will no longer be available.
Conclusions
Although it takes some time and work, setting up a dual-boot machine is well worth it if you wish to test Windows 11 without forfeiting Windows 10 just yet. You now have the best of both worlds: Windows 11 is a modern new OS with dependability based on Windows 10.
You can flip back and forth between operating systems whenever you wish with this arrangement. And it’s simple to delete one OS and recover the disk space should you ever have second thoughts.

