


Maintaining the performance of your computer is crucial. One essential aspect of this is ensuring that your storage drives, particularly SSDs and hard drives, are operating at their peak efficiency.
This can be achieved through processes known as trimming SSDs and defragging hard drives. While both tasks serve different purposes, they are equally important in preserving the speed and longevity of your storage devices.
So today, I want to share about trimming SSDs and defragging hard drives, exploring why these processes are necessary and how they can be performed efficiently on a Windows operating system.
What is Defrag?
Defragmentation, commonly known as defrag, is a process used on traditional hard disk drives (HDDs) to optimize the arrangement of data. Over time, as files are created, modified, and deleted, data on the HDD can become fragmented.
This means that pieces of files are scattered across different sectors of the disk, leading to slower read and write times. Defragging reorganizes these fragmented files, placing them in contiguous blocks, which reduces the time it takes for the HDD’s read/write head to access the data.
In essence, defragging helps to restore the efficiency of an HDD by minimizing the physical distance the head needs to travel, thus improving the overall performance of the drive.
Why Your Drive Needs Defrag/Trim?
As you use your computer over time, the accumulation of fragmented data on your HDD can significantly impact its performance. Fragmentation increases the time it takes for the system to retrieve data, which can lead to slower boot times, delayed program launches, and a general decrease in system responsiveness.
Regularly defragging your HDD helps to mitigate these issues, ensuring that your data is organized in the most efficient manner possible. This process not only speeds up data access but also prolongs the lifespan of your hard drive by reducing the wear and tear on the read/write head.
Unlike HDDs, Solid State Drives (SSDs) do not suffer from fragmentation in the same way. However, SSDs have their own set of maintenance needs, one of which is trimming.
The TRIM command is a feature that allows the operating system to inform the SSD which blocks of data are no longer in use and can be wiped internally. This helps to maintain the speed of the SSD over time by preventing the accumulation of unused data, which can slow down write operations.
Trimming is essential for SSDs because it ensures that the drive operates at optimal speed and efficiency, extending its lifespan and preserving the integrity of your data.
How to Trim SSD and Defrag Hard Drive
1. Trimming an SSD in Windows
Trimming an SSD in Windows is a straightforward process, thanks to the built-in tools provided by the operating system. Here’s how you can perform a trim operation on your SSD:
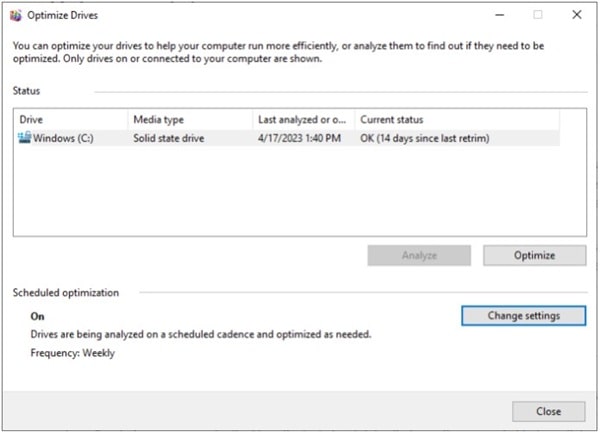
- Open the Start Menu and search for “Optimize Drives”
- Click on the Defragment and Optimize Drives option that appears
- In the Optimize Drives window, select your SSD from the list of drives
- Click on the Optimize button to initiate the trimming process
Windows will automatically run the TRIM command, cleaning up the unused data blocks on your SSD. It’s advisable to schedule regular optimization, ensuring that your SSD remains in top condition.
2. Defragging a Hard Drive in Windows
Defragging a hard drive in Windows is equally simple. Here’s how you can do it:
- Open the Start Menu and type “Defragment and Optimize Drives”
- Select the Defragment and Optimize Drives option
- In the Optimize Drives window, select your hard drive (HDD) from the list
- Click on the Optimize button to start the defragmentation process
Windows will begin to reorganize the fragmented data on your hard drive, improving its efficiency. Depending on the level of fragmentation, this process might take some time, but it’s an essential maintenance task that should be performed regularly.
3. Automating the Process
For those who prefer a hands-off approach, Windows allows you to schedule automatic trimming and defragmentation. By setting a regular schedule, you can ensure that your drives are always operating at their best without needing to manually initiate the processes.
To set this up:
- In the Defragment and Optimize Drives window, click on the Change settings button
- Check the box labeled Run on a schedule (recommended) and choose the frequency (e.g., daily, weekly)

- Select the drives you want to include in the schedule and click OK
With this setup, Windows will automatically trim your SSD and defrag your HDD according to the schedule, ensuring ongoing performance optimization.
Conclusion
Maintaining the performance of your storage drives is essential for ensuring the overall efficiency of your computer. While HDDs and SSDs have different maintenance needs, both defragmentation and trimming are critical tasks that should not be overlooked.
By regularly trimming your SSD and defragging your HDD, you can extend the lifespan of your drives, improve data access speeds, and ensure that your system continues to run smoothly. Whether you choose to manually perform these tasks or set up an automated schedule, taking the time to maintain your drives will pay off in the long run with a faster, more reliable computer.


