


A sluggish Windows device can be a significant hindrance whether for work, gaming, or general use, everyone desires a system that runs smoothly and efficiently. The good news is there are several effective strategies to enhance your Windows performance.
A slow Windows device doesn’t just waste time; it also hampers productivity and can lead to frustration. Over time, as you install more applications, store more files, and continue regular use, your computer can begin to slow down.
To maintain optimal performance and extend the lifespan of your device, regular maintenance and tweaks are essential. By implementing the following tips, you can ensure your Windows device runs faster and more efficiently.
Simple Tips to Speed Up Windows
Keeping your Windows device running smoothly doesn’t have to be a daunting task. With just a few tweaks and some routine maintenance, you can breathe new life into your computer and make it feel almost as fast as the day you got it.
Let’s explore these simple tips in detail to help you get the best performance out of your Windows system.
1. Uninstall Unused Software
Over time, we all accumulate programs that we no longer use. These unused applications can take up valuable space on your hard drive and consume system resources, even when you’re not actively using them.
Uninstalling these programs is a quick and easy way to free up space and reduce the load on your processor.
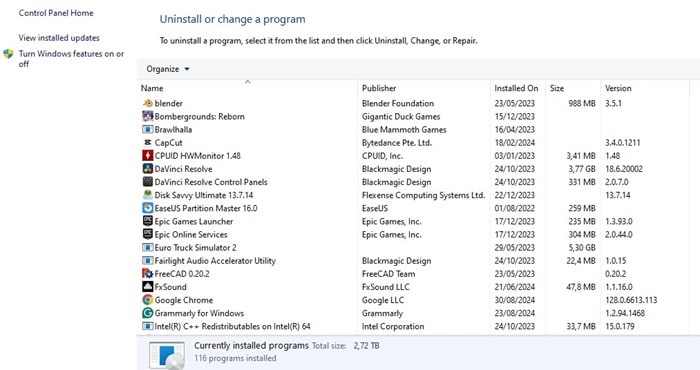
Start by going to your Control Panel, where you’ll find the Programs and Features option. From there, you can see a list of all the software installed on your computer.
Take some time to go through this list and identify the programs you no longer need. It might be that old photo editing software you haven’t opened in years or a game that has long since lost its appeal. Once you’ve made your selections, simply click Uninstall to remove them.
This small step can make a big difference in your system’s performance, freeing up resources and storage space for the programs you actually use.
2. Limit Startup Processes
Every time you boot up your computer, certain programs are set to launch automatically. While some of these are essential, others can slow down your startup time significantly.
The more programs that load at startup, the longer it takes for your computer to be ready for use.
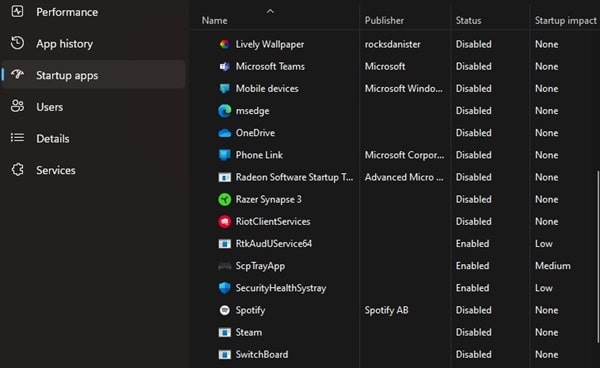
To streamline your startup process, you can easily manage which programs are allowed to run when your computer boots. Open the Task Manager by pressing Ctrl + Shift + Esc and navigate to the Startup tab.
Here, you’ll see a list of all the programs that start with your computer. Disable any that you don’t need to launch automatically.
By limiting startup processes, you can reduce the time it takes for your computer to boot up and improve overall performance. This means less waiting and more getting down to what you want to do.
3. Clean Up Your Disk
A cluttered hard drive can slow down your Windows device. Regularly cleaning up your disk can help free up space and remove unnecessary files, making your system faster and more efficient.
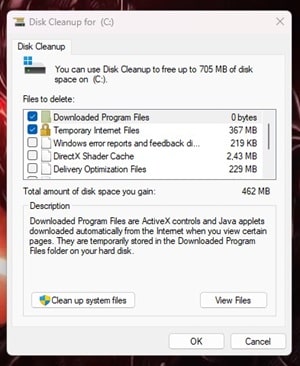
Windows comes with a built-in tool called Disk Cleanup, which is a handy feature that scans your computer for files you can safely delete, like temporary files, system cache, and old updates.
To use Disk Cleanup, just type “Disk Cleanup” into the search bar and select the drive you want to clean. The tool will then analyze the drive and present you with a list of file types to delete.
You can choose which ones to remove, freeing up valuable space on your hard drive. Keeping your disk clean and free of clutter not only improves performance but also helps to keep your system organized and running smoothly.
4. Add More RAM
Random Access Memory (RAM) is one of the most important factors when it comes to your computer’s speed. The more RAM you have, the better your system can handle multiple tasks at once.
If you find that your computer is slow, especially when running several programs simultaneously, adding more RAM could be the solution.
Upgrading your RAM is generally straightforward, and it can provide a significant performance boost. First, you’ll need to check how much RAM your computer currently has and how much it can support.
This information can usually be found in your computer’s documentation or by looking it up online. Once you know what you need, you can purchase additional RAM and install it yourself, or have it done by a professional.
With more RAM, your computer will be able to run more smoothly, even when you have multiple programs open at the same time.
5. Install an SSD Startup Drive
Switching from a traditional hard drive to a Solid-State Drive (SSD) is one of the best upgrades you can make for your Windows device. SSDs are faster, more reliable, and use less power compared to traditional hard drives.
This means faster boot times, quicker file access, and overall better performance.
Installing an SSD as your startup drive is a game-changer. The process involves purchasing a compatible SSD, cloning your existing hard drive to the new SSD, and then physically replacing the old drive with the SSD.
This upgrade will make your computer feel significantly faster, particularly when starting up and opening applications.
If you’ve never experienced the speed of an SSD, you’ll likely be amazed at how much faster your computer feels after the upgrade.
6. Install and Place Software Files on the SSD
Once you have an SSD installed, it’s a good idea to make the most of it by installing your most-used software and storing critical files on the SSD. This includes your operating system, essential applications, and any programs that require fast data access.
By placing these important files on the SSD, you’ll benefit from the SSD’s speed, which can lead to faster load times and improved performance for the applications you use most. This simple tip ensures that you’re getting the maximum benefit from your SSD investment.
7. Turn Off Tips and Notifications
Windows is full of helpful tips and notifications designed to improve your experience, but they can also consume system resources and slow down your device. If you’re looking to speed up your Windows system, turning off these notifications can help.
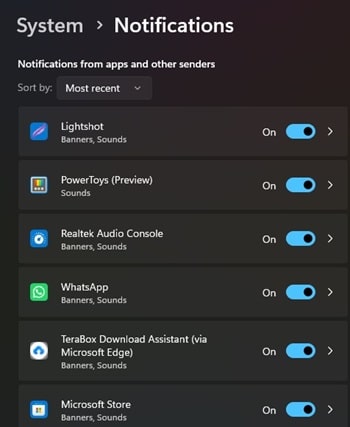
To do this, go to Settings, click on System, and then select Notifications & actions. From here, you can turn off any notifications you don’t need.
This frees up resources and reduces distractions, allowing your computer to run more efficiently. By keeping notifications to a minimum, you’ll have fewer interruptions and a faster system.
8. Change Power Mode to Best Performance
Windows offers different power modes that allow you to balance performance and energy consumption. If you’re looking to get the most speed out of your computer, switching to the Best Performance mode is a simple and effective tip.
To change your power mode, go to Settings, click on System, and then select Power & sleep. Under the Related settings section, click on Additional power settings, and choose High performance or Best performance from the power plan options.
This setting prioritizes performance over energy efficiency, which can lead to a noticeable increase in speed, especially when running demanding applications.
9. Change Appearance in Performance Options
Windows comes with a range of visual effects that, while attractive, can consume significant system resources. If you’re looking to speed up your computer, adjusting the appearance settings in the Performance Options menu can help.
To do this, press Windows + R to open the Run dialog, type sysdm.cpl, and press Enter. In the Advanced tab, click on Settings under Performance. You can choose Adjust for best performance, which will turn off many of the visual effects, or manually select which effects to disable.
By reducing these visual effects, you’ll free up system resources, allowing your computer to run faster and more efficiently.
10. Turn Off Search Indexing
Windows uses a feature called Search Indexing to catalog files for faster search results. While this can be helpful, it can also slow down your computer, particularly if you have a large number of files.
To turn off search indexing, press Windows + R, type services.msc, and press Enter. Find Windows Search in the list, right-click on it, and select Properties. Change the Startup type to Disabled.
Disabling search indexing can free up system resources, leading to a faster and more responsive Windows experience.
Conclusion
Maintaining optimal performance on your Windows device doesn’t require advanced technical knowledge. By following these 10 simple tips, you can ensure your computer runs smoothly, efficiently, and with the speed you need.
Regular maintenance and a few strategic upgrades can make a world of difference in your day-to-day computing experience. Don’t let a slow system hold you back—take action today to keep your Windows device running at its best.


