

Upgrading to Windows 11 offers a plethora of benefits, from enhanced performance to advanced security features. Whether you’re a casual user or a power user, the new operating system provides tools and functionalities that can significantly improve your computing experience.
However, upgrading to Windows 11 can be challenging, especially if your PC doesn’t meet the minimum requirements. This guide will walk you through the entire process, ensuring you can enjoy the latest OS without any hitches.
Check for Compatibility
Before diving into the upgrade process, it’s essential to check if your PC is compatible with Windows 11. Microsoft has set specific minimum system requirements that your device must meet. These include a compatible 64-bit processor, 4GB of RAM, and 64GB of storage, among other specifications.
To simplify this process, Microsoft provides a handy tool called the PC Health Check. This tool will scan your system and inform you if it’s ready for Windows 11.
Check for the Update
Once you’ve confirmed that your PC is compatible, the next step is to check for the Windows 11 update. Here’s how you can do it:
- Open Settings from the Start menu.
- Navigate to Update & Security.
- Click on Windows Update.
- Select Check for updates.
If the update is available, you will see an option to download and install Windows 11.
Download with the Installation Assistant
If the update isn’t showing up automatically, you can use the Windows 11 Installation Assistant. Here’s how:
- Visit the Windows 11 download page.
- Click on Download now under the Installation Assistant section.
- Run the downloaded file and follow the on-screen instructions to install Windows 11.
Use Microsoft’s Media Creation Tool
The Media Creation Tool is another way to upgrade to Windows 11. This tool allows you to create installation media, such as a USB drive or DVD, to install the OS. Here’s the process:
- Download the Media Creation Tool from the Windows 11 download page.
- Run the tool and select Create installation media for another PC.
- Choose your language, edition, and architecture, then create the installation media.
Download Windows 11 Disk Image (ISO)
For those who prefer using a disk image, Microsoft provides an ISO file for Windows 11. Here’s how to download and use it:
- Go to the Windows 11 download page.
- Select Download now under the Download Windows 11 Disk Image (ISO) section.
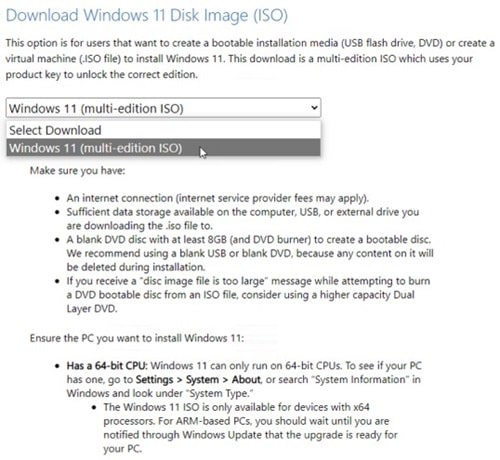
- Choose your language and click Confirm.
- Once downloaded, you can use it to create bootable media.
How to Upgrade to Windows 11 if Your PC Isn’t Supported
What if your PC doesn’t qualify for Windows 11? With the free third-party Rufus tool, you’re able to install Windows 11 by bypassing the usual requirements.
- Download or create the Windows 11 ISO as explained in the previous steps.
- Download and install Rufus from its official website.
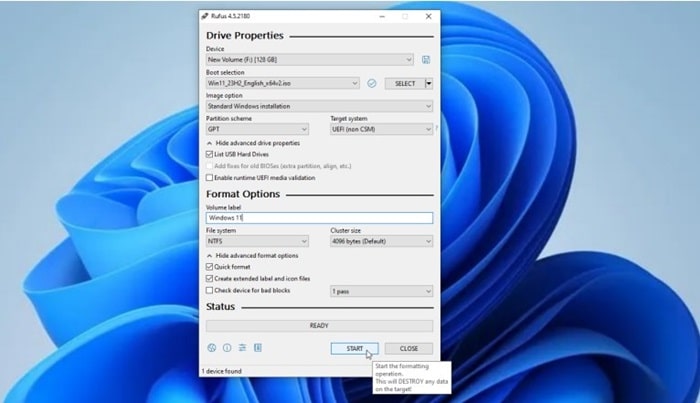
- Launch Rufus and insert a USB stick with at least 8GB of free space into your PC.
- In Rufus, click the SELECT button and choose the Windows 11 ISO file.
- Ensure the Device field points to your USB drive and that Image option is set to Standard Windows installation.
- Click START. In the pop-up window, check the box for Remove requirement for 4GB+ RAM, Secure Boot, and TPM 2.0, then click OK.
- Once the USB drive is set up, insert it into the PC you want to upgrade, open the drive in File Manager, and double-click setup.exe.
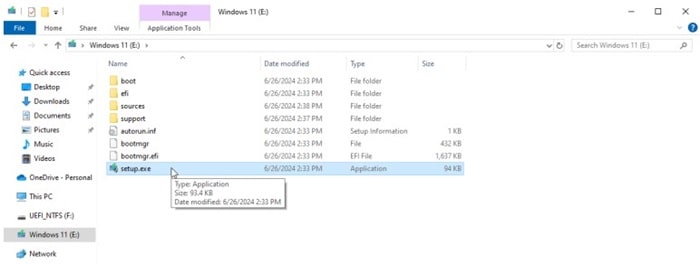
- Follow the on-screen instructions to proceed with the installation, ensuring you opt to keep your personal files and apps.
Preparing Your PC for Installation
Before you start the installation, it’s crucial to prepare your PC:
- Back up important data: Ensure all your important files are backed up to an external drive or cloud storage.
- Check disk space: Make sure you have at least 64GB of free space on your primary drive.
Installing Windows 11
With your bootable media ready and your PC prepared, you can now proceed with the installation:
- Insert the bootable media and restart your PC.
- Boot from the installation media (you might need to change the boot order in the BIOS/UEFI settings).
- Follow the on-screen instructions to install Windows 11.
After installing Windows 11, you’ll need to complete the initial setup:
- Choose your region and keyboard layout.
- Connect to a Wi-Fi network.
- Sign in with your Microsoft account or create a new one.
- Personalize your system settings.
Troubleshooting Common Issues
During installation, you might encounter some issues. Here are common problems and their solutions:
- Installation errors: Restart your PC and try again.
- Driver issues: Update your drivers before installing Windows 11.
- Compatibility warnings: Ensure all steps were followed correctly, especially if using Rufus for unsupported PCs.
Benefits of Windows 11 Features
Windows 11 comes with numerous features that enhance your computing experience:
- Improved performance: Faster and more efficient than previous versions.
- Enhanced security: New security features to protect your data.
- New features and tools: Redesigned Start menu, Snap Layouts, and more.
Maintaining Your System
To keep your system running smoothly, regularly:
- Update Windows: Keep your OS up to date with the latest patches and updates.
- Optimize your system: Use built-in tools like Disk Cleanup and Defragmenter.
Conclusion
Upgrading to Windows 11, even on unsupported PCs, is achievable with the right tools and steps. Enjoy the new features, improved performance, and enhanced security that Windows 11 offers.


