

The Control Center is an essential feature across Apple devices, providing quick access to various controls and settings like Wi-Fi, Bluetooth, Brightness, and much more. Whether you’re using an iPhone, iPad, or Mac, mastering how to access and customize the Control Center will significantly improve your experience.
If you still not familiar with this feature, dont worry. Cause Today I will walk you through the steps for using and customizing the Control Center on iOS 18, earlier versions of iOS, and macOS.
What is the Control Center in iOS?
So, here’s the deal: the Control Center is basically your iPhone or iPad’s personal command hub. Think of it as your device’s shortcut center, where you can quickly toggle things on or off without needing to open any apps.
From controlling your Wi-Fi and Bluetooth, adjusting brightness, to even playing your favorite song, the Control Center has your back.
Apple designed this feature to make your life simpler—because, let’s be real, no one wants to scroll endlessly just to turn on Airplane Mode when you’re boarding a flight, right?
Instead, you can swipe down, hit the icon, and boom, you’re good to go. It’s like the Swiss Army knife of settings, compact but packed with essential tools.
Accessing Control Center in iOS 18
Now, when it comes to iOS 18, accessing the Control Center has never been easier. All you have to do is swipe down from the top-right corner of your iPhone or iPad screen, and voilà, you’ve opened the gateway to quick controls.
But here’s the fun part: Apple split the Control Center into three different screens in iOS 18! So instead of cramming everything into one space, you get a more organized experience.
- The first screen holds all the core controls. This includes your essentials like Wi-Fi, Bluetooth, and the brightness slider.
- The second screen is all about the audio player, so you can manage your music or podcasts here.
- The third screen is where you’ll find extra connectivity options, like AirDrop or Personal Hotspot.
Navigating between these screens is super easy too. You can either swipe left or right to scroll through them or tap one of the three tiny icons on the right side of the Control Center to jump directly to the screen you need. It’s all about quick access and flexibility.
Customizing Control Center in iOS 18
This is where it gets exciting—customization! Apple knows we all love making our devices feel personal, so they’ve made it possible for you to rearrange the Control Center to your liking. You want to move that flashlight icon somewhere more convenient?
No problem! Here’s how you can customize it..
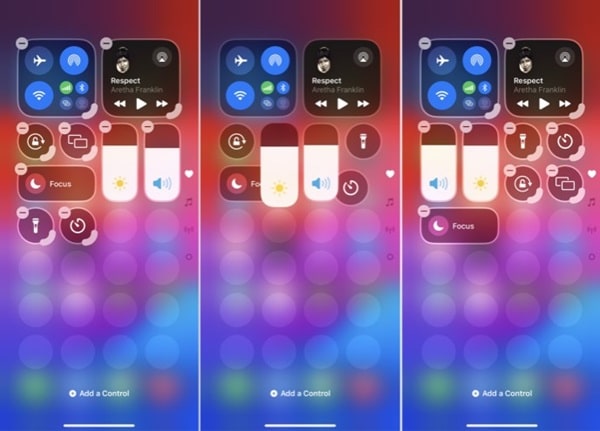
- Edit Mode:
Tap the + icon in the top-left corner of the screen, and you’ll enter what’s called ‘edit mode’. Each control will have a border around it with a – sign on the top. This is where the magic happens. - Rearrange Controls:
Now, just drag and drop the icons to new locations. Maybe you prefer the brightness control right next to the Wi-Fi icon, or you want the calculator to be more easily accessible? Whatever your preference, you can make it happen. - Resize Icons:
Some controls even allow resizing! If you see a small gray handle on the bottom right corner of an icon, that means you can make it bigger or smaller. Just drag that handle until the control icon is the size you want—super handy if you have a few controls you use more often than others. - Adding New Controls:
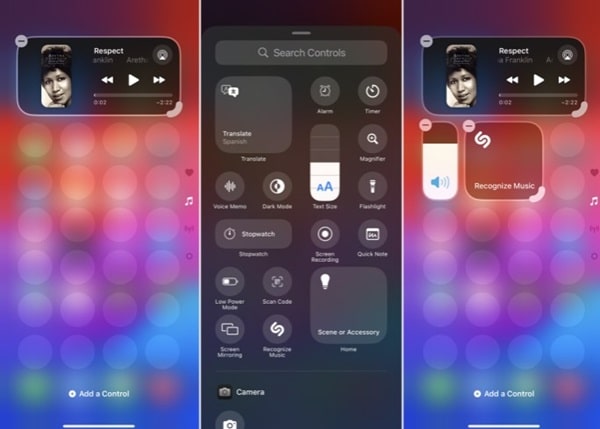 Got some extra space? Tap the + button and hit Add a Control at the bottom of the screen. You’ll be able to scroll through a list of available controls (or search by name) and pick your favorites. You can even add a whopping 15 screens if you want, filling them with controls until your heart’s content.
One thing I love about this feature is that it’s all about customization and making your device work for you. Whether you’re the kind of person who loves having shortcuts for everything or you just want the basics, iOS 18 gives you the freedom to design your own setup.
Powering Off Your Device from Control Center
Now, here’s a little trick that’s going to make life even easier: powering off your iPhone or iPad straight from the Control Center. No more pressing and holding physical buttons just to turn off your device—iOS 18 has introduced a simple power button right in the Control Center.
Here’s how it works..
- Open the Control Center by swiping down from the top-right corner (like we talked about earlier)
- In the upper-right corner, you’ll now see a power button icon. Tap it, and you’ll be taken to the familiar power-off screen
- Just slide the icon to the right, and your device will shut down
This is such a nice touch for anyone who prefers using the touchscreen over physical buttons, or for those times when your side button isn’t responding. Plus, it feels so futuristic, right?
Just a swipe and a tap, and your phone is off.
How to Use Control Center on Previous Versions of iOS

Alright, if you’re not rocking iOS 18 just yet, don’t worry, the Control Center still has your back. On older versions, like iOS 17 (or even before that), the way you access the Control Center is a little different, but still super easy.
Here’s how it works..
On most devices running iOS 17, you can swipe down from the top-right corner of the screen, and boom—you’re in! But if you’re using an older device like an iPhone 8 or SE, you’ll have to swipe up from the bottom of the screen instead.
Now, unlike iOS 18 where everything is divided into separate screens, the Control Center on older iOS versions is all housed in one single screen. You’ll see a bunch of useful toggles like Wi-Fi, Bluetooth and Brightness, but you don’t get the flexibility to remove or rearrange these controls like in iOS 18. It’s a fixed layout, but still pretty handy!
Certain controls are only available on specific devices. For example, if you’ve got an iPhone with cellular connectivity, you’ll find Personal Hotspot and Cellular Data in there.
If you’re on an iPad without cellular, you won’t see those options. Each icon works just like any other app: tap it to activate or deactivate a feature, or long-press for more options.
Here’s a little trick: long-press on the Wi-Fi, Bluetooth or AirDrop icons, and you’ll get more detailed settings without leaving the Control Center. For example, long-pressing the Wi-Fi icon will give you a list of available networks—perfect when you want to quickly switch Wi-Fi connections without opening the full Settings app.
Even though you can’t customize everything in older iOS versions like you can in iOS 18, it’s still packed with useful shortcuts that make navigating your iPhone or iPad a breeze. It’s all about efficiency and getting things done fast!
Customize Control Center in Settings
Now, let’s talk about how you can customize the Control Center to fit your personal preferences. Even if you’re not running iOS 18, there’s still some customization magic you can do through Settings.
Here’s how to get started..
- Open the Settings app on your iPhone or iPad
- Scroll down and tap on Control Center
Under Control Center Settings, you’ll see two sections: Included Controls and More Controls.
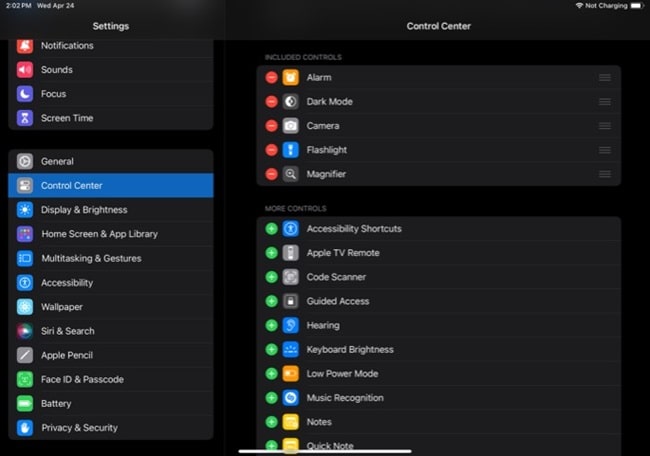
- Included Controls are the ones currently in your Control Center. These are the shortcuts that appear when you swipe down (or up) to access the Control Center. If you want to rearrange these, simply drag and drop them in whatever order makes sense to you.
- More Controls is a list of all the extra stuff you can add to your Control Center. This is where you can really personalize things. Want quicker access to your Apple TV Remote or the Magnifier? Just hit the + icon next to the control, and it’ll move up to the Included section. From here, you can rearrange it to your liking.
Some controls are super handy but often overlooked. Here are a few you might want to consider adding:
- Accessibility Shortcuts: Great if you use features like AssistiveTouch or VoiceOver frequently
- Dark Mode: One tap and your screen goes all moody and dark
- Screen Recording: Capture what’s happening on your screen in just a second
- Flashlight, Timer, Calculator: Basics that are always good to have on hand
And if you ever decide you don’t need a control anymore, just tap the – icon next to it in the Included Controls section, and it’ll be removed from your Control Center. You can always re-add it later, so no worries!
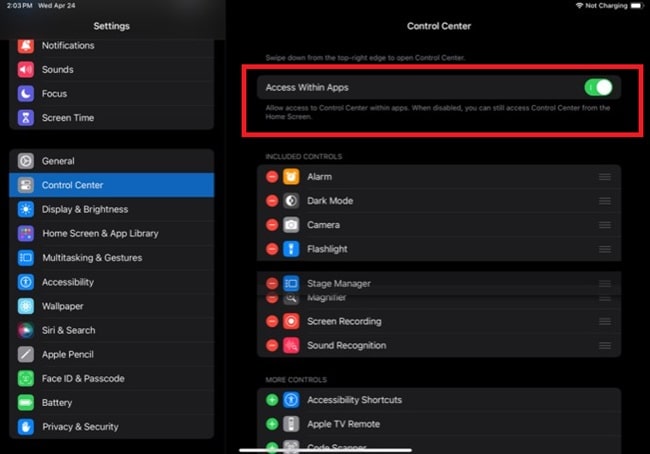
Oh, and here’s a pro tip: If you want to access the Control Center even while you’re using an app, make sure the Access Within Apps setting is enabled. This way, you don’t need to leave what you’re doing to adjust brightness, Wi-Fi, or whatever else you need.
How to Use and Customize Control Center on a Mac
Alright, let’s switch gears and talk about Macs. Since macOS Big Sur (which launched in 2020), Apple has introduced the Control Center on Mac, and it’s just as handy as it is on iOS devices.
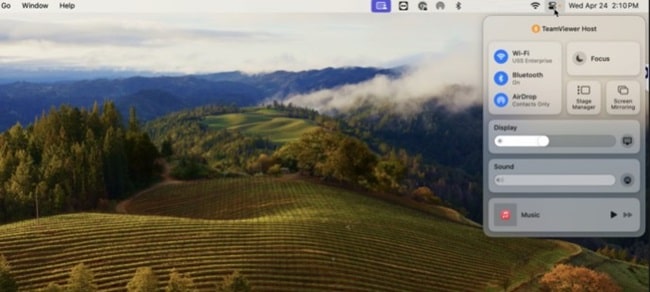
To open Control Center on your Mac, just click the Control Center icon on the menu bar at the top of your screen (it’s the one that looks like two stacked sliders, right next to the date and time). The Mac’s Control Center is designed to keep your most-used settings just one click away.
Here’s what you’ll find by default:
- Wi-Fi
- Bluetooth
- AirDrop
- Display
- Sound
- Focus
But wait, there’s more! You can also customize the Control Center on your Mac to better suit your needs. Here’s how you do it..
- Open System Settings on your Mac
- Scroll down and click on Control Center
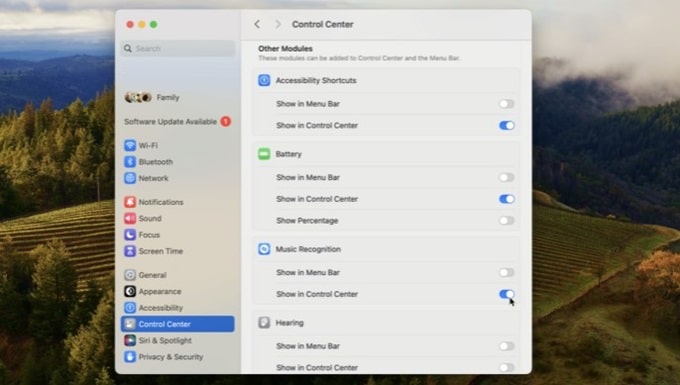
Once you’re in the Control Center settings, you’ll see a section called Other Modules. This is where you can enable or disable various controls to show up in the Control Center.
For example, if you want quick access to Screen Mirroring or the Battery Percentage, you can toggle those on. It’s super flexible!
Want to make things even more convenient? Drag any control from the Control Center straight to your menu bar. This lets you access it with just one click—no need to open the Control Center first.
For instance, if you’re constantly adjusting brightness or toggling Wi-Fi, just drag those icons up to your menu bar, and now they’re always available.
The Control Center on Mac may not be as customizable as on iOS, but it’s still a great tool to simplify your day-to-day tasks. Plus, it keeps your menu bar clean and clutter-free by hiding all the less frequently used settings behind the Control Center icon.
Conclusion
The Control Center on iOS and macOS is more powerful than ever, offering a highly customizable interface that makes it easy to access key settings and features quickly. Whether you’re using the latest version of iOS 18 or managing settings on your Mac, knowing how to use and personalize the Control Center can save you time and help you get more out of your Apple devices.
Be sure to explore all the available options and tailor the Control Center to suit your daily needs.


