


Hello guys! Often find yourself wondering why your internet isn’t working while mindlessly staring at a screen? Whether your goal is to just browse your preferred social media, grab a movie, or enter an online conference, we have all been there.
Though internet issues can be quite bothersome, relax! The good news is most problems can be fixed on your own without involving tech assistance. I will guide you through a few doable actions in this guide to have things back under control, so let us start now..
10 Ways to Troubleshoot Internet Connection
1. Try Another Device or Website
Alright, let’s decide whether the problem is network-wide or device-specific before you start yanking your hair out. Try connecting another gadget—such as a laptop or your phone—to the same Wi-Fi.
Should the internet function on other devices, the initial device most likely has problems. Perhaps your machine is malfunctioning, so you should not worry about the whole network.
These days, it’s also advisable to investigate different websites even if the issue just affects one particular page. Could you still open Google or search YouTube? Should everything except one website be in operation, that site may be momentarily down.
This is when handy tools like downforeveryoneorjustme.com or Downdetector can save the day by verifying whether the issue rests on their end.
Still, you might choose to clean the cache and cookies of your browser even if the website is up. Sometimes old cache files cause loading page faults. See whether using another browser or visiting the website in Incognito mode changes anything. Simple, correct?
2. Check the Wi-Fi Settings
Let’s next ensure your gadget is hooked to the correct Wi-Fi network. Accidental connection to an old network devoid of internet access or your neighbor’s Wi-Fi is simple.
Check your Wi-Fi settings to be sure you are connected to the correct SSID—the name of your network.
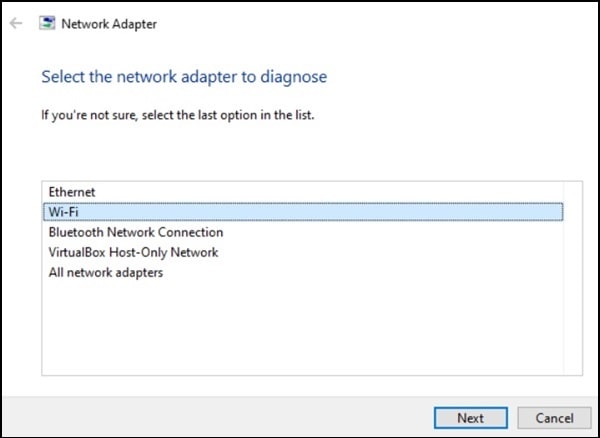
On a Windows machine, conduct a fast diagnostic by right-click the network icon found in the system tray and select Troubleshoot problems. On Windows 11, the choice will show as “Diagnose network problem”. This clever utility usually resets your network adapter and automatically fixes little problems.
You should also confirm your network adapter settings twice-through. Windows has this under the Network and Sharing Center in the Control Panel. Verify that the gateway address among other settings is accurate.
Sometimes incorrect settings will cause your gadget, which is linked to Wi-Fi, not to be able to access the internet.
Another advice is to rank your preferred network or turn off auto-connect to undesired ones if you notice several networks on your Wi-Fi list. Your gadget will therefore not continually switching networks and generating pointless connection drops.
3. Check Your Internet Package
Alright, let’s discuss speed now. Have you ever thought your internet is crawling more slowly than a snail? If so, you should find out from your Internet Service Provider (ISP) what speeds you are expected to obtain.
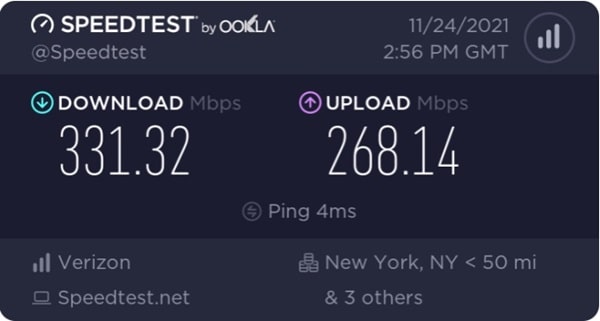
Visit Speedtest.net to launch a speed test. Measuring in megabytes per second (Mbps), this utility will show you the real speed your gadget is running.
Compare the findings now with your most recent bill, maybe it’s time to increase your plan even if the speed feels slow and matches what you pay for. Remember some hobbies, like gaming or streaming high-definition videos, demand quicker speeds; hence, make sure your bundle meets your needs.
On the other hand, it’s time to probe more if the speed test yields far lower scores than what you are paying for. Your ISP might be experiencing some outage or there may be a transient network problem.
To find out whether they know of any service interruptions, you can always phone them. And if this continues to happen regularly, you might want to review your ISP—after all, nobody enjoys paying for poor internet!
4. Scan for Viruses
Sometimes a cunning virus or malware hiding in your system causes a slow internet connection; your ISP is not the offender. Malware can slow down your browsing, chew on your bandwidth, or perhaps tamper with your network settings.
Run a virus search simply to be sure if nothing else seems to explain the problem. Built immediately into the system, Windows Defender is a decent tool for identifying hazards for users of Windows.
There are plenty of free and premium antivirus tools accessible if you want more sophisticated security.
And this advice is for you, Mac users as well, though some people claim, Macs are not impervious to malware. Having antivirus software installed is usually a smart idea.
Better still than treatment is prevention.
5. Bypass Your DNS Server
Alright, here’s where things get a bit technical, but hang with me—this one’s super useful. Whenever you type a website address into your browser, your computer talks to a DNS (Domain Name System) server to convert that address into an IP address.
Sometimes, DNS servers can act up, making websites unreachable even though your internet is working fine.
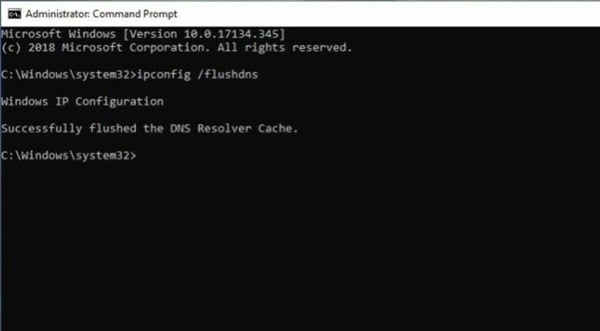
You can try flushing the DNS cache to reset things:
- On Windows, open Command Prompt and type:
ipconfig /flushdns - On Mac, open Terminal and enter:
sudo killall -HUP mDNSResponder
This process clears any outdated entries that might be causing problems.
If flushing the cache doesn’t solve the issue, consider switching to a public DNS server. Google’s DNS (8.8.8.8) or Cloudflare’s DNS (1.1.1.1) are popular and reliable options.
You can change the DNS settings either on your device or directly on your router, so the change applies to every gadget connected to your network.
6. Decode the Blinking Lights
Alright, ever notice those little blinking lights on your modem or router? They’re not just there for decoration—they’re trying to communicate with you!
Each light has a specific meaning, and understanding their behavior can help you figure out what’s going on with your internet.
First, grab your router or modem’s manual (or look it up online) to know what each light means. Usually, you’ll see lights for power, internet connection, Wi-Fi, and LAN ports. If they’re solid, all is well.
But if some are off or blinking like crazy, here’s what you can do:
- Power light off? Check if the device is properly plugged in. Maybe the power cord got knocked loose, or the outlet isn’t working.
- Wi-Fi light off? Press the Wi-Fi button on the side of your router to make sure it’s enabled. Some routers let you disable Wi-Fi manually (weird, but true).
- Flashing internet light? That usually means the router is struggling to establish a connection. Try restarting the router and modem—turn them off, wait a minute, then turn them back on.
- No lights at all? You might have a bigger issue, like a faulty power adapter or a fried router. If this happens, try plugging it into another outlet or borrow a friend’s power adapter (if compatible).
These lights may seem like a mystery at first, but once you learn their signals, they become helpful indicators of what’s wrong with your connection.
7. Check Your Bandwidth
Ever feel like your internet slows down only at certain times, especially when someone else is streaming or gaming? Bandwidth hogs can be a real problem, but don’t worry, there are ways to track and manage it.
On Windows, open Task Manager (press Ctrl + Shift + Esc) and click the Network tab. This will show you which apps are sucking up your bandwidth. If you see something like a game download or a backup running in the background, either pause it or let it finish to free up your connection.
For Mac users, hit Command + Space to open Spotlight and search for Activity Monitor. Check the Network tab to find the bandwidth hogs.
If you can’t find anything on your device, ask if someone in the house is downloading something big—like a movie or game update. In some cases, it could even be a neighbor stealing your Wi-Fi. To prevent this, change your Wi-Fi password and use WPA2 encryption for security.
And remember, some smart home devices (like cameras and doorbells) might also use up your bandwidth without you realizing it. A good solution is to enable Quality of Service (QoS) settings on your router to prioritize important activities (like video calls) over others.
8. Get a Better Signal
If your internet works fine when connected via Ethernet, but your Wi-Fi keeps dropping, it’s likely a signal issue. Wi-Fi signals weaken the farther you are from the router, especially if walls or large objects are in the way.
First, check the Wi-Fi icon on your device—how many bars do you have? If the signal is weak, try moving closer to the router. If that improves the connection, you know the issue is related to Wi-Fi coverage.
Here are some ways to improve your Wi-Fi signal:
- Move the router to a more central location in the house. Avoid placing it behind walls, furniture, or near appliances like microwaves that can interfere with the signal.
- Use a Wi-Fi extender if your home is large and has dead spots. This will boost the signal in areas where it’s weak.
- Upgrade to a mesh system if you need seamless coverage throughout your home. Mesh routers work together to eliminate dead zones better than traditional extenders.
If none of these solutions work, your router might be outdated. Consider upgrading to a newer router that supports the latest Wi-Fi standards (like Wi-Fi 6) for better performance.
9. Update Your Firmware
Just like apps on your phone, your router’s firmware also needs updates from time to time. Firmware updates improve performance, fix bugs, and sometimes even patch security vulnerabilities.
If your internet has been acting weird, it could be because your router’s firmware is out of date.
To check for updates, log into your router’s admin page. You can usually access it by typing something like 192.168.0.1 or 192.168.1.1 into your browser. (The exact address will depend on your router model, so check the manual if you’re unsure).
Look for a section called Firmware Update or System. If an update is available, follow the instructions carefully. Don’t interrupt the process while it’s updating—doing so can cause your router to malfunction.
And here’s a quick tip: Always download firmware updates directly from the manufacturer’s website. Avoid third-party sites, as they might contain malicious software.
10. Wipe Your Settings Clean
If you’ve tried everything and your internet is still misbehaving, it might be time for a factory reset. Resetting your router will erase all your custom settings (like Wi-Fi passwords and network names) and restore the device to its original state.
Most routers have a small reset button on the back. Press and hold it for 10-30 seconds until the lights start flashing. This indicates the reset is complete. Afterward, log into the router’s admin page and set it up from scratch.
A reset can solve many mysterious problems, especially if you’ve changed a setting in the past that’s now causing issues. Just make sure to reconfigure everything properly and avoid repeating the same mistake that led to the issue in the first place.
Conclusion
Troubleshooting internet issues doesn’t have to feel like rocket science. By following these steps, you can usually get your connection back on track without calling for professional help.
Remember, the key is to stay calm and tackle the problem step-by-step. Most issues have simple solutions, whether it’s moving your router, pausing a download, or just giving your modem a good old-fashioned restart.
So next time your Wi-Fi starts acting up, don’t stress! You’ve got this, and with a bit of patience, you’ll be back online in no time.


