


Syncing across devices is a key need for users who frequently switch between ecosystems, such as Apple and Microsoft. With iCloud Photos and Windows 11’s Photos app, it is now possible to seamlessly access your iPhone or iPad photos on a Windows PC.
Apple iCloud Photos is a cloud service by Apple that automatically uploads and stores your photos and videos across all your Apple devices, ensuring they are synchronized. On the other hand, Windows 11 Photos App is the default tool on Windows for managing your media library.
It allows you to view, organize, and even edit photos. With the recent updates, Windows 11 has introduced better integration for cloud storage services, including iCloud Photos.
By setting up iCloud Photos in Windows 11, users can now enjoy access to their iCloud images right from the Photos app, eliminating the need to manually download or transfer photos between platforms.
Alright, guys! Let’s dive deep into how you can easily access iCloud Photos on Windows 11’s Photos app. If you’re someone who’s rocking both Apple and Windows devices, this guide will be your best friend.
We’re talking about all those precious photos stored in iCloud and how to view them seamlessly right from your Windows 11 device. We’ll cover two methods—one for the updated Photos app and one for those still using the current version. So, let’s jump in!
How to Access iCloud Photos Using the New Version of Windows 11’s Photos App
So, first up, you’ve got Windows 11’s Photos app—the new and improved version that promises a smoother experience. But before you get too excited, there’s one thing you need to do: download and install iCloud for Windows.
Yeah, I know, it would’ve been cool if the connection worked automatically through the Photos app, but hey, we’re getting there!
Here’s the breakdown, step by step..
1. Installing iCloud for Windows
The first step is getting iCloud for Windows installed on your PC. Don’t worry, the new Photos app helps you along the way, making the process super easy.

You don’t have to search the Microsoft Store or head over to Apple’s website. As soon as you open the updated Photos app for the first time, you’ll see a splash screen telling you about the new iCloud capabilities.
2. Navigating the iCloud Photos Icon in the Photos App
Once you’ve dismissed that intro screen, you’ll notice the app’s familiar interface. Now, on the left side—below the OneDrive section—you’ll find a new icon for iCloud Photos.
![]()
Yup, it’s right there, ready to connect you to your Apple photos!
3. Get iCloud for Windows

Click on that iCloud Photos icon, and you’ll land on a screen with a blue button that says, “Get iCloud for Windows”. Clicking this button is your shortcut to download the software, and the best part?
It eliminates the need to go searching for it. The app streamlines everything for you.
4. Installation and Opening iCloud for Windows
Once the download is complete, click on Install. From there, tap Open to launch iCloud for Windows. You’ll get a prompt from User Account Control—don’t sweat it, just hit Yes to continue.
5. Signing into Your iCloud Account
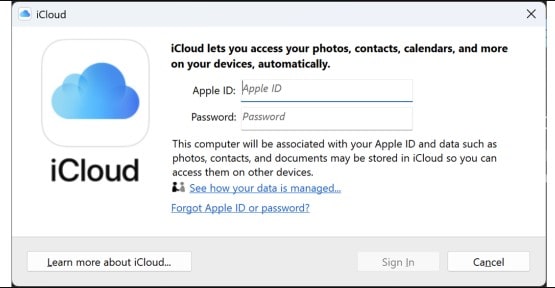
At this point, you’ll be prompted to log in to your Apple ID. Grab your Apple login credentials and sign in like you normally would. This step is crucial to connecting your iCloud Photos to Windows.
6. Verifying Your Login
If you’ve set up two-factor authentication (which you totally should), your iPhone or another Apple device will send you a verification code. Just enter the code, and you’re good to go!
7. Syncing Photos in iCloud for Windows
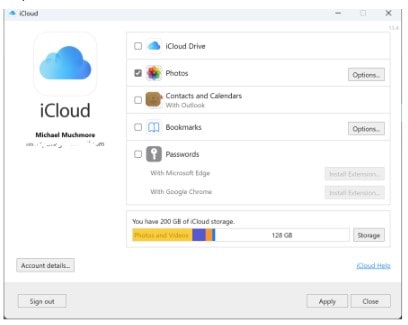
Now that you’re logged in, you’ll see the iCloud app interface. Here’s the important part—make sure the Photos option is checked.
This ensures that all your iCloud-stored images will sync with your Windows Photos app. Don’t worry about syncing anything else like contacts or bookmarks unless you need them.
8. iCloud Photos in Windows File Explorer
Once everything is set up, you’ll see a shiny new iCloud Photos icon in Windows File Explorer. This means your photos are now synced and ready for viewing!
9. Syncing Progress and Compatibility Messages

As your photos start syncing, you might see an animation indicating that your iCloud content is being loaded. You’ll also see a message about OneDrive incompatibility, but don’t stress about that. The two cloud services can live side by side in harmony within your Photos app!
And there you have it! With the updated Photos app, your iCloud Photos are now effortlessly integrated into Windows 11. This method is fast, intuitive, and makes the cross-platform experience feel like a breeze.
How to Access iCloud Photos in the Current Photos App
Now, if you’re using the current version of the Photos app, you might not have that smooth integration just yet. But don’t worry—there’s still a way to get the job done. It’s a bit more manual, but it works!
1. Download and Install iCloud for Windows
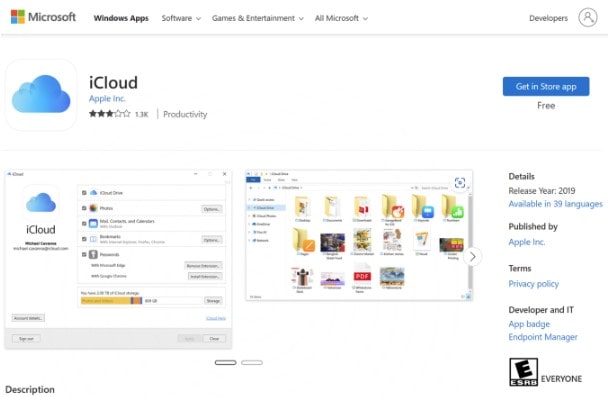
The first thing you’ll need to do is download iCloud for Windows. Unlike with the updated Photos app, you’ll have to head over to the Microsoft Store or Apple’s website to grab the installer.
Once you’ve downloaded it, run the installer and agree to the User Account Control prompt.
2. Log in to Your Apple ID
Next up, open the iCloud app, and just like with the updated version, you’ll be asked to log in using your Apple ID. If you’ve got two-factor authentication enabled (and you should), you’ll need to verify your login through your iPhone or another Apple device.
3. Enable Photos Sync in iCloud for Windows
Once you’ve logged in, make sure that Photos is checked in the iCloud app window. You can uncheck any other features (like iCloud Drive or bookmarks) if you don’t need them.
After this step, you’ll be asked whether you want to send diagnostic data to Apple—it’s up to you!
4. Find iCloud Photos in File Explorer
With everything set up, your iCloud photos will now appear in Windows File Explorer, specifically under the iCloud Photos folder. At this point, your iCloud photos are synced to your PC, but you might notice a slight difference in how they’re displayed in the Photos app.
5. Viewing iCloud Photos in the Photos App
Open the Photos app (Windows 11’s current version or Windows 10) and navigate to the Folders section. If you don’t see your iCloud photos listed automatically, don’t panic!
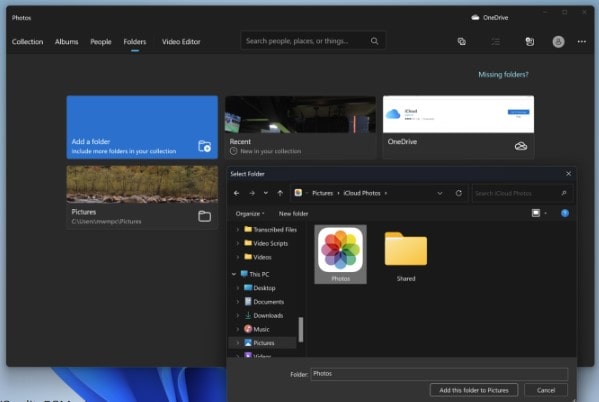
You can manually add the iCloud Photos folder from File Explorer by selecting Add a folder within the Photos app. Once it’s added, you’ll be able to view and manage your iCloud-stored images in the app.
Conclusion
Syncing iCloud Photos with Windows 11’s Photos app offers a seamless experience for those using both Apple and Windows devices. The setup process is simple, especially with the new Photos app integration that automatically guides you through installing iCloud for Windows.
Even if you’re using an older version of the Photos app, accessing your iCloud photos is still achievable, though less convenient. Either way, you’ll be able to manage your iCloud photo collection from your Windows PC efficiently, offering the best of both ecosystems without compromise.


