Alright friends, before we dive deep into the technical steps and Terminal commands, let’s just pause for a moment and talk about why you might want to create a bootable USB installer for macOS in the first place.
Imagine your Mac suddenly refuses to boot, or maybe you just got a new one and want to start fresh with a clean install. Maybe your internet connection isn’t always reliable, or you’re someone who helps others fix their Macs regularly. In all these cases—and more—a bootable macOS USB drive is a total lifesaver.
It’s like having a Swiss Army knife for your Mac. With it, you can reinstall macOS, update multiple devices without redownloading the installer every time, or even test new versions of the system without touching your main setup. Whether you’re a tech geek, a helpful friend, or just someone who wants a little more control over their Mac setup, this tool is gold.
So yeah, if you’ve ever wanted to feel like a low-key Apple genius, this is your first step. Let’s talk about what you’ll need before we start turning you into a macOS wizard.
What You Need to Make a Bootable USB for Mac
Before we execute the steps, there are several requirements you need to prepare. At a minimum, you need to ensure the following..
1. A USB Drive (Minimum 15GB)
First and foremost, you’ll need a USB flash drive. You’ll need a flash drive with at least 15GB of free space. That’s the minimum, as the macOS installer isn’t small.
For example, macOS Monterey has about 12GB of space, while Big Sur has about 13GB. So, anything less than 15GB will cause errors or even stop working altogether.
If you have a 16GB, 32GB, or even 64GB flash drive, even better—more space means easier installation.
If you have a newer Mac (especially one with only USB-C ports), you’ll definitely need a USB-C drive, or at least a decent USB 3.0 stick and an adapter. If you’re using an M1 or M2 Mac, you might consider using a Thunderbolt SSD, as some reports of USB compatibility issues with Apple Silicon.
Also, don’t use a USB stick containing important data, as this process will completely erase the data on the drive.
2. The macOS Installer File
And the second thing you’ll need is, of course, the macOS installer file itself. The installer file depends on which version of macOS you want—whether it’s the latest and greatest or a slightly older version.
If you just want to install macOS Sequoia, Sonoma, or Ventura, the Mac App Store or Software Update (in System Settings/System Preferences) usually allows you to easily download the installer. Simply search for the version, click get and the installer file will download.
However, if you want an older version—for example, Monterey, Catalina, Mojave, or even High Sierra—it might be a bit more difficult. Your Mac might not allow you to download it directly if it deems it unnecessary.
From what I’ve read, users searching for the file either use the direct App Store link or navigate to Apple’s support page to get it. Either way, make sure you don’t accidentally click install after downloading—you just need the installer file saved in the folder for later installation using the method I’ll share.
Also, make sure your internet connection is stable during the download process. During the installation process, your Mac might ask to verify your firmware, verify your Apple ID, or sign in to iCloud (make sure Wi-Fi is on).
How to Create a Bootable USB macOS Installer
At least if you have prepared a USB drive as an installation container, if perhaps you are still confused about how to get the installer file, you can read how to get it below..
Step 1: Grab the macOS Installer Files
Again, depending on which version you want to install and which version your Mac is running.
a. If You’re Installing macOS Sequoia
You can usually find macOS Sequoia on the Mac App Store. Or, if it’s not installed yet, you can check Software Update.
As soon as you download it, the system might try to start the install automatically. Don’t let it, just cancel that part right away.
b. If You Want the Beta Version Instead
Trying to live on the edge with a macOS beta? You’ll have to enroll in Apple’s Beta Software Program first. Once you’re in, you can grab the installer just like any normal update.
And yep, later in the guide there’s a specific Terminal command you’ll need if you’re installing the beta using USB, stay tuned for that part.
c. If You’re Looking for Sonoma, Ventura, Monterey, Big Sur, or Older Versions
Here’s how you can get the installers..
- Use Safari (not Chrome) and click the link for the version of macOS you want:
- Click the Get button and your Mac will start downloading the installer.
Just like before, don’t start the actual installation—we just need the file, not the full install process. You’ll use that file later to create the bootable USB.
Step 2: Make the USB Installer Bootable
Once you have the installer file, it’s time to create a bootable USB drive. In this section, we’ll start using Disk Utility and Terminal.
This method only works if your Mac is running OS X 10.7 (Lion) or later. If you’re still using Snow Leopard (10.6) or earlier, unfortunately, this won’t work.
- Plug in a USB drive with at least 15GB of free space.
- Open Disk Utility (just press Command + Space and type “Disk Utility”).
- If you’re using macOS High Sierra or newer, click View > Show All Devices.
- In the sidebar, pick the root drive, not just the volume (this is where people usually mess up).
- Click Erase and fill in the settings like this:
- Format: Mac OS Extended (Journaled)
- Scheme: GUID Partition Map
- Name it something simple like “macOSUSB” (you’ll use this name later in Terminal).
Let the formatting run—it might take a few minutes, and once it’s done, hit Done and close Disk Utility.
Use Terminal to Create the Bootable USB
- Open Terminal (again, Command + Space, type “Terminal”).
- Paste the command that matches the macOS version you downloaded. You’ll find that command in the next part of this guide.
- Before you hit enter, make sure to replace “MyVolume“ in the command with the name you gave your USB drive (macOSUSB, or whatever).
- Then press enter.
- Terminal will ask for your Mac password, type it in and hit enter again.
- You might see a pop-up asking for access to the removable drive—click OK.
- Terminal will warn you it’s gonna erase the USB. Hit Y, then enter if you’re sure everything is correct.
Now, let everything run until you will see a message like…
Erasing Disk: 0%... 10%... 20%... 100%...
Copying installer files to disk... Copy complete.
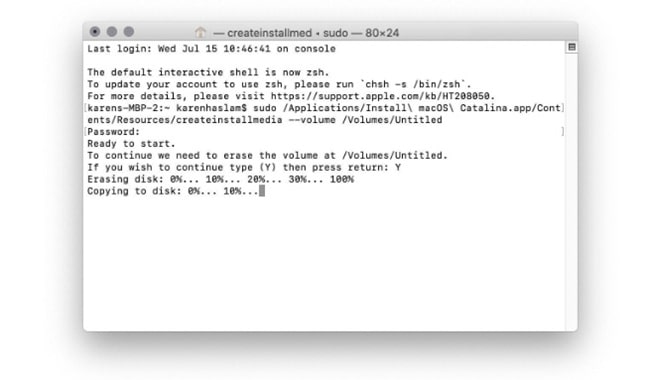
Once it says “Done”, you’re all set, you now have a fully working bootable USB installer for macOS.
Step 3: How to Use the Bootable USB to Install macOS on Your Mac
Okay, now that your macOS installer is saved to a USB drive, it’s time to install macOS on your Mac. This method can be used on multiple Macs, as long as the version you have is compatible with the target device.
Take the Mac you want to update and plug in the USB installer. Once connected, turn it on. Now, depending on which chip your Mac uses—Intel or Apple Silicon (such as M1 or M2), because the next steps will be slightly different.
- For Intel-based Macs:
Right after pressing the power button, hold down the Option (or Alt) key. Keep it held down until you see the startup options screen pop up. - For M1 or newer Macs:
Press and hold the power button until you see the screen with startup options. It might take a few seconds longer, so don’t let go too early.
Once you’re in the Startup Manager, you’ll see icons for your available startup disks. Find your USB drive—its name might be something like Untitled, Install macOS, or whatever you called it when you formatted it.
Select it, and hit Continue or simply click the arrow to boot from it. Now, your Mac will boot into Recovery Mode using the USB drive, that means you’re now ready to install macOS.
Once you’re in Recovery, you’ll see a window with a few options, click on Install macOS then hit Continue. The installer will launch, and the version of macOS stored on your USB will begin installing on your Mac’s internal drive.
The Mac will restart itself, and after a short wait, the new version of macOS will be installed and ready to use.
Run macOS Directly from Your USB (If You Want To)
FYI, you can boot and run macOS directly from an external drive without installing it to your Mac’s internal storage. If you might want to test macOS before actually installing it on your system, consider using a dedicated drive.
Createinstallmedia Commands for Each macOS Version
Now I’ll share a terminal command you can use to create a bootable installer. The command used is createinstallmedia, and it’s probably mostly the same across all versions of macOS, but there are some differences—especially in older versions.
When you copy-paste commands from websites, the double dashes -- sometimes get turned into long dashes – (they look nearly the same). If that happens, terminal will throw an error, and the command won’t run.
So always double check that you are using two regular hyphens, not one long hyphen.
Also, your USB drive name might not be MyVolume—it could be something like Untitled or USB. You can check this by opening Disk Utility and looking for the exact name of your USB drive before running the command.
Here are the correct commands to use in Terminal, based on the version of macOS you’re installing..
a. Sequoia
sudo /Applications/Install\ macOS\ Sequoia.app/Contents/Resources/createinstallmedia --volume /Volumes/MyVolume
b. Sequoia Beta
sudo /Applications/Install\ macOS\ Sequoia\ beta.app/Contents/Resources/createinstallmedia --volume /Volumes/MyVolume --nointeraction
c. Sonoma
sudo /Applications/Install\ macOS\ Sonoma.app/Contents/Resources/createinstallmedia --volume /Volumes/MyVolume
d. Ventura
sudo /Applications/Install\ macOS\ Ventura.app/Contents/Resources/createinstallmedia --volume /Volumes/MyVolume
e. Monterey
sudo /Applications/Install\ macOS\ Monterey.app/Contents/Resources/createinstallmedia --volume /Volumes/MyVolume
f. Big Sur
sudo /Applications/Install\ macOS\ Big\ Sur.app/Contents/Resources/createinstallmedia --volume /Volumes/MyVolume
g. Catalina
sudo /Applications/Install\ macOS\ Catalina.app/Contents/Resources/createinstallmedia --volume /Volumes/MyVolume
h. Mojave
sudo /Applications/Install\ macOS\ Mojave.app/Contents/Resources/createinstallmedia --volume /Volumes/MyVolume
i. High Sierra
sudo /Applications/Install\ macOS\ High\ Sierra.app/Contents/Resources/createinstallmedia --volume /Volumes/MyVolume
j. Sierra (older command format with application path)
sudo /Applications/Install\ macOS\ Sierra.app/Contents/Resources/createinstallmedia --volume /Volumes/MyVolume --applicationpath /Applications/Install\ macOS\ Sierra.app
k. El Capitan
sudo /Applications/Install\ OS\ X\ El\ Capitan.app/Contents/Resources/createinstallmedia --volume /Volumes/MyVolume --applicationpath /Applications/Install\ OS\ X\ El\ Capitan.app
l. Yosemite
sudo /Applications/Install\ OS\ X\ Yosemite.app/Contents/Resources/createinstallmedia --volume /Volumes/MyVolume --applicationpath /Applications/Install\ OS\ X\ Yosemite.app
Conclusion
And there you have it, you have the tools, the files, and of course, you can execute it as long as you follow the instructions above correctly. I hope what I’ve shared helps those of you who want to install macOS.