So, you’ve updated your Mac to the newest macOS, but suddenly you realize—uh-oh—your favorite apps don’t work anymore, or maybe the system feels heavier than before. Relax, you’re not the only one who has faced this.
Many Mac users at some point wish they could go back to an older macOS version—the one that felt faster, smoother, or simply more compatible with the tools they use every day.
But here’s the tricky part, installing an older macOS on top of a newer one isn’t as straightforward as hitting undo. It takes some preparation, patience, and the right steps so you don’t end up losing your precious files.
So in this guide, I want to break down what you need to know—and do—if you really want to roll your Mac back in time.
How to Install an Older macOS over a New One
1. Make Sure Your Mac Can Run the Older Version
Before you attempt a downgrade, you should check compatibility, as not all Macs can run all versions of macOS. So, your Mac can usually run the version of macOS released at the same time, plus any versions released shortly after.
Unfortunately, you usually can’t use a lower version than the one your Mac came with. This is because the hardware inside your Mac—the processor, graphics card, drivers, and all its components—is designed to work with specific software (depending on the era).
If an older macOS doesn’t have the right drivers to support that hardware, it won’t work.
For example, if you bought a Mac in 2022, it certainly won’t be able to run macOS Yosemite from 2014. However, if you bought a Mac around 2017 and the specifications remain the same as the previous model, you’ll likely be able to install Sierra or High Sierra.
Always double-check Apple’s official documentation or community forums to ensure your model can run the version you want. This can save you hours of time.
2. Backup Your Mac Before You Do Anything
Never downgrade macOS without backing up your data, as almost every method for installing macOS involves erasing your Mac’s data. This means you could lose photos, documents, music, and work projects unless you’ve saved them elsewhere.
Two Ways to Backup Safely
- Time Machine Backup
If you’ve been using Time Machine, this will be even easier, especially if you created a backup before updating macOS. Restoring from such a backup will not only restore your files, but also the version of macOS you had at the time. - Manual Backup
If you don’t have a Time Machine backup, no problem. Simply drag and copy your important files—photos, music, documents, project folders—to an external hard drive or SSD.
That way, you can keep only the data you need.
If you want more safe, do both. That way, you can recover your system if something goes wrong and still have the latest versions of your files stored separately.
3. Restore macOS Using an Old Time Machine Backup
Assuming you had a Time Machine backup before updating, rolling back will be much easier.
The catch, however, is that you’ll lose any new files you created after the backup. So, before you do anything, be sure to copy any new files—such as your photos, downloads, or recent work documents—to an external drive.
How to Revert with Time Machine
- Shut down your Mac completely
- Boot into Recovery Mode:
- On Intel Macs: press and hold Command + R while restarting
- On M1 or newer Macs: press and hold the power button until you see the startup options
- Once the utilities window appears, select Restore from Time Machine Backup and click Continue
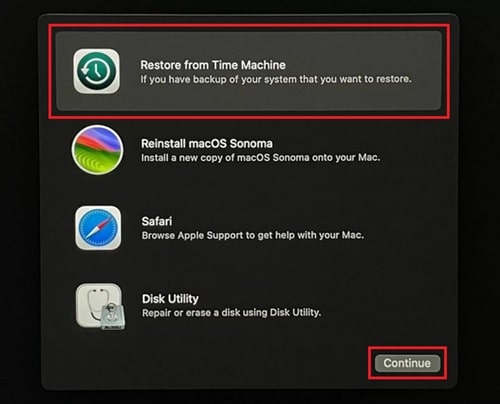
- Select your backup drive, then pick a backup created before you upgraded macOS
- Click Continue and let your Mac restore itself
4. How to Downgrade macOS to Original Version When You First Purchased It
One of the easiest ways to restore your Mac is to restore it to its factory state—the exact same version of macOS that came with it when you first purchased it. This option has actually been part of macOS Recovery since macOS Sierra 10.12.4.
And according to Apple, it should reinstall the original version of your Mac (or the closest version still available on their servers).
However, this feature is only available on Intel-based Macs. If you’re using an Apple Silicon M1 model or later, you’re out of luck, as these Macs only allow you to reinstall the current version.
In fact, on M1 Macs and later, you can’t revert to Big Sur at all.
The advantage of this option is that your data likely won’t be erased. Apple designed it so that reinstalling macOS this way simply reinstalls the system without deleting your personal files.
Well, to avoid any risks, it’s a good idea to back up first. Internet outages, installation errors, or unexpected bugs can still compromise your files.
Here’s how to downgrade according to Apple’s instructions..
- Shut down your Mac, make sure it’s completely powered off
- Restart with a special key combination. On an Intel Mac, press Shift + Option (Alt) + Command + R simultaneously
- Wait for the macOS utilities screen, once it loads, choose Reinstall macOS
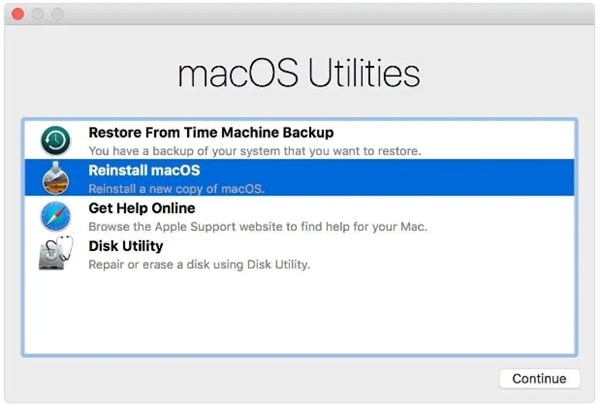
- Click Continue and follow the instructions shown on your screen
- Choose your startup disk (usually named “Macintosh HD”)
- Install and restart. Once the installation finishes, your Mac will automatically reboot into the older macOS
5. Download the macOS Version You Need and Install It with a Bootable Installer
Now, if you don’t have a Time Machine backup, and the Recovery tool doesn’t give you the option to revert to the stock version of your Mac, there’s still a workaround. You can download the macOS installer you want (even an older version of Mac OS X if it’s still available), and then convert it into a bootable USB installer.
This way, you can perform a fresh installation on your Mac.
Unlike some previous downgrade methods, this method will erase all data from your Mac. That’s why it’s crucial to back up any files you still need.
Don’t rely solely on Time Machine for this backup, as restoring from it could restore the latest version of macOS you’re trying to delete. Instead, manually back up your documents, photos, and other important files to an external drive or cloud storage.
Get the Installer File You Need
The first thing you’ll need is the installer for the version of macOS you’re trying to go back to. Depending on what Apple still has available, you might be able to grab one of these recent versions..
Once the download is complete, don’t click install right away. Unfortunately, you can’t simply transfer your old macOS to the new macOS, instead you’ll need to convert the installer to a bootable USB drive.
Doing a Clean Install with a Bootable USB
Essentially, when you perform a clean install, you completely erase your Mac’s data and set it up like new (except with the old version of macOS you want). Here’s a detailed process..
- Download the installer for the macOS version you want from the Mac App Store
- Create a bootable installer using that file. You’ll need an external USB stick or SSD for this step
- Erase your Mac. This part depends on which macOS you’re currently running:
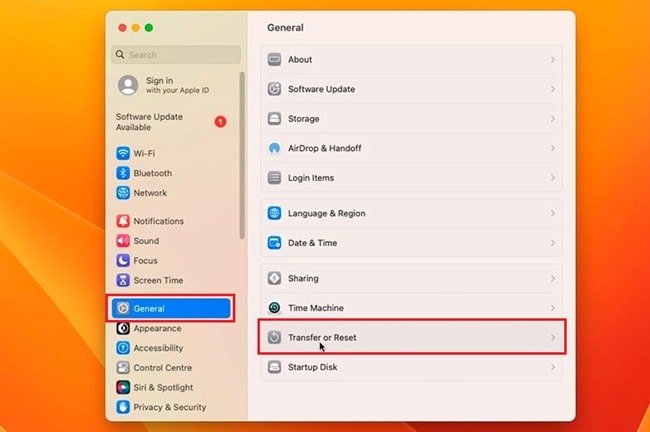
- On newer versions (like Sonoma or Sequoia), head to System Settings > General > Transfer or Reset and use the Erase All Content and Settings option
- On Monterey, you’ll find the same option in System Preferences
- On older macOS versions, you’ll need to restart into Recovery Mode and use Disk Utility to erase the drive manually
- On newer versions (like Sonoma or Sequoia), head to System Settings > General > Transfer or Reset and use the Erase All Content and Settings option
- Once your Mac is wiped and formatted, plug in your bootable USB installer
- Restart your Mac:
- On an Intel Mac, hold Option/Alt when booting until you see the startup volumes screen
- On an M1 or later Mac, press and hold the power button until you see the startup options window with your bootable installer listed.
- Select the bootable installer volume
- Click Continue and follow the on-screen instructions
Once the installation completes, your Mac will restart and boot into the older macOS.
6. Run an Older macOS on an External Drive
Not ready to wipe your Mac clean? Oc there’s another solution, you can install and run macOS from an external drive. Think of it like carrying a second Mac operating system in your pocket.
The advantages are as follows..
- No need to wipe your Mac, your current setup stays exactly as it is
- You can test or use older macOS versions without risking your primary system
Of course, there are some drawbacks. Bcs the operating system runs through an external USB or Thunderbolt drive, performance may feel slower than your internal SSD.
But if you still want to try it, here’s how to do it..
- Connect a large enough external drive (SSD preferred for better performance)
- Install the macOS version you want directly onto that external drive
- When restarting your Mac, hold down Option/Alt during boot
- Choose the external drive as the startup disk
Now you can boot into that older macOS whenever you want, without touching your main installation.
7. Run an Older macOS in a Partition or Volume
If you don’t like using an external drive, another option is to create a separate partition or APFS volume directly on your Mac’s internal storage. This way, you can keep your current macOS installation while running older versions side-by-side.
What’s the Difference Between a Partition and a Volume?
- Partition:
This splits your internal storage into fixed chunks. Each partition has a set amount of space you assign, and it works on all macOS versions - APFS Volume:
Available only on newer macOS versions, volumes are much more flexible. They share space dynamically, so you don’t have to stress about allocating too much or too little storage upfront
Of course this method has several advantages, such as…
- You don’t need to erase your Mac completely
- You can switch between two (or even more) macOS versions on the same machine
- Great for testing apps on different versions without committing fully to a downgrade
Here’s how to do it..
- Open Disk Utility from Applications > Utilities
- Create a new partition or APFS volume
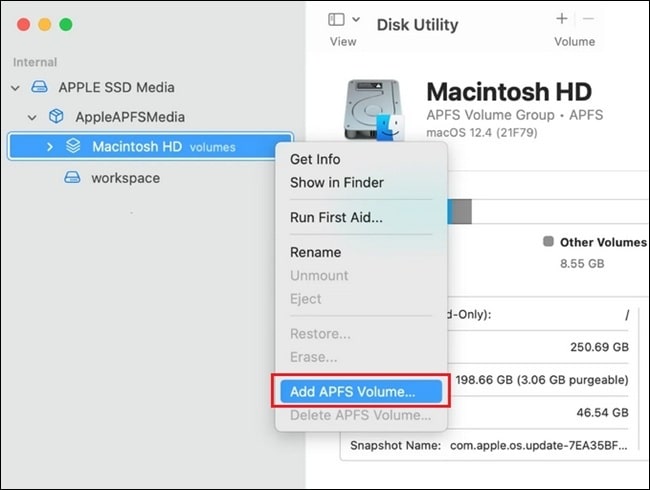
- Use a bootable installer of the macOS version you want to install
- Point the installation at the new partition/volume
When you restart, you can pick which macOS to boot into—like having two Macs in one.
Conclusion
Downgrading macOS isn’t difficult, and there are many ways to do it, which method you choose depends on your specific situation. In conclusion, it’s best not to skip the backup step and always double-check that your Mac supports the version you want.