

Running Linux on a Windows computer might have seemed strange back then, something only hoodie-wearing hackers could do, right? But now? Not so. Microsoft has made it incredibly easy to use Linux without leaving Windows.
Thanks to the Linux Bash Shell and something called WSL (Windows Subsystem for Linux), you can now open a terminal and start typing Linux commands right away. No need for complicated things like dual-booting, no need for heavy virtual machines, just smooth and clean integration.
How do you use it? You’d better pay close attention to what I’m going to explain below.
What Is Linux Bash Shell?
Let me explain briefly, bash (short for Bourne Again Shell) is essentially the brains of many Linux systems. Bash is a command-line interface (CLI) that lets you type instructions and execute them—like talking directly to your computer in its own language.
You can move files, install applications, monitor processes, and perform a variety of advanced tasks with just a single command.
With Linux Bash Shell on Windows, you’re not just pretending to be running Linux—it’s the real deal, you get real Linux binaries running natively on your Windows OS. No emulators, no gimmicks, just pure Linux power, right alongside your Windows applications.
How to Enable the Linux Bash Shell on Windows 10
Please follow the steps that I have prepared below..
Step 1: Turn on the “Windows Subsystem for Linux” Feature
The first thing you need to do is enable the Linux for Windows feature. Without this feature, your Windows system won’t understand how to speak Linux.
Here’s what you need to do…
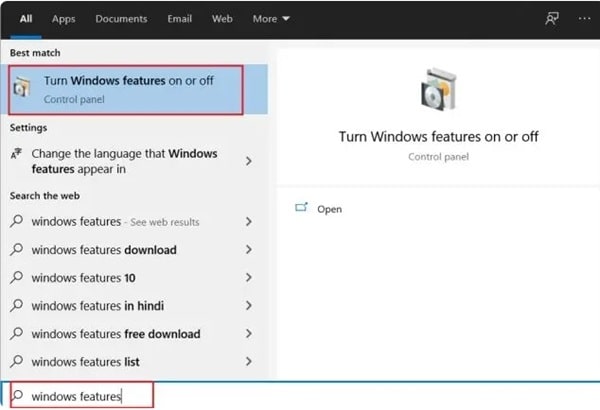
- Hit the Windows key on your keyboard and type in “Windows Features”
- From the list, click on Turn Windows features on or off
- A window will pop up with a ton of checkboxes—don’t freak out
- Scroll down until you find Windows Subsystem for Linux
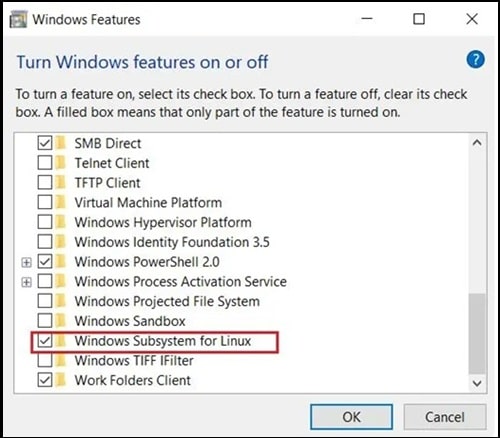
- Check the box, click OK, and then restart your PC
Yep, a quick restart is necessary here so the system can lock everything into place.
Step 2: Head to the Microsoft Store and Pick a Linux Flavor
After your system reboots, it’s time to visit the Microsoft Store.
- Open the MS store and type “Linux” in the search bar
- You’ll see a lineup of popular Linux distributions like Ubuntu, Debian, Kali Linux, and a few others
- For beginners (and even many pros), Ubuntu is the go-to. It’s user-friendly, widely supported, and pretty lightweight
- Click on Install and let Windows do its thing
This might take a few minutes depending on your internet speed, so wait a minute while it loads.
Step 3: Restart again and Launch Your Linux Distro
Once installation wraps up, you’ll want to give your PC another restart, this just helps everything sync up properly. Then hit the start menu, type in the name of your Linux distro (e.g., Ubuntu), click to open it.
You’ll see a black terminal window open with a message like “Installing…”. That’s normal, it’s setting up your new Linux environment for the first time.
Step 4: Create Your UNIX Username and Password
After that short wait, you’ll be asked to set up a UNIX username and password. This is just for the Linux part of your system and doesn’t have to match your Windows credentials.
Choose something you’ll remember because you’ll use it a lot, especially when running commands that require admin rights (like sudo commands).
Once that’s done, you’re in. Now you can use a Linux terminal, running smoothly inside Windows 10, for firts time try typing something simple like..
ls
or
pwd
See that? You’re officially talking to Linux. You can now use the Linux bash shell to run commands, installing packages, manage files, and even write code.
Oh, and if you want to make sure your packages are all up to date, just run this command..
sudo apt update && sudo apt upgrade
You’ll be asked to enter the password you created earlier, and then Linux will do the rest.
Why WSL 2 is a Big Leap Over WSL 1
Okay guys, so you’ve got WSL 1 running and maybe you’re already pretty impressed, right? Well, hold on—because WSL 2 can take things to a whole new level.
Imagine switching from cycling to driving a car. Both get you where you want to go, but one is much faster, smoother, and with more power.
So, what makes WSL 2 so innovative? Let me explain each step step by step..
1. Real Linux Kernel, Real Performance
WSL 2 comes with a native Linux kernel pre-installed, meaning it no longer emulates or fakes a Linux environment like WSL 1 did. Instead, Windows runs a native Linux kernel through lightweight virtualization, providing near-native performance and full system call compatibility.
In simpler terms, your Bash commands are no longer translated and interpreted—they simply run exactly as they would on a Linux machine.
2. Massive Boost in Speed and Efficiency
One of the biggest improvements in WSL 2 is its file system and I/O performance, which is incredibly fast compared to WSL 1. In fact, according to benchmarks, WSL 2 can be up to 20 times faster when running tasks involving heavy file operations—like compiling code or extracting large datasets.
Look at this real example transferring the Google homepage via WSL..
- WSL 2: just 4.09 seconds
- WSL 1: a much slower 11.64 seconds
3. Broader Command and App Compatibility
WSL 1 had limitations, with some Linux applications and commands not working or requiring complicated workarounds. However, with WSL 2, these issues have largely been resolved.
Thanks to the full kernel, you get…
- Support for Docker and containerized apps
- Ability to run cron jobs, sshd, and other background processes
- Tools like rsync, top, and systemctl functioning as expected
4. GUI Support (Kind of, For Now)
Because WSL 2 runs a real Linux kernel, you can technically run full Linux desktop applications with a GUI. This means apps like Gedit, VS Code, or even Firefox from Linux can run inside Windows.
However—and the catch is—this isn’t natively supported yet, Microsoft is working on it, and they’ve even hinted at official GUI support in a future WSL update. For now, if you’re an experienced user, you can run a GUI through some third-party methods (like using an X Server or Hyper-V), but honestly, it’s a bit complicated if you’re just starting out.
5. WSL 2 Timeline Snapshot
Just so you know where we’re at, here’s a quick rundown of the WSL 2 release timeline..
- June 2019: Released to Windows Insiders (Build 18917 or higher)
- Early 2020: Rolled out to the public as part of Windows 10 version 2004
If your system is updated and compatible, you’re already good to go.
How to Upgrade from WSL 1 to WSL 2
Want to upgrade to WSL 2? It’s easier than you think. You just need to enable one more Windows feature, install a kernel update, and run a few simple commands.
Here’s how to do it step by step..
Step 1: Enable ‘Virtual Machine Platform’
Just like when you enabled WSL, you’ll now need to turn on another Windows feature..
- Search for “Windows Features”
- Scroll down and check Virtual Machine Platform
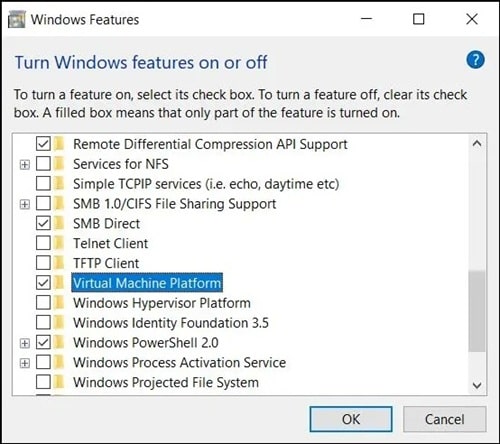
- Click OK and restart your system
This feature is essential because WSL 2 uses virtualization tech under the hood.
Step 2: Set Your Linux Distro to Use WSL 2
Now it’s time to convert your existing distro (like Ubuntu or Debian) to WSL 2.
- Open PowerShell as administrator
- Run this command:
wsl --set-version <YourDistro> 2
Replace <YourDistro> with the actual name of your installed Linux distribution. For example, if you’re using Ubuntu, type:
wsl --set-version Ubuntu 2
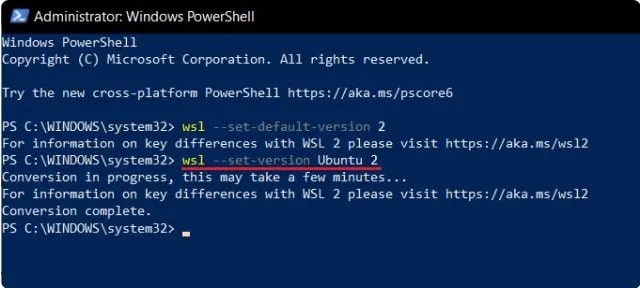
The conversion might take 5–10 minutes, depending on your system you’ll see progress updates as it works.
Step 3: Check That the Upgrade Was Successful
After the conversion finishes, verify it with this command:
wsl -l -v
This lists all your installed distros and shows their WSL version. If it says “2” next to yours—you’ve officially joined the WSL 2 club.
Running WSL 2 in Windows Terminal—The Easy Way
Microsoft has updated the Windows Terminal app to support multiple environments side by side. That means you can launch WSL 2, PowerShell, and Command Prompt all in separate tabs—no switching windows or launching different tools.
To use WSL 2 in Windows Terminal..
- Open Windows Terminal
- Click the down arrow next to the tab bar
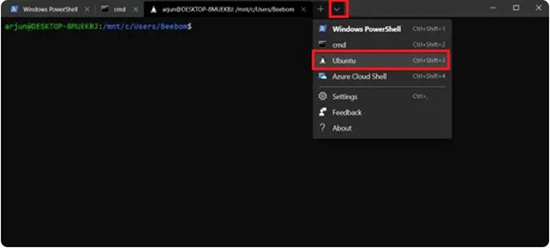
- Select Ubuntu (or whatever distro you’re using)
- A WSL 2 Bash Shell will launch in a new tab, ready to roll
It’s clean, modern, and honestly a joy to use. You can even customize your terminal themes and color schemes to make it look just the way you like.
Conclusion
Enabling the Linux Bash Shell on Windows 10 is a great option if you want a full-fledged Linux environment without having to leave Windows.
With the power of WSL 2, you get better performance, broader command support, and a real Linux kernel—all running seamlessly alongside your Windows device. Whether you’re a developer, sysadmin, or simply curious about Linux, WSL 2 makes it easy to get started.


