


A proxy might sound complicated, but it’s essentially an intermediary between your device and the internet. Instead of your computer connecting directly to a website, it goes through this middleman first—a proxy server.
Think of it like sending a letter to your crush, but using a friend to deliver it to keep your identity hidden. That’s how a proxy works—it hides your IP address and can help you access content more privately (and sometimes more freely, too).
A proxy server is like your digital bodyguard or personal assistant; it handles your requests to the internet for you. Want to visit a website? The proxy makes the request on your behalf, retrieves the information, and sends it back to you—sometimes even faster or more securely.
Some proxies are very clever—they can filter out bad content, speed up the process by saving your frequently visited sites, or hide your location so you can access region-restricted content (yes, including certain Netflix shows).
And in corporate environments, proxies are even more important. Companies use them to monitor employee traffic, block suspicious activity, or route users through secure networks.
Whether at home or at work, you certainly want a secure internet connection, and using a proxy is one way to do that. Now the question is, do you know how to set up a proxy on your computer?
Indeed, we need a tutorial first before we can get used to it, especially technical matters like setting up a proxy. Therefore, if you’re looking for how to set up a proxy, especially on Windows 10, please read the tutorial I’ve provided below..
Why Bother Using a Proxy in Windows?
For some people, using a proxy on Windows is essential, while others may be skeptical about its use. However, using a proxy offers the following benefits:
- Privacy: Maybe you work remotely or browse using public Wi-Fi. A proxy can help keep your digital footprint hidden.
- Access: Need to access sites restricted in your region? A proxy might be the solution you need.
- Employment Requirements: Many companies require employees to use proxies to keep their traffic secure and controlled.
- Speed & Efficiency: Some proxies store copies of websites locally (called caching) so you don’t have to reload them.
Essentially, if you care about privacy, control, or access, setting up a proxy on Windows 10 is a no-brainer.
How to Set Up a Proxy Using an Automatic Configuration Script
Okay, folks, let’s say you’re trying to get online at work, but something’s not right. You’re connected, but websites won’t load, or perhaps your apps won’t connect to the internet.
The likely cause is that your system isn’t using the proper proxy settings, which are often required in business or school networks to route traffic through a secure server.
By default, Windows 10 tries to detect proxy settings automatically. However, this doesn’t always work, especially when you’re on a corporate or more secure network.
One of the most straightforward ways to ensure everything works is to use a configuration script, usually provided by your IT department or network administrator. This script tells your computer what to do and where to go when connecting to the internet—think of it as a digital instruction manual.
The address of this script often looks like a website URL, like so.. http://my.proxy.server:8000/
And this is how you can set it up step by step..
- Hit the start menu, then click on Settings (the gear icon)
- Go to Network & Internet—you’ll see all the network-related options here
- On the left side, select Proxy
- Under the section labeled Automatic Proxy Setup, find the switch that says Use setup script and flip it to On
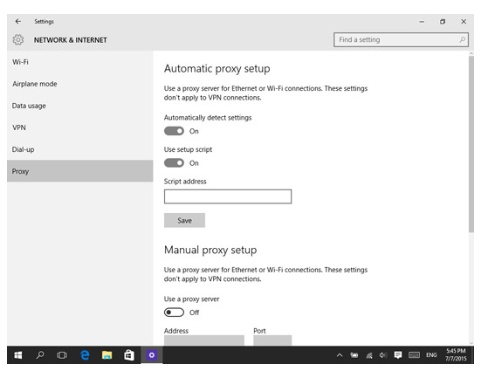
- In the text box that appears, type in the script address you got from your IT department
- Click Save to apply the settings
- Once done, simply close the settings window
Now your PC will follow the script to connect properly through the company’s proxy. No more connectivity issues (hopefully), and noe you can browsing like a pro.
How to Set Up a Proxy Manually
Maybe you want more control over your settings—or maybe your company didn’t provide you with a script, but instead gave you a specific IP address and port number to use. That’s fine, because you can also set them manually.
In this setup, you’ll enter the proxy server’s IP address and port number yourself. The IP address is just like any other address on your network, something like 192.168.1.211, and the port is a number that might be 80, 8080, or something else your admin gave you.
Here’s how to go about it..
- Open the Settings app (just like before)
- Head over to Network & Internet
- Click on Proxy from the menu on the left
- Scroll down to the Manual Proxy Setup section
- Toggle Use a proxy server to On
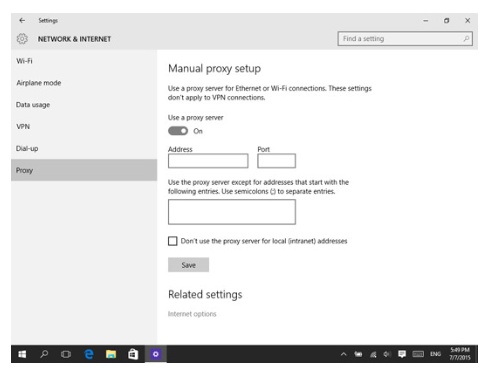
- In the Address field, type in the IP address of the proxy server
- In the Port field, enter the port number (make sure it’s exactly as provided)
- Hit Save
- Close the Settings window and you’re good to go
Done, whether you use a script or enter everything manually, Windows 10 gives you the flexibility to work with any network setup—whether at home, work, or anywhere else.
Conclusion
Okay, let’s recap: setting up a proxy in Windows 10 isn’t that difficult, is it? Whether you use the automatic configuration script your IT team provided, or you use the manual method with specific IP addresses and ports, it’s all manageable if you follow the steps I’ve provided.
Automatic setup is great if you have a smart script doing the heavy lifting for you, while manual setup gives you more control if you know the exact server details. Either way, Windows 10 gives you all the tools right in the Settings menu to handle it.
The bottom line is—if you want more privacy, better access, or just want to do what your workplace needs, knowing how to set up a proxy in Windows is a skill you need to know.


