


In today, our smartphones have become indispensable tools for capturing life’s precious moments. With the iPhone’s exceptional camera quality and user-friendly interface, it’s no wonder that many people rely on their iPhones to document their lives.
However, the convenience of taking countless photos and videos can quickly lead to a storage dilemma. To ensure that your memories are safely backed up and easily accessible across all your devices, using iCloud is a smart and efficient solution
This guide will walk you through the detailed steps of calculating your storage needs and enabling iCloud Photos on your iPhone.
Calculate Your Storage Space Needs
Before diving into the process of backing up your photos to iCloud, it’s crucial to understand your storage requirements. The first step is to evaluate how much space your photos and videos currently occupy on your device.
Here’s how you can do it:
- Open the Settings app on your iPhone
- Navigate to General > iPhone Storage
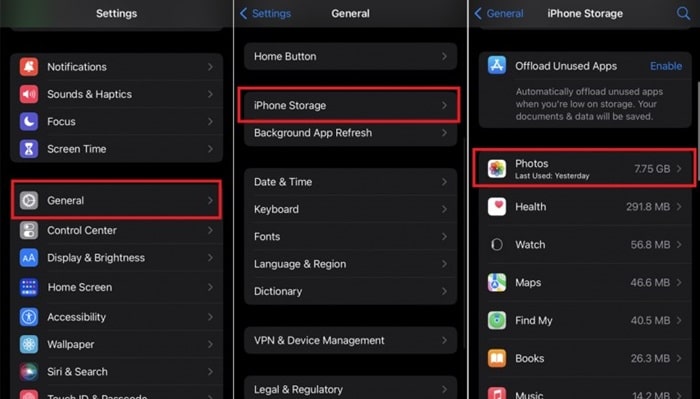
- Scroll down to find the Photos entry. Here, you’ll see the total amount of storage your photos and videos are consuming
Understanding your current storage usage is essential because it helps you determine whether the free 5GB of iCloud storage is sufficient or if you need to upgrade to one of Apple’s iCloud+ plans. The available options for iCloud+ are:
- 50GB for $0.99 per month:
This plan is suitable for users who have a moderate amount of photos and videos and want a budget-friendly solution. - 200GB for $2.99 per month:
Ideal for families or individuals with a large collection of media files. This plan also supports Family Sharing, allowing multiple users to share the storage space. - 2TB for $9.99 per month:
This plan is perfect for users with extensive photo and video libraries or those who use iCloud for additional data storage, such as documents and backups.
If upgrading your iCloud storage plan isn’t an option, you can free up space by deleting unnecessary items. Focus on removing duplicates, screenshots, or videos you no longer need, as these often take up significant storage.
Enable iCloud Photos on iPhone
Once you’ve assessed your storage needs, the next step is to enable iCloud Photos on your iPhone. This feature ensures that all your photos and videos are automatically uploaded to iCloud, keeping them safe and accessible from any device with your Apple ID.
Follow these detailed steps to set up iCloud Photos on your iPhone:
1. Go to Settings and Tap on Your Name:
Open the Settings app on your iPhone. Tap on your name at the top of the screen to access your Apple ID settings.
2. Choose iCloud > Photos:
In the Apple ID settings, select iCloud. Scroll down and tap on Photos.
3. Enable Sync this iPhone:
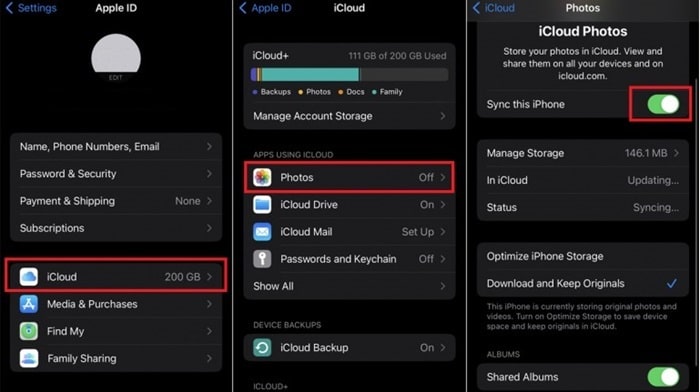
Toggle the switch next to Sync this iPhone to turn on iCloud Photos.
4. Choose Your Storage Option:
After enabling iCloud Photos, you’ll be prompted to choose between two storage options:
- Optimize iPhone Storage:
This option is ideal if your iPhone is low on space. It stores smaller, lower-resolution versions of your photos on your device while keeping the original, high-resolution versions in iCloud. This way, you can save space on your iPhone without losing the quality of your photos. - Download and Keep Originals:
Select this option if you have sufficient storage on your iPhone. It ensures that both the original, high-resolution versions and copies of your photos are stored on your device. This is useful if you often access your photos without a reliable internet connection.
5. Enable Shared Albums:
If you want to share your photo albums with family and friends, turn on Shared Albums. This feature allows you to create and share albums with other iCloud users, and they can add their photos and videos to the shared album as well.
By enabling iCloud Photos, you’ll have peace of mind knowing that your photos and videos are securely backed up and can be accessed from any of your Apple devices. This seamless integration across devices makes managing your photo library effortless and convenient.
How to Enable iCloud Photos on iPad, Mac, Apple TV and Windows
Ensuring your photos are safely backed up and accessible across all your devices is essential. While enabling iCloud Photos on your iPhone is a crucial first step, extending this functionality to your iPad, Mac, and Apple TV provides a seamless experience.
Here’s a detailed guide on how to set up iCloud Photos on these devices.
a. Set Up iCloud Photos on iPad
Your iPad can serve as an excellent tool for viewing, editing, and sharing photos. Enabling iCloud Photos on your iPad ensures that your photo library is synchronized with your iPhone and other Apple devices. Here’s how to do it:
1. Go to Settings and Tap Your Name:
Open the Settings app on your iPad. Tap on your name at the top of the sidebar to access your Apple ID settings.
2. Open iCloud > Photos:
In the Apple ID settings, select iCloud. Scroll down and tap on Photos.
3. Enable iCloud Photos:
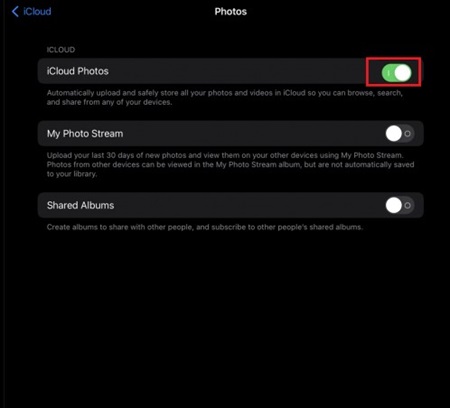
Toggle the switch next to iCloud Photos to turn it on. Once enabled, your iPad will start syncing with your iCloud account, uploading any new photos and downloading those from other devices.
4. Choose Your Storage Option:
Similar to the iPhone, you can choose between Optimize iPad Storage and Download and Keep Originals. The former saves space on your iPad by storing lower-resolution copies, while the latter keeps high-resolution versions on your device.
b. Set Up iCloud Photos on Mac
Having your photos available on your Mac allows for easy editing, organization, and sharing. The larger screen and advanced photo editing tools on a Mac can enhance your photo management experience.
Follow these steps to enable iCloud Photos on your Mac:
1. Open System Preferences:
Click the Apple menu in the top-left corner of your screen and select System Preferences. If you’re using macOS Ventura or later, this will be called System Settings.
Select Apple ID at the top of the System Preferences window.
2. Select iCloud:
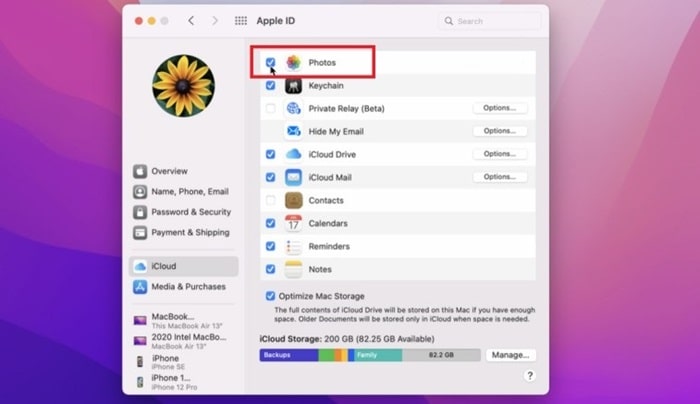
In the Apple ID settings, click on iCloud. You’ll see a list of iCloud features and services. Find Photos and check the box next to it.
3. Enter Your Password:
If prompted, enter the password for your Apple ID to enable iCloud Photos. Once activated, your Mac will start syncing photos with your iCloud account.
You can view your photos in the Photos app on your Mac.
4. Configure Additional Settings:
Open the Photos app on your Mac, go to Photos > Preferences > iCloud.
Here, you can choose between Download Originals to this Mac and Optimize Mac Storage, depending on your storage preferences.
c. Set Up iCloud Photos on Apple TV
Apple TV isn’t just for streaming video content; it can also be a great way to view your photo library on a large screen. Setting up iCloud Photos on Apple TV allows you to enjoy slideshows and share memories with friends and family.
Here’s how to enable it:
1. Go to Settings > Users and Accounts:
Open the Settings app on your Apple TV. Select Users and Accounts from the list.
2. Select iCloud:
Choose iCloud under the user account you want to configure. Ensure you’re signed in with your Apple ID.
3. Turn on iCloud Photos:
Toggle the switch next to iCloud Photos to enable it. Once enabled, your iCloud Photo Library will be accessible from the Photos app on your Apple TV.
4. View Your Photos and Videos:
Open the Photos app on your Apple TV to start viewing your synchronized photos and videos. You can create and view slideshows, browse by albums, and enjoy your memories on a larger screen.
d. Enable iCloud Photos on Windows PC
Download the Free iCloud for Windows App from the Microsoft Store:
- Click the Start button and select the iCloud shortcut
- Sign in with your Apple username and password
Configure iCloud Photos:
- Click the Options button next to Photos
- Enable iCloud Photos and Shared Albums (if you want to share your albums and access other shared albums)
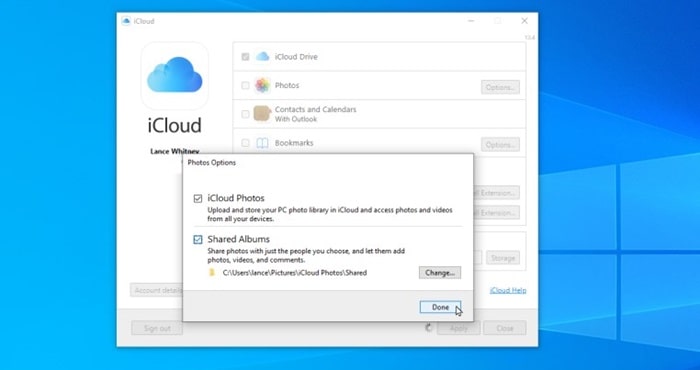
- Click Done, then select Apply
- You can view your iCloud photos in File Explorer by navigating to Photos\iCloud Photos\Photos
Conclusion
Backing up and syncing your iPhone photos with iCloud is a straightforward process that ensures your memories are safely stored and accessible across all your devices. By following the steps outlined above, you can easily manage your storage needs and keep your photos organized.
Whether you’re using an iPhone, iPad, Mac, Apple TV, or Windows PC, iCloud provides a reliable solution for photo backup and synchronization.


