

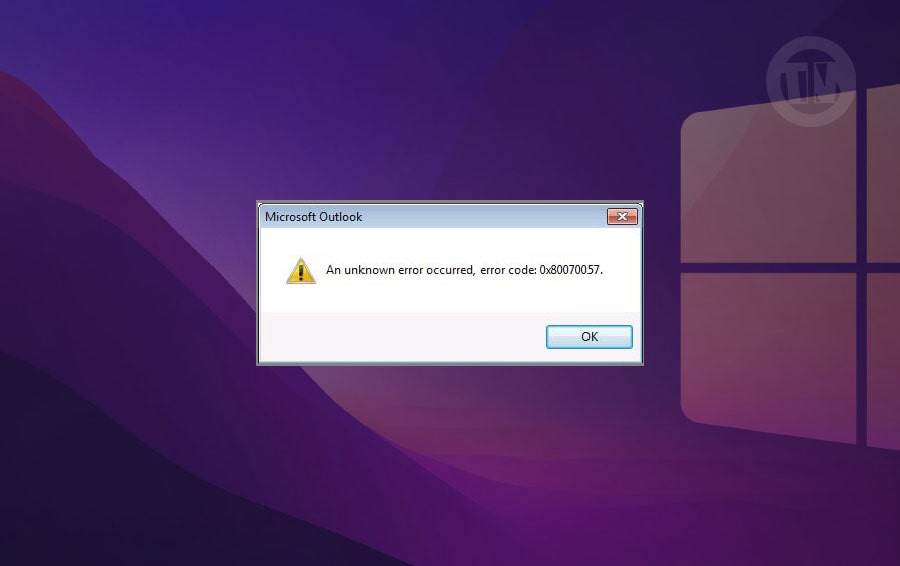
Windows error codes can be very confusing and downright frustrating. When you’re trying to install a Windows update or transfer some important files, you get the message “Error Code 0x80070057”.
There’s no explanation, no obvious fix—just a bunch of numbers and letters that can really ruin the mood.
These errors are one of those digital pests that have been around since the days of Windows 7, believe it or not. And yes, they can still appear on Windows 10 and 11 today.
So, if you’re encountering this strange combination of numbers, know that many others have experienced it too.
Now, what causes this strange error code? The answer isn’t as simple as we all hope. It turns out that 0x80070057 can appear for a variety of reasons, most of which are related to storage or update issues.
Whether you’re installing a completely new version of Windows, backing up your data, or simply updating your Outlook profile, this little hiccup can pop up and cause a hassle.
Of course, having an error doesn’t mean it can’t be fixed. With the right info and a little patience, you can fix it yourself (and you’ll find it in this tutorial). That’s why I’ve written this article, as a solution to fix Error 0x80070057 properly—step by step.
But, let’s talk about the cause first—so you can understand what’s wrong before we get into how to fix it.
Causes of Error Code 0x80070057
Here are some possible causes of error Code 0x80070057, if you know, you can diagnose it..
1. Not Enough Free Space on the Drive
Sometimes the problem is as simple as your drive being full. If there’s not enough space for an update, installation, or backup, Windows will just give up and give you this error.
2. Incorrect File System Format
Trying to back up data to a drive formatted in the wrong file system—like FAT32 when NTFS is required—can also trip this error. Windows needs things to be just right when it comes to file formats.
3. Corrupted Disk Partitions
If a partition on your hard drive is corrupted, Windows might struggle to write files to it or read from it—leading to error 0x80070057. This is especially common if your PC shut down suddenly or you’ve got a very old drive.
4. Failing Hard Drive or SSD
When hardware starts to go bad, weird things start happening. And yes, this error can be one of them. If your hard drive is on its last legs, Windows might not be able to read or write data properly.
5. Problems During Windows Updates
Sometimes Windows just messes up its own updates. The files get corrupted, or something goes wrong halfway through the process, and the result? You guessed it—this error.
6. Large App Installation Issues
Big applications sometimes fail to install if the system doesn’t have enough space or the installation process hits a snag with system permissions or corrupted registry entries.
7. Outlook Profile Errors
If you’re setting up Outlook and get hit with this error, it could be a registry problem or storage issue again. Either way, it’s not fun.
8. General Storage Glitches or Malware
Sometimes the problem is hidden in the background. Malware for example, can corrupt system files or block normal disk usage, causing this error without you even realizing it.
So yeah, it’s a bit of a mixed bag. The causes vary, but at the core, it almost always comes down to storage, file integrity, or system conflicts.
How to Fix Error Code 0x80070057
Okay, now how to solve the problem code 0x80070057, please try the 10 methods that I have prepared below..
1. Check That Date and Time
If your PC’s date and time are way off, Windows might start acting like it’s in an alternate timeline. And yep, that can totally lead to errors during updates or downloads.
So here’s the move..
- Head to your system settings
- Look for Date & Time
- Turn on Set time automatically and Set time zone automatically (if it’s off)
- Or just manually adjust the date and time if needed
Once that’s synced up properly, give whatever triggered the error another shot.
2. Run a Quick Hard Drive Check
Your hard drive is obviously trying to tell you something—but it can’t speak our language, so it displays an error code instead. If the drive has bad sectors or internal issues, Windows may have trouble accessing the data it needs, and unfortunately, error code 0x80070057 appears.
If this is the case, here’s what you can do..
- Open File Explorer, right-click the drive (usually C:), and select Properties
- Go to the Tools tab
- Click Check under the Error checking section

Windows will scan your drive and try to fix minor issues automatically. It might even ask you to restart—just follow the prompts and let it do its thing.
3. Clear Out Some Space
Running low on disk space? That alone could be the reason this error is haunting your system. Updates and installations need some space, and if your drive is jam-packed, Windows throws in the towel.
Here’s a quick cleanup guide..
- Hit Win + R, type
cleanmgr, and press enter - Choose your main drive (usually C:) and let Disk Cleanup do a scan
- Check off things like Temporary files, Recycle Bin, and System created Windows Error Reporting logs
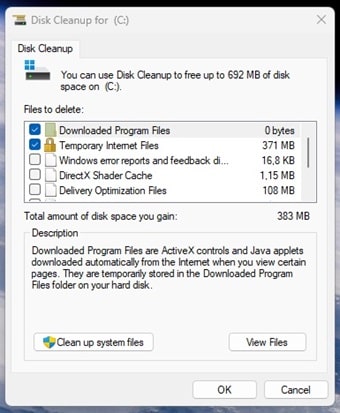
You can also go the manual route—uninstall apps you never use, delete old downloads, and move big files to an external drive or cloud storage.
4. Scan for Malware
Malware can be the culprit behind all sorts of system mayhem. It can mess with files, block updates, and even corrupt partitions.
If there’s a chance something suspicious is lurking on your system, it’s a good idea to run a full scan.
Use your preferred antivirus (Windows Defender is also good) and run a deep scan, not just a quick scan. Let the antivirus examine every nook and cranny of your system.
If anything shows up, quarantine or delete it—then try the task that caused the error again.
5. Use the System Update Readiness Tool (For Windows 7 Users)
Still using Windows 7? First of all, congratulations to those of you who are still using it. But yes, Windows 7 can be a pain when it comes to updates.
The System Update Readiness Tool is like giving your old OS a cup of coffee before asking it to do something important.
Here’s how..
- Go to Microsoft’s official site and download the System Update Readiness Tool
- Install it, run it, and let it check for inconsistencies or missing files
This tool doesn’t just diagnose—it often fixes minor issues along the way too.
6. Run a CMD Command
If you’re on a more modern version of Windows, the DISM tool is your best bet when updates fail or system files go haywire. It’s a bit fiddly, but don’t worry—it’s just a matter of copying and pasting.
Here’s what to do..
- Open Command Prompt as administrator. Just search for “cmd”, right-click, and hit Run as administrator
- Type this in and press enter:
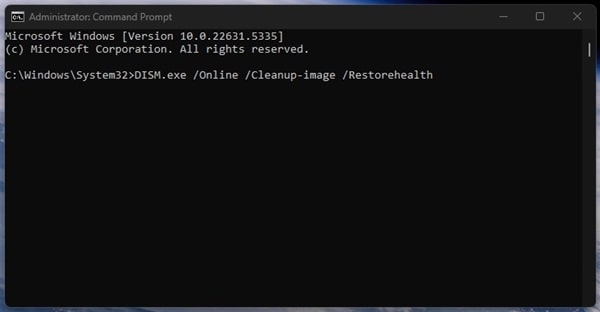
DISM.exe /Online /Cleanup-image /Restorehealth - Let it do its thing—it might take a while
Once it finishes, go ahead and run another command:sfc /scannow
That second command will scan your system files and repair anything corrupted. Together, they’re like a system detox.
7. Use System Restore
Still no luck? Sometimes the best fix is just to rewind your PC to a time when things were working fine. If that’s the case, you can use the System Restore feature.
Here’s how to do it..
- Search for “System Restore” in your start menu
- Choose a restore point before the error started showing up
- Follow the wizard—it’ll handle the heavy lifting
notes
it may undo recently installed apps or drivers. Your personal files will stay safe, but your system settings and apps might take a step back.
8. Reset Windows
If restore points don’t solve the issue, it might be time for the big guns—resetting Windows. Thanks to newer versions of Windows, this process is much smoother than it used to be.
Here’s the reset path..
- Go to Settings > Update & Security > Recovery
- Under Reset this PC, hit Get started
- Choose whether to keep your files or wipe everything clean
If you’re keeping files, Windows will reinstall itself while saving your documents. Still, back up the important stuff—just in case things go sideways.
9. Delete Partitions and Do a Clean Install
If none of the above methods work, it may be time to do a full reset. We’re talking about wiping the drive, deleting partitions, and installing Windows from scratch.
It may be complicated, but sometimes it’s the only way to fix a severe system crash.
Here’s the basic idea..
- Use a bootable USB installer for Windows
- During setup, delete the existing partitions when asked where to install Windows
- Let the installer recreate the necessary partitions
This option gives you a totally clean slate—but again, back up everything important before you start.
10. Swap Out That Hard Drive
Let’s be realistic—sometimes the hardware just isn’t working as it should. If your drive is old, noisy, or has been displaying SMART errors, replacing it could save you a lot of trouble down the road.
If you’ve tried every fix I’ve outlined and nothing has worked, this may be the root of the problem.
My advice: go for a solid-state drive (SSD) for better performance. Clone your old drive if possible, or reinstall Windows on a fresh new drive.
Conclusion
Here we are at the end of the Error Code 0x80070057. I’ve explained why it happens, and most importantly—how you can fix it.
While it may seem like a major technical issue, the truth is, it can often be fixed with just a few simple steps. If you’re not sure or don’t have the time to handle it yourself, it’s always a good idea to call in a professional.
But more often than not, with a little patience and the right guidance (like this one), you can get things running smoothly again without having to call tech support.


