

Hey guys, let’s be honest—sometimes the default fonts on our Windows PC just don’t cut it right? Whether you’re designing something for work, editing a resume, making a presentation pop, or just tired of the same old Calibri and Times New Roman, custom fonts can seriously level things up.
But not everyone knows how to actually get new fonts onto their computer. And if you’ve thought where to find cool fonts that won’t cost me a fortune, well you’re definitely not alone.
A lot of people assume they need to pay for every nice-looking font they see online, but there are tons of high-quality, free fonts out there just waiting to be downloaded. Yup, you can get that aesthetic you’re craving without dropping a single dime.
How to Install Fonts on Windows 11/10
Alright guys, now that you’ve found that perfect font—there are a few different ways to install fonts on Windows 11 or Windows 10, depend on what you’re comfortable with and how your system’s set up. So, if you don’t know how to install new fonts for Windows 10 or 11, keep reading the method I explain below..
1. Installing Fonts Using the Source File
If you’ve downloaded your dream font from a site like Google Fonts, DaFont or wherever. Chances are, it came in a .zip file, right? That’s totally normal, fonts usually come packed up neatly like that so you get all the goodies in one place.
Let’s get that font installed..
- First, right-click on the zip file you just downloaded, then choose Extract All…. This will unzip the folder and give you access to the actual font files inside.
- Inside that folder, look for files that end in .ttf or .otf. Those are the actual font files Windows understands. Generally speaking, .ttf (TrueType Font) and .otf (OpenType Font) both work fine for most people, just go with whatever’s in there.
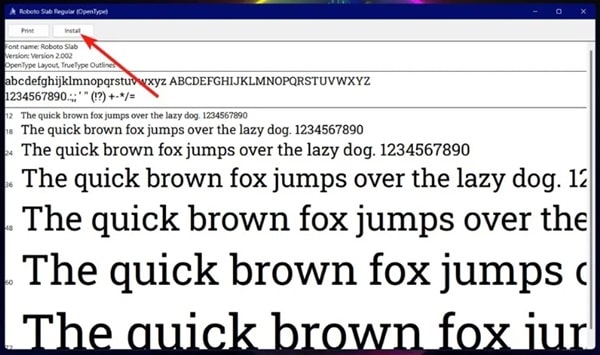
- Double-click on the font file you want. A new window will pop up, showing you a preview of what the font looks like—uppercase, lowercase, numbers, symbols, the whole vibe.
- At the top left corner of that preview window, you’ll see a button that says Install, you can click it.
Want to save more time? If you know which font you want without needing to preview it, just right-click on the font file and choose Install or Install for all users (if you want everyone on your PC to be able to use it).
The whole process may take about five seconds. And once it’s done, your new font is ready to roll in apps like Microsoft Word, Photoshop, PowerPoint, and more.
If the font comes in multiple versions like bold, italic, or light—repeat these steps for each file so you can use all styles.
2. Installing Fonts Using Settings on Windows 11
If you want to install fonts using Windows Settings—no worries, you can do that too. Microsoft has been slowly moving stuff away from the Control Panel, and fonts have followed that trend too.
Here’s how you install fonts straight from the Settings..
- Hit the Windows key, then type “Settings”, or just press Windows + I to open it up quickly.
- On the left sidebar, click on Personalization. That’s where all your design and display options live.
- Scroll down a bit and you’ll see Fonts on the right side—click it.
- You’ll see a little drag-and-drop area that says “Drag and drop to install”.
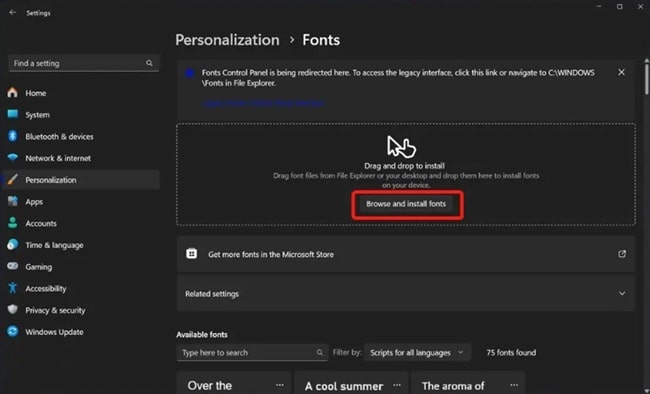
- If you’ve already unzipped your font files like we talked about earlier, just drag those .ttf or .otf files straight into this box. Alternatively, click Browse and install fonts, navigate to the folder where you unzipped the files, and select the font you want.
And Windows will install it, then you’ll see the font appear in your list of available fonts immediately. No reboot required, this method’s great if you prefer a cleaner, app-based approach or just want to avoid poking around in folders.
3. Installing Fonts Using Control Panel on Windows 10
Now, for those of you who are still hanging onto Windows 10, or maybe just prefer the classic interface, you can totally still use the Control Panel to install fonts. Here’s how to do it..
- Click the start menu and type “Control Panel”, then hit enter on keyboard.
- Once inside the Control Panel, go to Appearance and Personalization, then click on Fonts.
- This will take you to a page showing all the fonts currently installed on your system. It’s like a mini library of everything your computer can use.
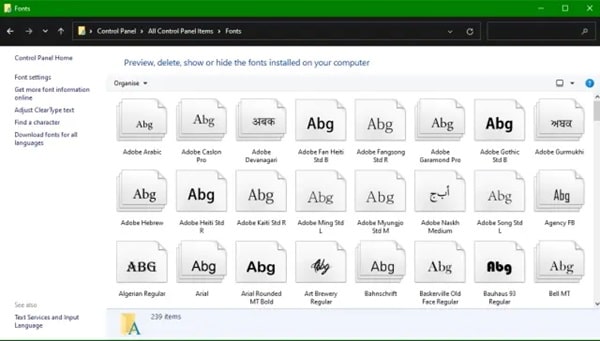
- Now open up the folder where you extracted your downloaded font. Simply drag and drop the
.ttfor.otffiles from that folder into the Fonts window.
Windows will automatically install the fonts for you as soon as you drop them in.
How to Download Fonts on Windows 11
If I have discussed various ways to install fonts for Windows above. And if perhaps some of you do not know the best way or place to download fonts, don’t worry, because I will also discuss it.
Of course when we have a design project or document, we want to make our project look more attractive. But where do you start?
Well, one of the most reliable places to go for free fonts is Google Fonts. It’s legit, safe, and offers hundreds of fonts with open-source licenses, meaning you can use them in both personal and commercial projects.
Here’s how you can get a fonts from Google Fonts..
- Go to https://fonts.google.com/
- Take your time browsing, bcs there’s a lot to choose from. You can filter by categories like Sans Serif, Serif, Display, Handwriting or Monospace depending on your style
- Once you find a font you like, click on it to open its page. You’ll see a preview and some details like styles and weights
- On the right-hand side, hit that download icon. It’ll package the font in a
.zipfile and save it to your Downloads folder (or wherever you save files)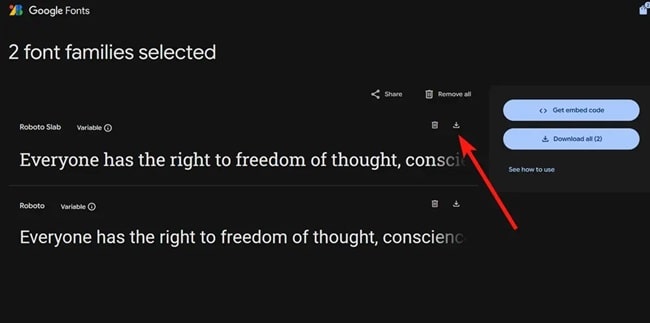
- Now, go ahead and extract the .zip file—you’ll find
.ttfor.otffont files inside - After that, you can jump into the font installation part, which we’ve already covered above (and yep, it’s super easy too—double-click the font file, hit “Install”, done)
And that’s basically it! You can repeat this process as many times as you want and start building your own font collection.
One cool thing about Google Fonts is that you can preview how your text will look before you even download anything. Just type your own sentence into the preview box on the font’s page—great for seeing if it fits your vibe or project before you commit.
Also, if you’re someone who works across multiple devices, you can sync your downloaded fonts using cloud storage like Google Drive or Dropbox. By that way, you’re never stuck without your favorite font—even on a fresh install.
What If You’re Using Windows 10?
No worries at all—these steps still work, Google Fonts doesn’t care which version of Windows you’re using. The only small thing to keep in mind is that some font installation methods using the Settings app might look a bit different in Windows 10.
But worst-case scenario, you can always go the Control Panel route, which is still very much alive in Windows 10. Just drag and drop the font file into the Fonts folder, and you’re set.
Conclusion
Downloading fonts on Windows 11 or 10 doesn’t have to be complicated or expensive. With resources like Google Fonts, you’ve got a whole world of typefaces at your fingertips.
Custom fonts are more than just aesthetic upgrades—they help you communicate better, express personality, and make your projects stand out. And now that you know how easy it is to download and install them, there’s no reason not to give it a try.


