


Ever wondered how to manage remote servers without having to jump through hoops or install obscure third-party tools? Luckily, Microsoft thought ahead and packed something incredibly useful for IT admins and tech enthusiasts alike — it’s called RSAT.
Now, before we get into the nitty-gritty of installing and uninstalling it (don’t worry, I’ll walk you through it step by step), let’s take a moment and familiarize ourselves with what RSAT actually is. Because, let’s face it — jumping straight into PowerShell commands without knowing what we’re doing is a recipe for stress right?
Well, at least I will explain a little bit first before going into how to install and uninstall RSAT, so please just listen for a moment..
What is RSAT?
So, RSAT stands for Remote Server Administration Tools. It may sound a bit formal, but think of RSAT as a complete remote control for handling various Windows Server roles and features — from the comfort of your own Windows 11 computer.
Instead of having to physically log into your server or access it remotely every time you need to change a setting or check on a service, RSAT lets you manage things like..
- Active Directory (AD) — for managing users, groups, and computers on a domain
- DNS and DHCP — for all things IP address-related
- Group Policy — for setting rules across a bunch of machines
- File Services, Hyper-V, and a bunch more techie stuff that makes sysadmins’ lives easier
FYI, you don’t need to download RSAT from the website, because since Windows 10 version 1809, and now with Windows 11, RSAT is already built into the OS — it’s just turned off by default. Which means RSAT is there, and ready to go once you enable it.
RSAT isn’t just one tool, either — it’s a collection of specific utilities, you can pick and choose exactly which ones you need. So, if you just want to set up DNS and don’t want anything else, just pick what you need and install it.
So in short, RSAT is a powerful tool for managing Windows Server, right from your Windows 11 computer. No hassle, no additional software, just the tools you need to get the job done.
How to Install and Uninstall RSAT in Windows 11
1. Installing RSAT from Windows 11 Settings
First method — you can install RSAT from the Windows 11 Settings app. This method is perfect if you’re not too keen on the command line stuff and just want to get things done with a few clicks.
First, pop open your start menu and click on the settings icon — or just type “Settings” into the search bar and hit enter. Once you’re inside the settings menu, look over to the left side and click on System.
Then, scroll down until you find a section called Optional features. Inside Optional Features, you’ll see a button that says View features under the Add an optional feature section, just click that.
In the little search box that pops up, type in “rsat” and let it load. What you’ll see next is a list of all the RSAT tools that Windows has to offer.
These might include things like..
- RSAT: Active Directory
- RSAT: DHCP Server Tools
- RSAT: DNS Server Tools
- RSAT: File Services Tools
- And more…
Basically, Microsoft breaks RSAT down into bite-sized tools so you can install only what you need.
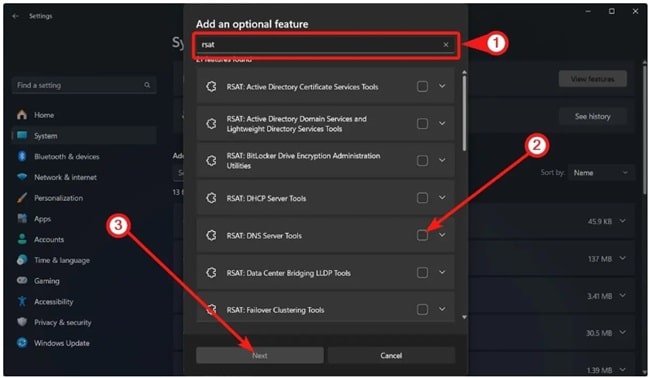
Now, tick the checkboxes next to the tools you want to install. Also you can always come back later and add more if you missed something.
Once you’ve made your choices, click Next, and then hit Add.
Windows will start downloading the selected RSAT components in the background. Depending on your internet speed and how many tools you’re adding, this might take a few minutes.
Once it’s done, you’ll see your newly installed RSAT tools listed under Installed features. Click the Sort by dropdown and choose Date added — that way, you’ll see your most recent installations right at the top.
And if you want to double-check where a certain RSAT tool was installed or how to launch it, just search for its name in the start menu — it usually shows up with its own management console or configuration utility.
2. Installing RSAT Using Windows PowerShell
For the second method, if you prefer typing commands like a techie, this section is for you. Using PowerShell to install RSAT gives you more control and is especially useful when you are managing multiple machines or setting up scripted deployments.
Here’s how to do it step by step..
Hit the start menu and type in “powershell”, and when you see Windows PowerShell, right-click it and choose Run as Administrator. You’ll probably get a prompt asking for permission — just click Yes.
With the PowerShell window open, let’s get a full list of all the RSAT tools that are available (and whether they’re already installed or not). Copy and paste this command into the terminal and press enter..
Get-WindowsCapability -Name RSAT* -Online | Select-Object -Property DisplayName, State
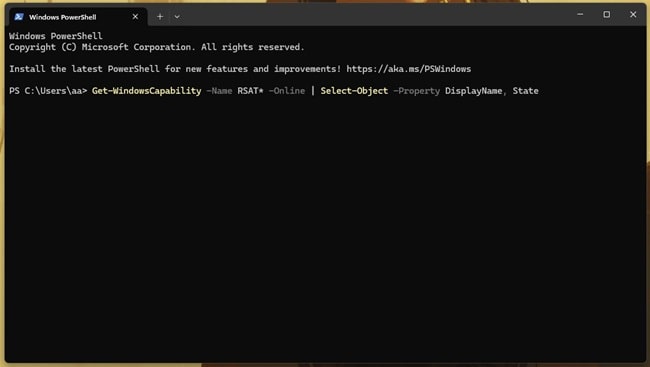
This will show you something like:
- RSAT: DHCP Server Tools — NotPresent
- RSAT: DNS Server Tools — Installed
- RSAT: Group Policy Management Tools — NotPresent
You can now see exactly what’s available and what’s already on your system.
To install one specific RSAT feature, you’ll need to plug its exact capability name into the next command. Let’s say you want to install the DHCP tools, you’d run:
Get-WindowsCapability -Name 'Rsat.DHCP.Tools~~~~0.0.1.0' -Online | Add-WindowsCapability -Online
Just swap out the name with the feature you want.
The installation will take a few seconds to a couple of minutes depending on your system and internet. Once it’s done, you can again verify installation by running the first command or by simply searching for the tool in your start menu.
PowerShell is especially useful if you’re installing the same tools across multiple machines — just save the commands into a script.
3. How to Uninstall RSAT on Windows 11
Maybe you’ve finished your server project. Maybe you installed a bunch of RSAT tools just to try them out and now you want to tidy things up.
Whatever the reason, uninstalling RSAT is just easy — and yes, you can do it from both Settings and PowerShell.
a. Uninstalling RSAT via Windows Settings
Let’s start with the GUI method again. Open Settings from the start menu, then go to System, and head down to Optional Features (yep, same place as when we installed RSAT earlier).
In the list of installed features, use the search bar to type in “RSAT”. You’ll get a filtered view showing only the RSAT tools you’ve installed.
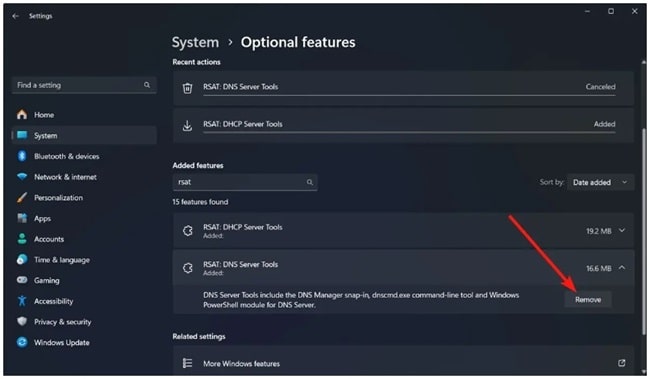
Now just click on the one you want to remove, and hit Uninstall. Give it a moment, and Windows will take care of the rest.
You can repeat this process for as many RSAT tools as you want to remove, no restart required in most cases.
b. Uninstalling RSAT Using PowerShell
If you want to uninstall RSAT via PowerShell instead, first, open PowerShell again as administrator.
Then use this command (replace the name with the RSAT tool you’re targeting):
Get-WindowsCapability -Name 'Rsat.DHCP.Tools~~~~0.0.1.0' -Online | Remove-WindowsCapability -Online
From this example, will remove the DHCP tools from system. Just like the installation command, you can substitute any other RSAT feature name you want to uninstall.
Conclusion
Let’s face it, managing servers isn’t always smooth sailing — especially when you’re doing it from a client computer. But with RSAT on Windows 11, things can certainly get easier.
No need to jump between computers or RDP sessions just to check settings or reset user passwords. Everything you need can literally be done with just a few clicks (or a few PowerShell commands).
Plus, for IT admins out there who manage multiple systems or entire fleets of computers, knowing how to script RSAT installations and removals via PowerShell can really boost your capabilities.


