

Have you ever tried using an Apple Pencil? If you’re someone who loves creativity, note-taking, or even just doodling on your iPad, then the Apple Pencil is something you should definitely explore.
It’s like a magic wand for your iPad, allowing you to do so many things that you couldn’t do with just your fingers. From sketching a quick drawing to making professional-level art, it’s become a must-have tool for many creatives and tech enthusiasts.
But wait, what exactly is an Apple Pencil, and what makes it so special? Let’s dive into that and discover how this little gadget can transform your iPad experience, whether you’re an artist, student, or someone who just enjoys writing notes.
What is Apple Pencil?
Simply said, the Apple Pencil is a super-smart stylus meant especially for iPads. Unlike a standard stylus you might have used in the past, this one is loaded with sophisticated tools that give the impression of a real pencil or pen.
It’s quite exact, so you can write easily, create intricate doodles, or even move your iPad in a natural and simple manner.
There are two versions of the Apple Pencil: the first-generation and the second-generation, with the Apple Pencil Pro being part of the newer and more advanced range.
What distinguishes the second-generation pencil? Double-tapping to switch tools, customizing gestures, and even wireless charging by just hanging it on the side of your iPad are among the extra capabilities. That is quite cool.
People adore the Apple Pencil in part because of its adaptability. For those who wish to sketch and paint on a digital canvas, it’s ideal; but, it’s also great for students who must mark papers, take notes, or even edit documents.
The Pencil is an amazing tool regardless of your use since it fits your workflow. It’s all the more fascinating as it feels as responsive as a genuine pencil or pen.
But what about the Apple Pencil Pro? This version carries even more tricks just under its surface. From sophisticated gesture controls to customisable buttons, it provides far more freedom to work the way you choose.
The Apple Pencil Pro speeds and improves your drawing, writing, even app controlling with a flick of the wrist.
14 Must-Know Apple Pencil Pro Tips
This little tool is packed with features that can take your iPad experience to a whole new level. Whether you’re an artist, note-taker, or someone who just loves to doodle, knowing these tips will make your time with the Apple Pencil Pro so much more fun and efficient..
1. Customize Your Pencil Actions
Did you know that you can customize the actions on your Apple Pencil Pro? Yup, no need to stick with the default settings!
You can change what happens when you squeeze or double-tap the pencil’s barrel. Normally, squeezing brings up the tool palette, and double-tapping switches between the current tool and the eraser.
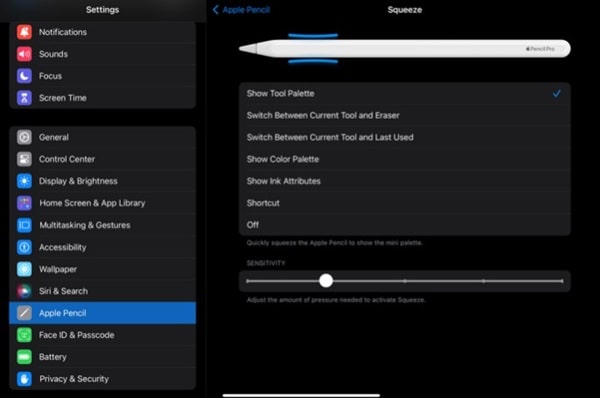
But why stop there? Head over to Settings > Apple Pencil Pro, and you’ll find a bunch of options. You can set the squeeze to do things like switching tools, showing the color palette, or even triggering a Siri shortcut.
Double-tap can also be adjusted to match whatever works best for you. It’s all about making the Apple Pencil Pro work for your style!
2. Adjust Pencil Gestures
Here’s a cool one—did you know you can change how the Pencil Gestures work? If you swipe diagonally from the bottom-left or bottom-right corner of your iPad screen, certain actions are triggered, like opening a quick note or taking a screenshot.
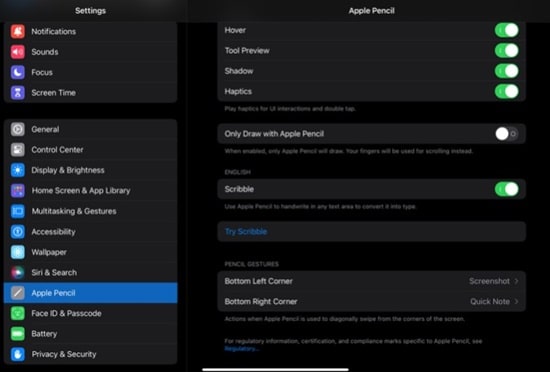
But guess what? You don’t have to stick with these defaults. Go into Settings > Apple Pencil Pro > Pencil Gestures and switch up what those swipes do, or turn them off entirely if they’re not your jam.
3. Practice with Apple Pencil Pro Features
New to the Apple Pencil? No problem! You can get some hands-on practice with its features straight from the settings.

Just go to Settings > Apple Pencil Pro and hit Try Scribble. This will help you get used to how the pencil works with different apps. You can:
- Try Handwrite, which lets you write out words that convert into editable text.
- Delete lets you erase text by scratching it out with the pencil—like magic!
- Select allows you to draw a line through words to highlight them.
- With Insert, you can tap and hold to insert words where you need them.
- And for something fun, Join allows you to link two selections by drawing a vertical line between them.
These practice tools are super helpful for getting the hang of the Apple Pencil Pro quickly.
4. Convert Handwriting into Text
If you’re someone who loves taking notes or writing by hand, this feature will blow your mind. The Apple Pencil Pro can instantly convert your handwritten notes into editable text.
Here’s how it works:
- Open the palette and tap the pencil with the little A on it.
- Start writing, and voilà! Your handwriting is transformed into text right in front of your eyes.
No more worrying about sloppy handwriting—this is a game-changer for students, professionals, or anyone who prefers writing by hand.
5. Draw Lines or Shapes
Whether you’re sketching, diagramming, or just drawing for fun, this feature is super handy. You can easily draw lines or shapes by selecting the pen tool from the bottom palette.
You’ve got options too—choose between a thin or thick pen, or even a marker. You can also switch up the colors with just a tap. It’s like having a full set of art supplies at your fingertips!
6. Erase Objects with Ease
Made a mistake? No problem, with the Eraser tool, you can easily erase any lines, shapes, or objects you’ve drawn. Just tap the Eraser on the toolbar and swipe over what you want to get rid of.
It’s as simple as that!
7. Select and Modify Objects
The lasso tool is your best friend when it comes to selecting and moving objects on your screen. Simply tap the lasso tool (it’s right next to the eraser), and draw a circle around whatever you want to select.
After that, you can move, resize, or even change the color of your selection. It’s perfect for tweaking your artwork or notes without starting over.
8. Draw a Perfect Straight Line
If you’re someone who loves precision, you’re going to love the Ruler tool. Want to draw the perfect straight line? Just tap the Ruler tool and position it on your screen using your fingers.
Now, draw along the edge to create a flawless straight line. When you’re done, just tap the ruler again to remove it. It’s great for technical drawings or neat designs.
9. Access More Tools with a Tap
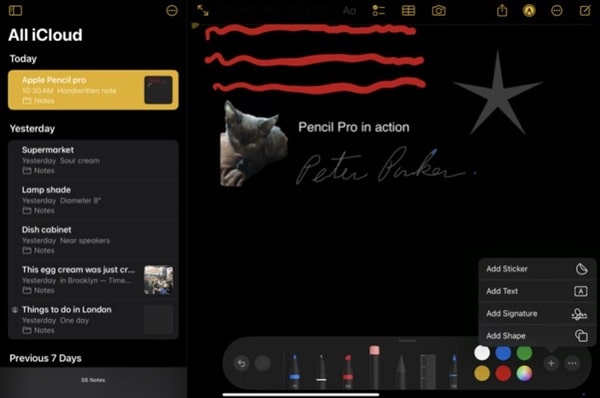
Need more tools? You’ve got them! Just tap the plus (+) icon on your toolbar, and you’ll see a whole menu of additional goodies like stickers, text boxes, signatures and shapes.
You can also access more advanced settings by tapping the ellipsis (•••) icon, allowing you to fine-tune how your Apple Pencil Pro works.
10. Undo or Redo in Seconds
Made a mistake or want to go back a step? Easy peasy. Just tap the Undo icon on the palette to reverse your last move.
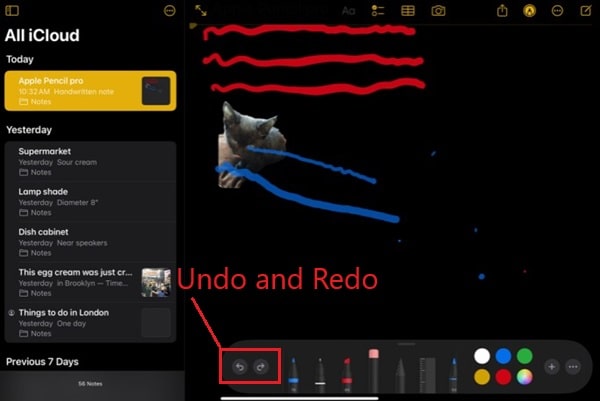
Want to redo what you just undid? Tap the Redo icon and you’re back where you started. No stress, just smooth and quick adjustments.
11. Quick Access to Pencil Pro Palette
Speed is everything right? Well, you can access the Pencil Pro Palette faster by simply squeezing the barrel of your Apple Pencil Pro. A smaller version of the palette will pop up, allowing you to select tools quickly.
If you tap a tool again, you can adjust options like stroke thickness or color without interrupting your workflow.
12. Change Line Thickness with Pressure
Here’s something cool: the Apple Pencil Pro is pressure-sensitive, meaning the harder you press, the thicker your lines will be. Light strokes create thin lines, while more pressure results in thicker lines.
This feature is perfect for artists who want full control over their strokes or anyone who loves the feel of sketching with different line weights.
13. Switch Between Two Tools Instantly
Double-tap the barrel of your Apple Pencil Pro to switch quickly between two tools, like the pen and eraser. A small thumbnail in the corner will show you which tool is currently selected, so you always know what you’re working with.
This makes switching tools a breeze, especially when you’re deep into a project and don’t want to break your flow.
14. Hover for Precision Drawing
Precision is key, and with the hover feature, you can see exactly where your pen or eraser will land on the screen. When you hover the pencil tip close to the screen, a small shadow appears, giving you a preview of where your mark will be.
This is especially useful when you need to start drawing in a specific spot. It’s all about accuracy and making sure your work turns out exactly how you want it.
Conclusion
Apple Pencil Pro is more than just a stylus. It’s an incredibly powerful tool that can help you unleash your creativity and productivity, whether you’re drawing intricate artwork or simply jotting down some quick notes.
The more you use it, the more you’ll appreciate how much easier it makes your work. From the customizable gestures to the seamless integration with iPadOS, it’s designed to be as intuitive as possible, making it a joy to use.
So if you’re someone who enjoys creating, or if you’re looking for a way to make your digital life a bit easier, the Apple Pencil Pro could be just the gadget you need. Give it a try—you might be surprised at just how much it changes your iPad experience.


