

Have you recently tried to launch a game or app and found yourself with the “MSVCP140.dll is missing” notification? Yep, it’s definitely annoying. One second you’re ready to start a gaming session or complete your to-do list, and the next, Windows 11 is showing you this error.
If you’re not a tech-savvy person, seeing something like MSVCP140.dll might make you feel like your PC is speaking a foreign language. But don’t worry, this issue is more common than you might think, and it’s not as scary as it sounds.
That’s why I’m going to talk about what exactly this MSVCP140.dll file is, why it might be missing, and most importantly—how you can fix the error and get back to using your PC like normal..
What is MSVCP140.dll?
MSVCP140.dll is simply a file that your Windows system (especially Windows 11) needs to help certain apps and games work properly.
Think of it like building blocks, you know how Lego sets need certain pieces to fit together to form the desired shape? Well, it’s the same idea here. Without these specific blocks, some programs won’t run—or worse, they’ll just crash.
The ‘MSVCP’ part stands for Microsoft Visual C++, and this file is part of something called the Visual C++ Redistributable package. Developers use Visual C++ to create programs that run on Windows, and when they build those programs, they assume your computer has all the files (or “runtime libraries”) it needs to run them.
The problem is—MSVCP140.dll isn’t included with every application; it’s more like an ingredient shared by many recipes. Microsoft puts it in a single package (the Visual C++ Redistributable) and expects applications to include it or trust that your system has it installed.
Now, if that program is missing—whether due to a bad installation, system corruption, or you never installed it in the first place—of course Windows will pop up a notification that says “This program can’t start because MSVCP140.dll is missing”.
That’s not your fault. It just means your PC is missing a small piece—and an important one. Luckily, the fix isn’t hard, and once you know where to look, the problem can be solved in a matter of minutes.
How to Fix MSVCP140.dll Is Missing on Windows 11
Now, to solve this problem, you can try the 5 methods that I have summarized below..
Method 1: Install the VCRedist Package
The first and easiest method is to install the VCRedist package, because it is possible that MSVCP140.dll is not installed or is missing. And the good news is, if the game or application you are trying to run is built correctly, there is a good chance that the MSVCP installation file is already there where you just need to find and install it.
- Open the Game or App Folder
First, head over to the installation folder of the app or game that’s acting up. If you’re using platform like Epic Games Launcher, just find the game, click on the three little dots next to it, and select Manage.
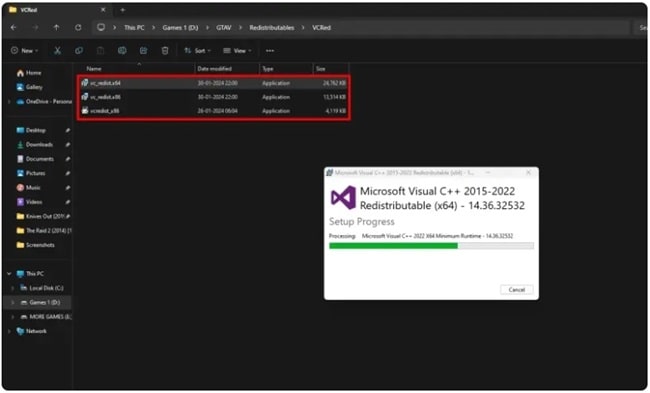
That’ll lead you to the actual folder where the game is installed. - Look for the “Redistributables” or “VCRedist” Folder
Once you’re logged in, look for a folder called Redistributables or VCRedist.- For example, in GTA 5, you’ll find it under Redistributables > VCRedist. Other games like Red Dead Redemption 2 have something similar.
- In some games like Honkai: Star Rail, the setup file might just right in the root folder.
- For example, in GTA 5, you’ll find it under Redistributables > VCRedist. Other games like Red Dead Redemption 2 have something similar.
- Install the VCRedist Files
When you find the vcredist installer—usually an .exe file—go ahead and double-click it to install it. You may see more than one (usually an x86 and x64 version), just install both to be safe.
Some games require one, some require the other, and some require both. - Try Running the App Again
After installation, give your app or game another shot. If all went well, the annoying “MSVCP140.dll is missing” error should be gone.
So, yes—this method is fast and effective if the developer has included the required files, you don’t even need to download the required files.
Method 2: Install Visual C++ Manually
What if you’ve looked in the game folder and can’t find anything that resembles “vcredist”? Don’t worry—it just means the app doesn’t include the necessary tools. And of course, you can get the Visual C++ Redistributable files directly from Microsoft’s official website.
Here’s how to do it..
- Visit the Microsoft Download Page
Open your browser and head over to Microsoft’s site, you’ll want to search for the latest Visual C++ Redistributable for Visual Studio 2015–2022.
Or you can just go here https://learn.microsoft.com/en-us/cpp/windows/latest-supported-vc-redist - Download Both Versions (x64 & x86)
Once you’re on the page, scroll down a bit and you’ll see two links:- One for vc_redist.x64.exe
- One for vc_redist.x86.exe
Download both, even if your system is 64-bit, some apps are weird and still rely on the 32-bit version too.
- Install the Packages
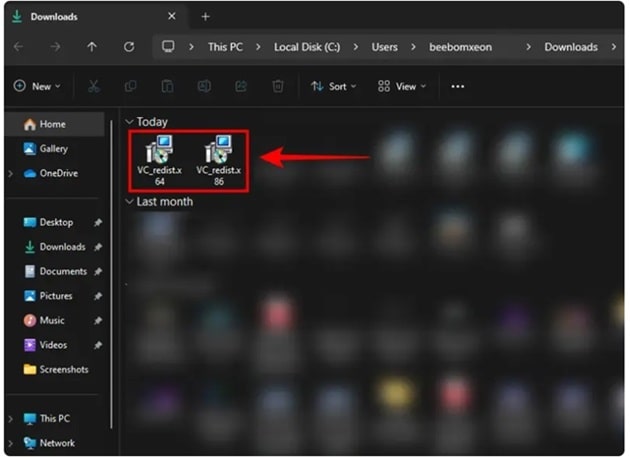
Open your downloads folder, double-click both installers one by one, and follow the on-screen instructions. If the system tells you that Visual C++ is already installed, it may give you the option to Repair, do so. - Restart & Check
After installation, restart your PC (just to be safe), and then try launching the app or game that was throwing the DLL error.
Still getting the same error? It could mean that the application you’re running relies on an older version of the Visual C++ package. Some applications do require older versions, so what you can do is…
- Go back to the same Microsoft page.
- Scroll down further until you find an older version like Visual C++ 2010, 2012, or 2013.
- Download and install that version as well—again, both x86 and x64 if available.
Each version of Visual C++ Redistributable includes different versions of the MSVCP140.dll (and its friends like VCRUNTIME140.dll). Some programs only work with a specific version, so having multiple installed isn’t just okay—it’s actually kind of the norm.
Method 3: Run SFC & DISM Commands
If the reinstallation method as before doesn’t fix the MSVCP140.dll error, you may need to check and repair your Windows system yourself.
Because it’s possible that the problem isn’t just a missing application or DLL file—there could be something deeper in the system files that are damaged or corrupted. And to fix this, you can use two built-in Windows tools, namely DISM and SFC.
However, keep in mind—you’ll need an internet connection for some of these, as DISM sometimes pulls clean files directly from Microsoft’s servers.
Here’s how to use both tools..
Step 1: Open Command Prompt as Administrator
- First, press the Windows key + S on your keyboard to open the search bar.
- Type in “Command Prompt” or just “cmd”.
- When it pops up, right-click on it (or click the option with three dots) and choose Run as administrator.
Step 2: Start with the DISM Commands
DISM stands for Deployment Imaging Service and Management Tool. Now, in the cmd window, type or paste these commands one by one, and press enter after each..
- First command:
DISM /Online /Cleanup-Image /CheckHealthThis one checks whether your Windows image is flagged as corrupted.
- Second command:
DISM /Online /Cleanup-Image /ScanHealthThis digs deeper and actually scans for any corruption within system files.
- Third command:
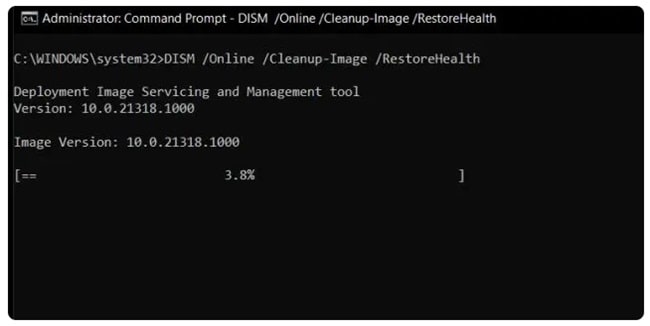
DISM /Online /Cleanup-Image /RestoreHealthThis is the real fix—it pulls fresh copies of any damaged files from Microsoft’s servers and restores your system image.
Be patient—this part can take a while depending on your system and internet speed.
Step 3: Run the SFC Command
Once DISM has finished fixing the issues, it’s time to use SFC (short for System File Checker) as a final check step to make sure everything is working properly.
Type this command in your CMD window:
SFC /scannow
This command will scan all protected system files and replace corrupted ones with healthy copies.
Method 4: Reinstall or Repair the Application
Sometimes, the problem isn’t Windows or its missing DLLs—it’s the application itself that’s having problems. Maybe a file wasn’t installed correctly, or something got corrupted during a software update.
Whatever the cause, the fix is actually pretty simple, just reinstall or repair the application. Here’s how you can do it..
- Open the App Settings
- Press Windows + S to open the search.
- Type in “Add or Remove Programs” and hit enter on keyboard.
- Find the Troublemaker App
- Scroll through your list of installed apps.
- Look for the specific one giving you the MSVCP140.dll error.
- Click the three dots next to it and choos Uninstall.
- Reinstall It
- If it’s a game, reinstall it using the launcher it came from (like Steam, Epic Games, or Battle.net).
- If it’s a regular app, go to the official website and download the installer again. Or if it came from the Microsoft Store, just re-download it from there.
Before you uninstall, check if there’s a Manage or Advanced Options button under the app. Some apps give you the option to Repair without fully uninstalling them, try that first—it might fix things without you needing to reinstall from scratch.
Method 5: Perform a System Restore
Okay, let’s say your app was working fine for a few days, and then all of a sudden this DLL error pops up. Think about what changed? Maybe you installed something, updated a driver, or Windows updated itself and messed things up.
From there, you can use System Restore. Like a time machine, you can revert your system to a previous state, like going back to a moment before something went wrong.
And it won’t delete any of your files—just your system settings, installed programs, and registry changes. Here’s how to use it..
- Press Windows + S, type “Create a restore point”, and press enter.
- In the System Properties window, click on the System Restore… button.
- You’ll see a list of restore points. Choose one that was created before the MSVCP140.dll error started showing up.
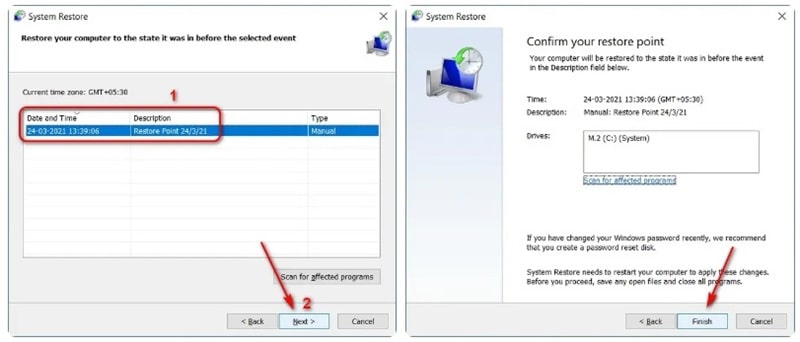
- Click Next, then Finish, and Windows will restart and begin restoring your system.
Even if you don’t remember creating a restore point, Windows often creates them automatically during software installs or updates. So you might already have one ready to go.
Conclusion
The “MSVCP140.dll is missing” error can be annoying, but it’s really just your computer asking for help. It’s simply missing a file it needs—a file that’s part of the Visual C++ Redistributable package required by apps and games.
Of course, as I’ve written, you can fix it yourself, using the methods I’ve listed. With a little patience and following the guide, you can get rid of this error and get your software running as it should.


