

Recording your screen in Windows 11 may sound like a task for tech geeks, but honestly, it’s a lot easier than you might think.
Whether you’re a gamer looking to show off your skills, a student trying to save that all-important online lecture, or someone who loves creating tutorials to share with people, screen recording is something you’re going to need sooner or later.
Now, Windows 11 actually gives us a few options to get it done — both built-in tools and some third-party features. No need to feel overwhelmed, because we’ll go through them together, step by step, in a fun and easy way.
Think of this guide as having a friend by your side, showing you how to do it. Okay, here I will share a list of recommendations for the best screen recording applications for Windows 11, along with how to use them.
How to Record Screen on Windows 11
Method 1: Recording Screen with Xbox Game Bar on Windows 11
Okay, for the first method, we have the Xbox Game Bar. Now, don’t let the name fool you — yes, this app is made specifically for gamers. But trust me, you can use it even if you’ve never touched a game in your life.
It’s actually one of Windows 11’s built-in tools that lets you record your screen without having to install anything (other than the Snipping Tool, but we’ll get to that later).
It’s super easy to use, but the Game Bar can’t record your screen if you’re just sitting on your desktop or fiddling around in File Explorer. You’ll need to open some app, like Chrome, Word, Spotify — whatever.
How to Record Screen with Xbox Game Bar
- First things first, open up an app — any app, just don’t stay on your desktop or in File Explorer.
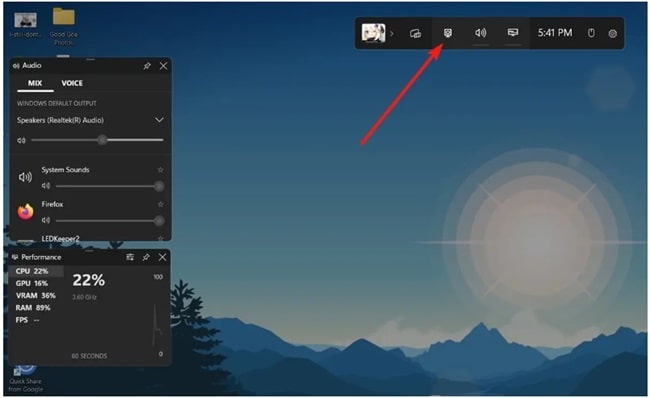
- Then, press the keyboard Windows + G. That should pull up the Xbox Game Bar overlay on your screen.
- Look for the capture option in the top bar that appears. Once you click Capture, a little floating window will pop up.
- Find the Record button (it’s the third button from the left — the one that looks like a regular “record” icon) and give it a click.
- When you’re done and you’re ready to wrap things up, hit the Stop button in that same little floating overlay.
After you stop recording, Windows automatically saves your video at:
C:\Users\yourusername\Videos\Captures
Method 2: Taking Things to the Next Level with OBS Studio
Okay, so the Xbox Game Bar is great for quick stuff, but what if you want a little more control? Maybe you want to record in super high quality, change settings, or even stream while you record?
Well the answer to all of that is OBS Studio.
OBS (short for Open Broadcaster Software) is like the Swiss Army knife of screen recording. It’s free, it’s powerful, and it’s trusted by gamers, YouTubers, pros — pretty much everyone.
How to Record Screen with OBS Studio
- GO to the official OBS Studio website in https://obsproject.com/.
- Download and install it like you would any other app.
- Once you launch it for the first time, OBS will ask you if you want to optimize it for recording only — choose Optimize just for recording > Next.
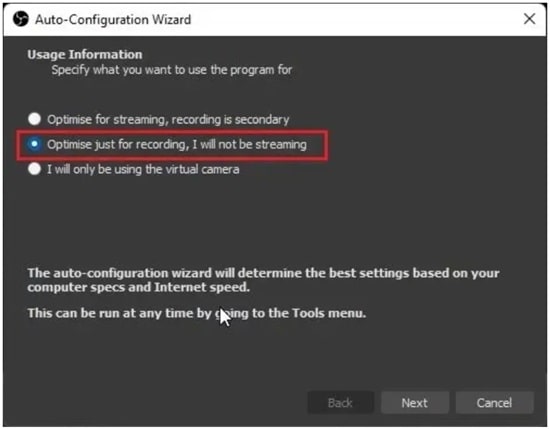
(Unless you’re planning to stream too, but that’s another story). - On the main OBS window, find the Sources panel — it’s usually at the bottom.
- Hit the + (plus) button and select Display Capture from the list.
- A window will pop up asking you to name the source. You can stick with the default or get creative, your call, then click OK.
- OBS will then show your entire screen in the preview.
Start and Stop Recording
- When you’re ready to roll, click that Start Recording button on the right-hand side.
- When you’re done showing off or explaining, click Stop Recording.
Where your recordings end, your videos will be saved on.. C:\Users\yourusername\Videos
You can also tweak the settings to save them elsewhere if you want, but for now, that’s the default spot.
Method 3: Using Microsoft PowerPoint to Record the Screen
Well, here’s a method that many people don’t even realize, Microsoft PowerPoint. Yes, the long-standing presentation app can also record your screen.
And if you’re a student or someone who already has an Office subscription (or gets it for free through your school or work), this app is a way for you to record your screen.
How to Record Screen with Microsoft PowerPoint
- Fire up Microsoft PowerPoint and create a new blank presentation (or open an existing one if you’re feeling fancy).
- Go to the Insert tab at the top menu bar.
- Look for the Screen Recording button and click on it.
- Your screen will dim a little, and you’ll be asked to select the area you want to record.
- Once you’ve picked your zone, click the Record button to start capturing.
Stopping and Saving
- When you’re ready to stop, use the shortcut Windows + Shift + Q.
- Your recording will automatically appear inside your PowerPoint slide.
- If you want the video as a standalone file (and not just stuck inside the presentation), right-click on it and choose Save Media As.
- Pick your save location, click Save, and you’ve got yourself an MP4 file ready to use however you want.
Method 4: Recording Your Screen Using the Snipping Tool on Windows 11
Okay, you know Snipping Tool right? That lightweight app that’s super handy for taking quick screenshots when print screen feels… too clunky?
Well, guess what — in Windows 11, Snipping Tool got a serious upgrade, it can now record your screen too. Yes, you heard that right — no more third-party apps if you just need a simple recording.
How to Record Screen with Snipping Tool
- First thing’s first, open up the Start menu and type “Snipping Tool” in the search bar. Click on it when it pops up.
- Once it’s open, look around for the little video camera icon. Yup, that’s the button that switches it from screenshot mode to recording mode.
- Hit the New button, and just like taking a screenshot, you’ll get to select the part of the screen you wanna record. Drag your mouse to highlight the area you need.
- After you’ve picked your region, go ahead and click the Start button to kick off the recording session.
When you finish up and stop recording, Windows will neatly save the file in this folder.. Videos\Screen Recordings
Method 5: Recording with Microsoft Clipchamp
Alright folks, let’s take things up a notch. If you’re looking for something a little more professional — like adding a webcam overlay, cutting out boring bits, or spicing things up — then Microsoft Clipchamp is definitely worth checking out.
Clipchamp comes built into Windows 11 (well, newer versions anyway), and it’s basically like a mini video editor + recorder.
How to Recording with Clipchamp
- First, open Clipchamp. If it’s not already installed, no worries — you can grab it free from the Microsoft Store.
- When you launch it, it’ll ask you to sign in with your Microsoft Account. After signing in, click on Create a new video.
- Then head over to the Record & create section.
- Hit Screen, and when you’re ready, tap the Record button.
- A pop-up will ask you if you want to record the entire screen, a specific window, or just a browser tab. Pick whatever suits your need and then hit Share.
Stopping and Saving
- When you’re done recording, simply click on Stop Sharing.
- Clipchamp will automatically save your raw recording into the Downloads folder — but heads up, it saves in WEBM format at first.
- If you prefer an MP4 (which is more universal and easier to work with), click on Save and Edit inside Clipchamp, then Export your video.
- Choose the quality you want (even the free version gives you up to 1080p, which is nice).
- After exporting, your MP4 file will be right there in the Downloads folder.
In the free version, you can only record up to 30 minutes at a time.
If you’re planning to record longer webinars or gaming sessions, you might need to chunk it into parts, or consider upgrading.
Method 6: Recording Screen Using ShareX
Okay, so for those of you who love open-source tools, love flexibility, and love to tinker with settings until everything feels just right, you’re going to LOVE ShareX.
ShareX isn’t just a screen recorder — it’s a complete package for everything screen capture and screen recording. It’s completely free, ad-free, and packed with a ton of awesome features.
How to Record Screen with ShareX
- Head over to the official ShareX website in https://getsharex.com/ or the Microsoft Store and download it.
- Go through the usual install process.
Once installed, it might feel a little overwhelming at first because wow, there’s a LOT packed into this tool. But don’t worry, we’re sticking to the basics for now.
- Open up ShareX.
- Look to the left sidebar and click on Capture.
- In the dropdown, pick Screen Recording (not “Screen Recording (GIF)” unless you wanna make an animated GIF instead).

- A little overlay will pop up asking you to select the area you wanna record.
- Drag your mouse over the area you need, and ShareX starts recording right away.
Stopping and Saving
- When you’re done, click Stop, and ShareX will immediately finalize the recording.
- You can find all your recorded videos neatly saved here:
C:\Users\yourusername\Documents\ShareX\Screenshots\
Conclusion
Well, those are some easy ways to record your screen on Windows 11, depending on your needs and how good the quality you want is. I conclude that recording your screen on Windows 11 has never been easier — you just need to choose the tool that suits your flow.


