

Running iPhone and iPad apps on a Mac has become an exciting possibility with recent advancements in technology. This capability opens up a new realm of functionality and convenience, allowing users to enjoy their favorite mobile apps on a larger screen and with the power of their Mac.
Whether for productivity, entertainment, or creativity, this integration enhances the overall user experience, bridging the gap between mobile and desktop environments.
This guide will walk you through the steps to check your Mac’s specifications, install mobile apps, and activate touch-alternative controls. Additionally, it will address whether Mac apps can be used on an iPad.
Requirements to Run iPhone or iPad Apps on Mac
Running iPhone and iPad apps on a Mac is now possible with the introduction of Apple Silicon chips. These powerful chips include the M1, M2, and M3 models, which are found in various Mac models.
To run iPhone or iPad apps on your Mac, you need a machine equipped with an Apple Silicon chip. The following Mac models are compatible:
- MacBook Air from late 2020 and later
- Mac mini from late 2020 and later
- MacBook Pro 13-inch from late 2020 and later
- MacBook Pro 14-inch and 16-inch from 2021 and later
- iMac from 2021 and later
- Mac Studio from 2022 and later
- Mac Pro from 2023 and later
These models support the necessary hardware to run iPhone and iPad apps seamlessly.
How to Check Your Mac Specs
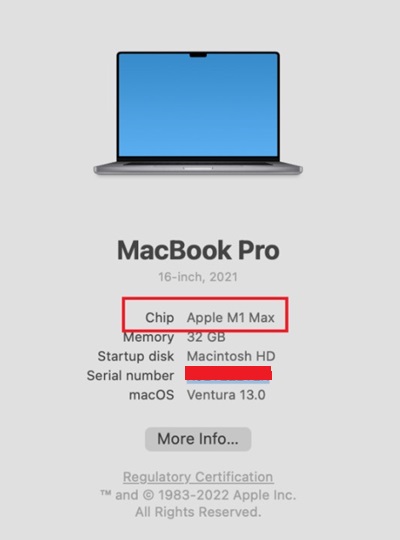
Before attempting to run iPhone or iPad apps on your Mac, verify your machine’s specifications. Follow these steps:
- Click the Apple logo in the top-left corner of the screen
- Select About This Mac
- Identify your chip type:
- In macOS Ventura and later, the Chip label on the pop-up window will either show Apple or Intel
- For older OS versions, look for the Processor label
This check will confirm whether your Mac has the required Apple Silicon chip to run mobile apps.
How to Install Mobile Apps on a Mac
Installing iPhone and iPad apps on a Mac is a straightforward process, thanks to the integration of Apple Silicon chips. Follow these steps to bring your favorite mobile apps to your Mac:
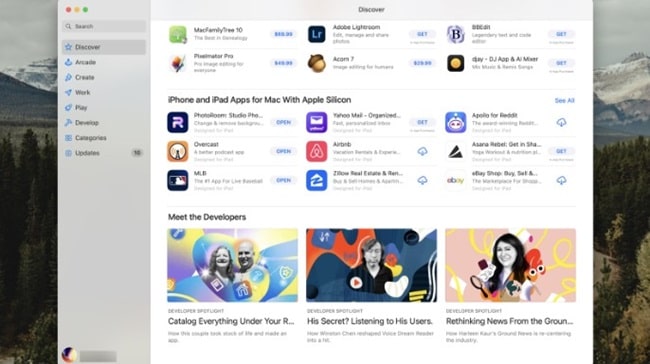
Open the App Store application on your Mac. This is your central hub for downloading and managing all your apps.
Ensure you are signed in with the same Apple ID you use on your iPhone or iPad. This will synchronize your app purchases and downloads across devices.
Click on your account name located in the bottom-left corner of the App Store window. This will take you to a section where you can manage your account and app purchases.
Select the iPhone & iPad Apps tab to view a list of apps available for download on your Mac. This section shows apps you have previously downloaded or purchased on your iPhone or iPad.
Browse through the available apps and click the download button next to the app you want to install. The app will download and install on your Mac, ready for use.
Note: Not all iPhone and iPad apps are available for download on a Mac. Developers have the option to opt out of making their apps compatible with Mac.
If an app is not available, it will not appear in the search results even if you have it on your mobile device.
Add Touch-Alternative Controls
Many iPhone and iPad apps are designed with touch interfaces, which might not translate perfectly to a Mac’s keyboard and mouse setup. Apple provides a way to activate touch-alternative controls, enhancing your experience when using these apps on a Mac.
Here’s how to enable these controls:
Launch the iPhone or iPad app you want to use on your Mac.
Click the app name in the top-left corner of the screen to open the app-specific menu. From the dropdown menu, select Settings.
In the settings menu, turn on Touch Alternative. This feature allows you to use keyboard and mouse inputs in a way that mimics touch gestures.
If you are using a game that benefits from a gamepad, select the Game Control tab within the settings menu. Here, you can enable and customize gamepad controls to use with the app.
These controls are particularly useful for apps that require swipe gestures, multi-touch, or other touch-specific interactions, making them more user-friendly on a Mac.
Can I Use Mac Apps on an iPad?
Currently, Mac apps cannot be directly installed or run on an iPad. The macOS and iPadOS platforms are distinct, each designed with its own specific set of features and capabilities.
However, there is a workaround that allows you to access Mac apps on your iPad..
Using remote access software, you can control your Mac from your iPad. Applications like TeamViewer, AnyDesk or Chrome Remote Desktop enable you to connect to your Mac over the internet.
This method allows you to run Mac apps remotely, giving you access to all the features and capabilities of macOS on your iPad.
Steps to Use Remote Access
- Install Remote Access Software:
Download and install a remote access app on both your Mac and iPad - Set Up Your Account:
Create an account and sign in on both devices - Connect to Your Mac:
Use the remote access app on your iPad to find and connect to your Mac. You will need to ensure your Mac is powered on and connected to the internet - Control Your Mac:
Once connected, you can control your Mac from your iPad, using Mac apps as if you were sitting in front of your Mac
While this solution requires a constant internet connection and can sometimes be less responsive than using apps natively, it provides a viable way to utilize Mac software on an iPad when needed.
Conclusion
Running iPhone and iPad apps on your Mac enhances the versatility and usability of your Apple ecosystem. By following the steps outlined above, you can check your Mac’s compatibility, install mobile apps, and activate alternative controls to optimize your experience.
Although direct usage of Mac apps on an iPad is not yet possible, remote access solutions provide a viable alternative.


