

Setting up a new PC should feel exciting. That fresh Windows logo, the clean desktop waiting to be customized — it’s like moving into a new digital apartment.
But then you hit a wall, “Please sign in with your Microsoft account”, uh what if I don’t want to? Now, don’t get us wrong — Microsoft accounts have their perks.
You get OneDrive integration, sync across devices, easy access to the Store, yada yada. But sometimes, all you want is a simple local account, one that just logs you into your own computer without all the fluff.
Maybe it’s a test system, maybe it’s for your grandma who doesn’t even know what an Outlook address is. Or maybe you’re just a privacy-focused kinda person who prefers not to have every digital move tied back to an email address.
And let’s face it — not everyone wants their settings and activity synced across machines. Some folks just want to turn on the computer, do their thing, and turn it off without a bunch of cloud stuff running in the background.
Plus, there’s something oddly satisfying about having a PC that’s 100% yours, offline, unlinked. You install what you want, how you want, when you want — no nudges, nags, or ‘We noticed you’re not signed in’ pop-ups.
So yeah, while Microsoft’s push toward online accounts might make sense for some, it’s not the only way to roll — and certainly not the best one for everyone.
Is It Actually Safe to Install Windows 11 Without a Microsoft Account?
Of course there is no problem with that, but of course there are a few things you need to know.
When you choose to skip the Microsoft account during setup, you’re not doing anything illegal, or hacky. You’re just choosing an option that Microsoft kinda-sorta buries beneath a bunch of prompts.
It’s still part of the system — just not the one they advertise front and center. Now, what do you give up when you go this route?
Well, you won’t get automatic OneDrive syncing, password recovery via your Microsoft profile, or quick access to Microsoft Store purchases. And yeah, you won’t be able to pull your wallpapers and themes from another device.
But you can still sign into those services later, if and when you need them. You’re just keeping it local during the setup.
On the flip side, you gain privacy, you cut down on background sync. You reduce the number of accounts floating around the web with your personal data.
Plus, no need to worry about online login errors or forgotten credentials at startup. It’s just… your computer, logging you in, like the good old days.
So is it safe? Yes. Is it risky? Not in the slightest — as long as you keep your machine secure (antivirus, updates, etc.), you’re totally good.
How to Set Up Windows 11 Without a Microsoft Account
Now for how to install Windows 11 without having to log in with an account, please read the steps below carefully..
Method 1: Use the “ms-cxh:localonly” Command
Okay, let’s start with the latest method, fresh out of the trenches of the Windows tweaking community.
You see, Microsoft has been busy patching all the backdoors that allow people to bypass online account settings. One of their biggest targets? The old “bypassnro” trick (more on that later).
However, just when they thought they had it all locked down, the community found a new way to sneak past the setup screen.
Here’s how you can do it..
- Install Windows 11 as usual until you reach the ‘Let’s connect you to a network’ or setup screen — aka the onboarding or OOBE (Out-of-Box Experience) stage.
- Now press Shift + F10, this will open up the Command Prompt.
- In the command window, type this:
start ms-cxh:localonly - Press enter on the keyboard, and a window will pop up to create a local user account.
- Enter your name, create a password (if you want), and click Next.
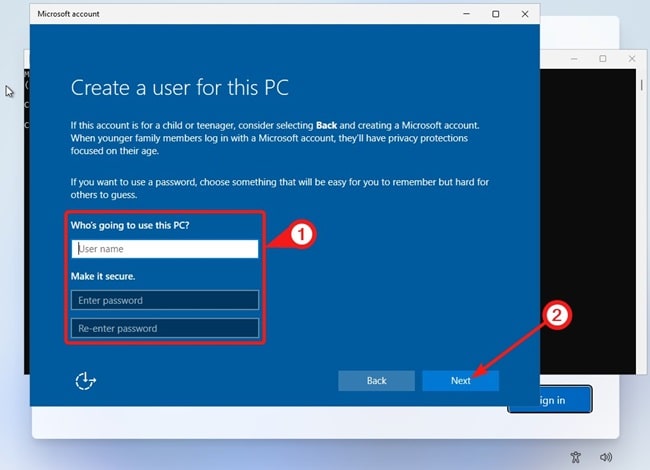
- Your PC will now boot straight into Windows 11, no Microsoft account needed, no questions asked.
This command is effective, quick, and doesn’t require any extra tools or downloads. As of now, it works like a charm on the latest builds.
But keep your eyes peeled — Microsoft might try to patch this in future updates.
Method 2: Use “bypassnro” Command
Now, let’s say you’re using an older version of Windows 11 — maybe one you downloaded a while ago. In that case, the ‘bypassnro’ method might still be available to you.
This trick has been around for a while, and while Microsoft is slowly phasing it out, it’s still a favorite among seasoned users. Here’s how you can do it..
- Start your Windows 11 installation and wait until you hit that setup screen asking you to connect to the internet.
- Again, press Shift + F10 to open Command Prompt.
- Now, type this command:
oobe\bypassnro - Hit enter on keyboard, then your computer will restart automatically.
- When it powers back on, it’ll skip some of the online account prompts.
- If you turn off your Wi-Fi or unplug your Ethernet cable at this point, you’ll be directed to the ‘Continue with limited setup’ screen.

- From there, you can create a local account with your chosen name and password.
What’s neat about this method is how it tricks Windows into thinking it can’t complete the setup online — so it just shrugs and gives you the local option instead.
Tip
Don’t forget to actually disable your internet connection during this process — it’s the key to unlocking the local account setup screen.
Method 3: Use Rufus to Make a Bootable USB That Skips the Microsoft Account
Okay, so maybe you’re more of a ‘set it and forget it’ kind of person. You don’t want to type commands, you just want a smooth installation with all the annoying stuff already handled.
In that case, you should try Rufus.
Rufus isn’t just your average USB creation tool — it’s a powerful program that gives you full control over how Windows is installed, including an option to skip the Microsoft account requirement altogether.
So, just follow the steps below..
- Head to the Rufus website in https://rufus.ie, and download the latest version of the app.
- Open it up, plug in your USB drive, and it should detect it automatically.
- Under ‘Boot selection’, click SELECT and choose the Windows 11 ISO file (you can get this from Microsoft’s website if you haven’t already).
- Once everything looks good, click START.
- Now, a new window will pop up with customization options.
- Look for these checkboxes and enable them:

- Remove requirement for an online Microsoft account
- Disable data collection
- (Optional) Create a local account with username (**you can enter a username here to automate the process even more)
- Click OK, and Rufus will handle the rest.
After Rufus finishes cooking your USB stick, just boot into it from your PC and go through the usual Windows setup. Since you’ve already disabled the online stuff, Windows will automatically prompt you to create a local administrator account — no Microsoft login required.
This is one of the easiest and most future-proof methods, especially if you install Windows often or want to prepare a setup USB for multiple machines.
Conclusion
If you’ve made it this far, chances are you’re done setting up Windows 11 without a Microsoft account — and honestly, we get it. Whether it’s about speed, control, or keeping things a little more old-school, there’s no shame in going offline.
You can still install Windows 11 however you want, without having to hand over your email just to get started.


