

You know those days when you have to multitask on your laptop or PC — maybe reply to emails while watching a YouTube tutorial, or write a report with 10 research tabs open?
Multitasking on one screen can be a pain, right? You’re constantly switching between windows, resizing apps, and maybe even forgetting which app you were using five seconds ago.
That’s where Windows comes in with a split-screen feature, especially in Windows 11, which makes everything feel a lot smoother and simpler. What exactly is split-screen, and why should you use it? Because once you master it, it will completely change the way you use your computer on a daily basis..
What Does Split Screen Mean on Windows?
So, split screen is basically a way to divide your computer screen into sections so that you can run more than one application or program side by side — and of course, you can see them all at the same time.
For example, if you’re working on a document, and you need to refer to a web page. Instead of constantly switching back and forth, pressing alt+tab all the time, you can simply snap your document to one side and your browser to the other.
And yup, by splitting the screen between two applications (or maybe several at once), you don’t have to bother switching between applications on the main screen. Because now you can see them all at once, you just have to look (or even glance) at them.
Of course, this is a simple way when you’re multitasking, having lots of applications open and needing to see them all at once.
And in Windows 11, this feature is getting an upgrade with something called Snap Layouts. So, instead of just two apps split 50-50, you can go full productivity with layouts like..
- One app taking 75% of the screen while another chills in the corner with 25%
- Three apps evenly spaced across the screen (33-33-33)
- Even four apps, each in a neat corner of your display
Basically, Windows gives you the tools to design your workspace the way you want it, without having to waste time manually resizing your apps.
Split screen is definitely a helpful feature for anyone, whether you’re a remote worker, content creator, developer, or anyone who needs to have more than one app open at a time — which I certainly do.
How to Split Screen on Windows 11
Okay, now for the various methods that you can do to split the application screen on Windows 11, please try which one suits you among the methods below..
Method 1: Use Snap Layouts
This is the easiest and arguably the simplest method, Windows 11 introduces Snap Layouts, which are basically ready-made screen arrangements. You just pick one, and Windows will take care of the rest, here’s how to use it..
- First things first — go to Settings > System > Multitasking
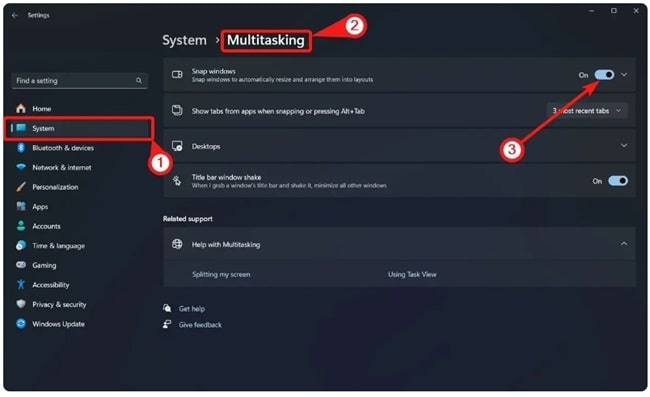
- Make sure the Snap Windows toggle is turned on (If it’s already on, just skip ahead)
And move on to the practical part..
- Open any app or window — maybe a browser, Word doc, or spreadsheet
- Hover your mouse over the maximize button (the little square in the top-right corner of the window)
- Instead of just maximizing it like usual, you’ll see a small menu pop up showing different layout options
- Click one of those layouts — like half screen, one-third screen, or even four-way split — and now your window snaps right into place
Once you snap the first one, Windows will suggest your other open apps to fill the remaining spots. Just click what you want where, and you’ve got yourself a custom multitasking setup!
Some common Snap Layouts
- 50-50: Two equal windows side by side
- 75-25: One big, one small
- 50-25-25: One main window with two smaller ones next to it
- 25-50-25: A wider middle window with two side apps
- 33-33-33: Three evenly spaced windows
- 25-25-25-25: Four equal sections for max multitasking power
Want to resize them a bit? Just hover between the windows until you see the divider, then drag it left or right.
Method 2: Drag and Drop
If you like to do it manually and don’t want to go into settings to set the snap layout, the next method is definitely for you. Because you don’t need any menus or settings.
Here’s how to do it..
- Click on the title bar of a window (that top bar with the window name)
- Drag the window to the left or right edge of your screen until you see a shadow or outline appear
- Let go of the mouse — and just like that, your window snaps to half the screen
- Windows will automatically show your other open apps. Click on one, and it’ll fill the other half
Now, if you want to get a bit fancier, say a 50-25-25 split, I got a trick..
- After you’ve snapped the first window to take up 50%, drag another app to the top right or bottom right corner, that creates a 25% section

- Do the same with a third app in the other corner
- And just like that, you’ve got three apps running in a tidy 50-25-25 layout. Perfect for research, coding, video calls — or whatever chaos your day brings
Method 3: Use the Snap Bar
Okay, you may have noticed that with regular dragging, you can’t always get a nicer layout like 25-50-25 or 33-33-33. Don’t worry because Microsoft has prepared a way to set it up.
From here, you can take advantage of the Snap Bar..
- Grab a window and drag it up toward the top center of your screen
- When you see a shadow or drop zone appear, pause for a second
- That’s the Snap Bar, drop your window there
- It’ll show you all the snap layout options — even the more complex ones
- Just click where you want that window to go, and it’ll slide right into position
- Pick your other open apps to fill the rest of the layout, and done
Method 4: Use Keyboard Shortcuts
Now if you’re someone who loves keyboard shortcuts (or just hates using the mouse), you’re gonna love this one. Windows 11 lets you trigger Snap Layouts with a quick key combo.
Here’s how you can do it..
- Hit Windows + Z, this opens the Snap Layout menu, just like hovering over the maximize button would
- Each layout area will be marked with a number or letter
- Press the corresponding key on your keyboard to place the window into that zone
- Repeat for the next app, and now you can multitasking with zero mouse clicks
And if you want basic snapping (without layouts), here are a few more handy shortcuts..
- Windows + Left Arrow → snap window to the left half
- Windows + Right Arrow → snap it to the right
- Windows + Up Arrow → maximize the window
- Windows + Down Arrow → minimize or restore the window
Of course, using these shortcuts will speed up your work as well — especially once your fingers get used to the rhythm.
Conclusion
So yeah, if you haven’t used split-screen in Windows 11, you’re seriously missing out. Whether you want to keep it simple with a basic two-window setup or go full productivity mode with four different apps open in a custom layout, Windows 11 gives you all the options.
Once you start using split-screen regularly, you’ll notice how much smoother your day runs. No more clicking around like a madman, losing track of windows, or getting distracted just trying to figure out what you were doing.


